
Linux Privilege Escalation
LinPEAS (common options)
# Full run with sudo password for checks that need it
./linpeas.sh -a -e -r -P SUDO_PASSWORD -n -o system_information,container,procs_crons_timers_srvcs_sockets,network_information,users_information,software_information,interesting_perms_files,interesting_files,api_keys_regex

# Same but without -a (no full mode); -o limits to these sections only
./linpeas.sh -e -r -P SUDO_PASSWORD -o system_information,container,procs_crons_timers_srvcs_sockets,network_information,users_information,software_information,interesting_perms_files,interesting_files,api_keys_regex-a
All checks (slower)
-e
Extra enumeration
-r
Enable regex (can take a long time)
-P PASS
Password for sudo (runs sudo checks)
-n
Skip (no) network checks
-o section1,section2,...
Only run these sections (e.g. skip cloud)
Basic Manual Enumeration
Check your groups: Users in the adm group can read many files under
/var/log/(e.g. syslog). Look for sensitive logs or misplaced files (e.g. passwords, config snippets). If you have a user password, trysu USERto switch and re-checkidand file access.Recent sudo use: The file
/home/USER/.sudo_as_admin_successfulexists if that user recently used sudo successfully — indicates who may have sudo rights.See what is listening internally
OS, Kernel & Hostname
To remove DoS exploits by adding -exclude=”/dos/”
Identifying Password Hash Algorithms
Salted MD5
$1$...
SHA-256
$5$...
SHA-512
$6$...
BCrypt
$2a$...
Scrypt
$7$...
Argon2
$argon2i$...
Users with Login Shells
Defenses in Place
Check for: AppArmor, SELinux, Fail2ban, iptables, ufw, Snort, Exec Shield.
Hidden Files and Directories
Finding History Files
Finding Config Files
Finding Scripts
Comparing Installed Packages to GTFObins
Requires creating a package list first: apt list --installed | tr "/" " " | cut -d" " -f1,3 | sed 's/[0-9]://g' | tee -a installed_pkgs.list
Binaries Owned by the root user
Always run with
-pso it preserves permissions for the root user!!!!
Something Weird
Check to see if youre in a docker container with
No hashes in
/etc/shadowis another pretty good indicator
Database files
Make sure to look for any passwords for the root user in .php files in web root!
Quick SUID
The following command can be used to find all SUID programs on a given system:
Find files that the users group can edit
In the above example users is the name of the group he is in.
Sudo -l
If you have the password, on of the first checks should be
If there is an entry like:
Means you can
sudo /usr/bin/perl /home/itguy/backup.plwith no passwordHowever you cannot
sudo perl /home/itguy/backup.plwith no passwordNeed to use the absolute paths if they are specified that way!!!
Taking advantage of SUID files
Some administrators will set the SUID bit manually to allow certain programs to be run as them.
Lets say you're a system administrator and a non-privileged user wants to program that requires it to be run with higher privileges.
They can set the SUID bit, then the non-privileged user can execute the program without having any extra account permissions set.
See who a command is running as:
Custom Binarys
Cross reference a list of standard binaries on a linux system with the ones you see, admins will add their own sometimes
File Systems
Use the following command to check for unmounted file systems
World Writeable
Files on the system with permissions that can be modifiled by any user on the system
World writable directories for root
World writable files
Quick writable directory/file checks:
Automated enumeration and exploit tools
linpeas (PEASS-ng/linPEAS) — runs a broad set of checks and includes Linux Exploit Suggester (suggests kernel/userland CVEs with tags and download URLs). Review output for SUID, sudo, writable paths, polkit/pkexec, etc.
Traitor (liamg/traitor) — automatically exploits common misconfigurations and CVEs to get a root shell. Covers many GTFOBins-style escapes plus e.g. CVE-2022-0847 (Dirty Pipe), CVE-2021-4034 (PwnKit), CVE-2021-3560 (Polkit), and writable
docker.sock.
Polkit (CVE-2021-3560) in Traitor may try to install packages and can fail without internet; PwnKit (CVE-2021-4034) and other local vectors often work offline.
Weak File Permissions
Readable shadow
A users password hash (if they have one) can be found between the first and second (:) of each line.
Save the root user's hash to a file called hash.txt on your kali machine and use john to crack it.
Switch to the root user
Unshadow method
Transfer both back to attack box
Writeable shadow
Generate a new password hash
Edit /etc/shadow and replace origional root user's password hash with the one that you just created
Switch to the root user
Writable passwd
The /etc/passwd file contained user password hashes, and some versions of Linux still allow password hashes to be stored there
The /etc/passwd file contains information about user accounts. It is world-readable, but usually only writable by the root user.
Generate a new password hash with a password of your choice:
Edit the /etc/passwd file and place the generated password hash between the first and second colon (:) of the root user's row (replacing the "x").
Switch to the root user, using the new password:
Alternatively, copy the root user's row and append it to the bottom of the file, changing the first instance of the word "root" to "newroot" and placing the generated password hash between the first and second colon (replacing the "x").
Now switch to the newroot user, using the new password:
Passwords and Keys
History Files
If a user accidentally types their password on the command line instead of into a password prompt, it may get recorded in a history file.
View the contents of all the hidden history files in the user's home directory:
Look for
sshpass,mysql -p,su,sshcommands with credentials passed inline.
Find Config Files and Logs with Passwords
Search logs for authentication events and password changes:
Firefox Saved Passwords
If the target user has Firefox installed, tar up the .mozilla directory and bring it back to your attack machine:
Config Files
Config files often contain passwords in plaintext or other reversible formats.
Backup and alternate config files: Check for
.bak,.old, or-oldvariants (e.g./etc/tomcat9/tomcat-users.xml.bak). These often contain the same or older plaintext passwords and may be world-readable.WordPress: If you have read access to the web root (e.g. as www-data),
cat /var/www/SITE/public_html/wp-config.php(or similar path) forDB_USER,DB_PASSWORD, andDB_NAME— reuse for MySQL or lateral movement.List the contents of the user's home directory:
Note the presence of a myvpn.ovpn config file. View the contents of the file:
The file should contain a reference to another location where the root user's credentials can be found. Switch to the root user, using the credentials:
User Mail
Check /var/mail/ and /var/spool/mail/ for messages addressed to compromised users. Mail often contains password hints, password format specifications, or migration instructions from other users/admins.
LinPEAS flags mail files under "Readable files belonging to root and readable by me but not world readable" — do not skip this output.
SQLite Credential Databases
Search for .db and .sqlite files that may contain credentials. Use strings for a quick look, but always pull the database properly for accurate data — strings can produce incomplete or mangled hashes.
For accurate extraction, use sqlite3:
If sqlite3 is not on the target, exfiltrate the file using base64:
Then decode on your attacker box:
This base64 exfiltration technique works for any binary file when your only output channel is text (e.g., SSTI output, webshell, limited command injection).
SSH Keys
Sometimes users make backups of important files but fail to secure them with the correct permissions.
Look for hidden files and directories in the system root and in each user's home (e.g.
~/.config/— files like.config/.flag1.txtare easy to overlook):
Web Application Database Credentials
Search web application files for hardcoded database credentials. Different database users often have different privileges.
Tip: Different database users may have different privileges. Test each discovered credential for privilege escalation paths (e.g., PostgreSQL NSS user injection).
Old sudo version
CVE-2019-14287
Looking for the
(ALL, !root) NOPASSWD:, and Sudo (versions < 1.8.28). Easy priv esc.
CVE-2021-3156 - Sudo Baron Samedit (Heap Buffer Overflow)
Affects sudo versions 1.8.2 through 1.8.31p2 and 1.9.0 through 1.9.5p1. Hidden for over ten years before discovery.
Affected versions:
1.8.31 — Ubuntu 20.04
1.8.27 — Debian 10
1.9.2 — Fedora 33
CVE-2022-0847 - Dirty Pipe
Affects Linux kernels 5.8 through 5.17. Allows unauthorized writing to root user files as long as you have read access. Also affects Android phones.
exploit-1 — modifies /etc/passwd and gives a root prompt:
exploit-2 — runs any SUID binary with root privileges:
Netfilter Kernel Exploits
Netfilter is the Linux kernel packet filtering module (iptables). Multiple kernel exploits exist for it.
CVE-2021-22555 — Vulnerable kernel versions 2.6 through 5.11:
CVE-2022-25636 — Affects kernel 5.4 through 5.6.10 (net/netfilter/nf_dup_netdev.c). Can corrupt the kernel — reboot may be required:
CVE-2023-32233 — Use-After-Free in nf_tables anonymous sets. Kernel up to 6.3.1:
Kernel exploits are unstable — use with caution on production systems.
CVE-2021-4034 - PwnKit (Polkit pkexec)
Memory corruption in pkexec — affects all polkit installations. Hidden for over ten years.
CVE-2025-32463 - Sudo --chroot Privilege Escalation
Sudo before 1.9.17p1 allows local users to obtain root access because /etc/nsswitch.conf from a user-controlled directory is used with the --chroot option.
Detection:
Quick Test:
Exploit:
Reference: https://github.com/pr0v3rbs/CVE-2025-32463_chwoot
CVE-2025-4517 - Python tarfile extract filter bypass (symlink/hardlink)
Python 3.8.0–3.13.1: tarfile.extractall(path=..., filter="data") (and extract(..., filter="data")) can be bypassed when entries use symlinks whose resolved path length exceeds PATH_MAX; later symlinks are not fully expanded, allowing path traversal. Combined with hardlinks, an attacker can write arbitrary files (e.g. /etc/sudoers, /root/.ssh/authorized_keys) during extraction.
Typical scenario: A script runs as root and extracts a user-supplied tar with filter="data" (e.g. tar.extractall(path=staging_dir, filter="data")). User can upload a malicious tar (e.g. to a backup/restore feature) and trigger extraction via something like:
Detection: grep -r "tarfile\|extractall\|filter=" in the script; look for filter="data" or filter='data'.
Exploit: Build a tar that uses a long symlink chain so resolved path exceeds PATH_MAX, then a symlink escaping to e.g. /etc, a hardlink to sudoers, and a regular file entry that writes the new sudoers line. PoC scripts exist for adding a sudoers entry or overwriting authorized_keys.
References:
https://github.com/google/security-research/security/advisories/GHSA-hgqp-3mmf-7h8f
https://github.com/AzureADTrent/CVE-2025-4517-POC-HTB-WingData
CVE-2023-2640 / CVE-2023-32629 - GameOver(lay) Ubuntu Kernel PrivEsc
OverlayFS vulnerability in Ubuntu kernels allowing local privilege escalation.
Affected Kernels:
6.2.0
Ubuntu 23.04 (Lunar Lobster) / Ubuntu 22.04 LTS (Jammy Jellyfish)
5.19.0
Ubuntu 22.10 (Kinetic Kudu) / Ubuntu 22.04 LTS (Jammy Jellyfish)
5.4.0
Ubuntu 20.04 LTS (Focal Fossa) / Ubuntu 18.04 LTS (Bionic Beaver)
Detection:
Exploit (One-liner):
Alternative POC:
Verify root:
References:
https://github.com/g1vi/CVE-2023-2640-CVE-2023-32629
https://www.crowdstrike.com/blog/crowdstrike-discovers-new-container-exploit/
Without a stabilized shell (webshell / limited shell)
When you only have a webshell or an unstable reverse shell, you can still run some commands without upgrading to a full TTY.
Running MySQL from the command line
Use one-shot -e "query" so you don't need an interactive MySQL session. Database name can go at the end.
No need for a stabilized shell or interactive mysql> prompt; each command runs and exits. Use \G at the end of the query for vertical (key: value) output.
su root without a stabilized shell
You can su root from a webshell or limited shell: run su root, then type the root password when prompted. It works without a full TTY (e.g. from wright.php or a simple cmd= shell). After that you are root for subsequent commands in that same request/session.
If you obtained the password from a config file (e.g. DB password reused for a system user), use it here.
Sudo-Shell escape Sequences
List the programs which sudo allows your user to run:
Visit GTFOBins (https://gtfobins.github.io) and search for some of the program names. If the program is listed with "sudo" as a function, you can use it to elevate privileges, usually via an escape sequence.
Zip
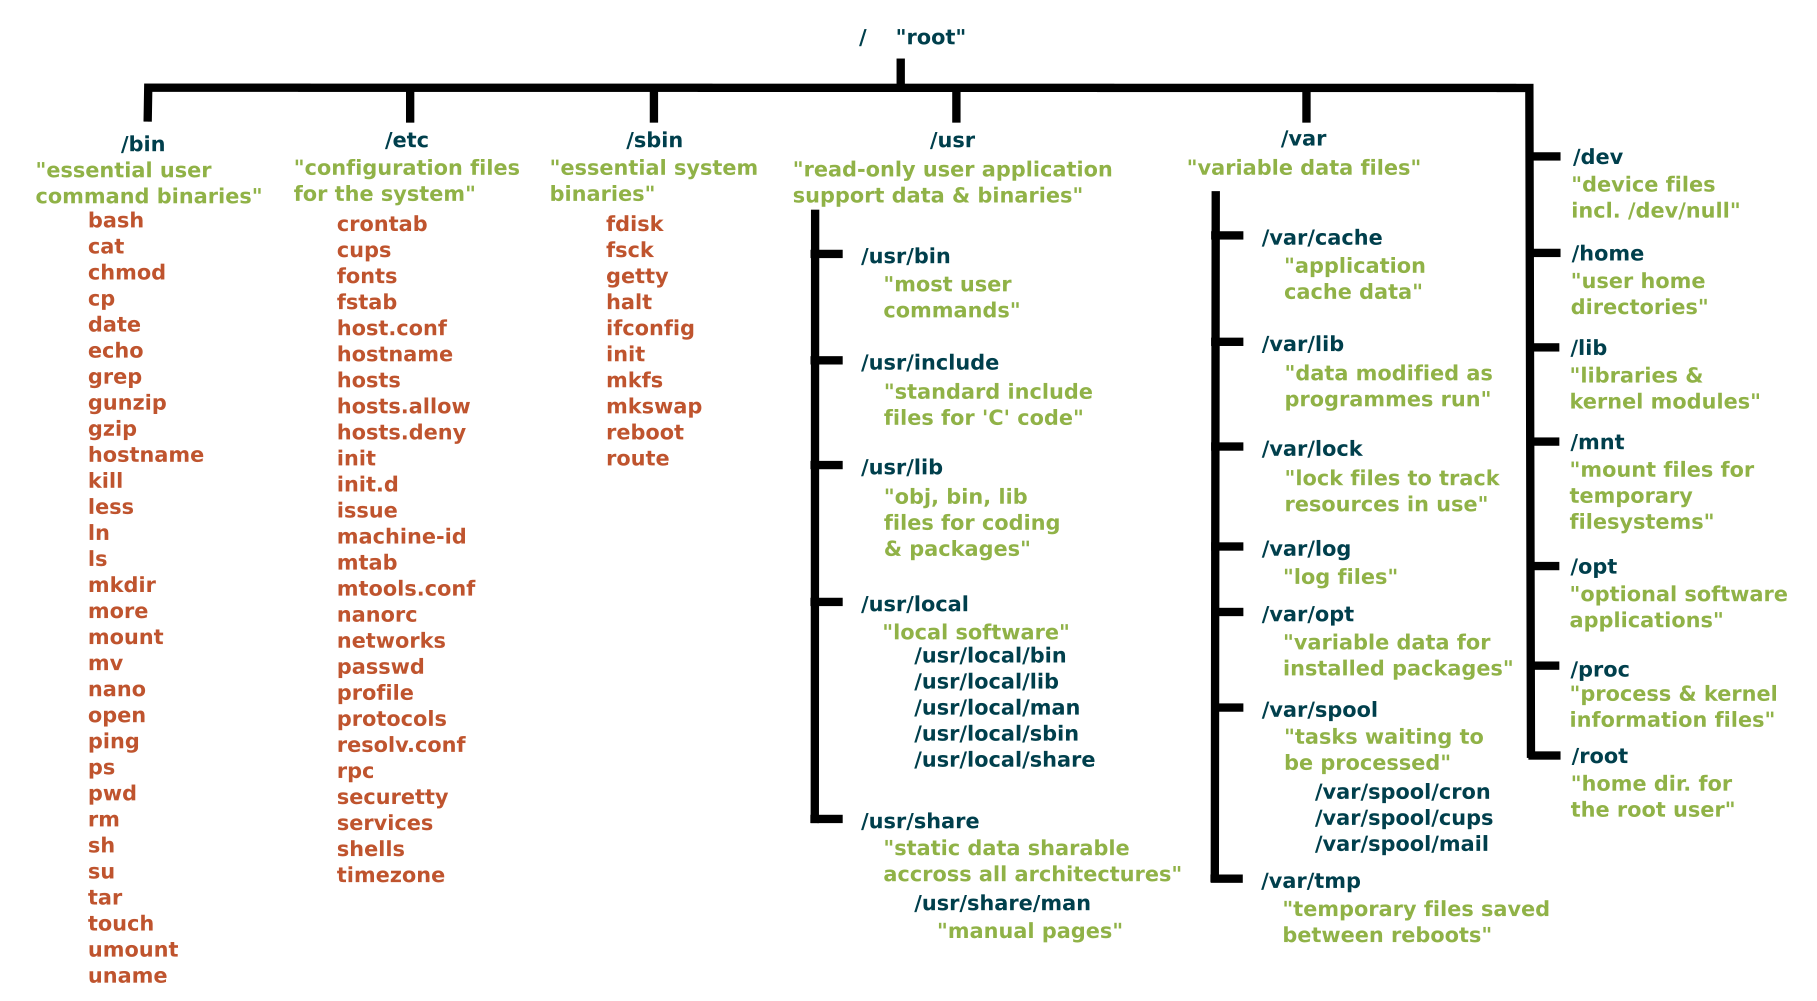
npm

journalctl
iftop
find
Facter (Puppet)
If you can run sudo /usr/bin/facter (e.g. (ALL) NOPASSWD: /usr/bin/facter), use --custom-dir to load a directory containing Ruby code; Facter will execute custom facts as root. Write a Ruby script that runs a shell or bind shell, then point facter at its directory.
One-liner (exec shell):
Bind shell (Ruby, listen on 5555): Save as /tmp/s.rb, then sudo /usr/bin/facter --custom-dir=/tmp s.rb. From attacker: echo "id" | nc TARGET 5555.
References:
https://gtfobins.github.io/gtfobins/facter/
https://github.com/secjohn/ruby-shells/blob/master/revshell.rb (Ruby reverse/bind shells)
nano
vim
Method 2
Method 3
vi
man
awk
less
FTP
SSH
If you can run ssh with sudo, you can spawn a root shell using the ProxyCommand option:
Method 1 - ProxyCommand:
Method 2 - Run command via SSH:
Method 3 - Using PermitLocalCommand:
Reference: https://gtfobins.github.io/gtfobins/ssh/
bee (Backdrop CMS CLI)
If you can run bee with sudo, it has a PHP eval command that allows arbitrary code execution.
Detection:
Exploitation:
Verify:
Reference: https://gtfobins.github.io/gtfobins/bee/
nmap
Method 1
Method 2
Method 3
more
Apache2
Copy hash to attacker box and crack with john
Sudo -l LD_PRELOAD
Sudo can be configured to inherit certain environment variables from the user's environment.
Check which environment variables are inherited (look for the env_keep+=LD_PRELOAD options):
Output you're looking for
LD_PRELOAD and LD_LIBRARY_PATH are both inherited from the user's environment.
LD_PRELOAD loads a shared object before any others when a program is run. LD_LIBRARY_PATH provides a list of directories where shared libraries are searched for first.
Create a shared object using the code located at /home/user/tools/sudo/preload.c:
preload.c code in another file in this repo:
Run one of the programs you are allowed to run via sudo (listed when running sudo -l), while setting the LD_PRELOAD environment variable to the full path of the new shared object:
A root shell should spawn.
Run ldd against the apache2 program file to see which shared libraries are used by the program:
Create a shared object with the same name as one of the listed libraries (libcrypt.so.1) using the code located at /home/user/tools/sudo/library_path.c:
Run apache2 using sudo, while settings the LD_LIBRARY_PATH environment variable to /tmp (where we output the compiled shared object):
A root shell should spawn.
Errors: Try renaming /tmp/libcrypt.so.1 to the name of another library used by apache2 and re-run apache2 using sudo again.
Did it work? If not, try to figure out why not, and how the library_path.c code could be changed to make it work.
Sudo script: env_keep and unquoted [ -z $VAR ] (e.g. CHECK_CONTENT)
[ -z $VAR ] (e.g. CHECK_CONTENT)If a sudoers entry has env_keep+=CHECK_CONTENT (or similar) and the allowed script uses unquoted $VAR in a test and later runs $VAR as a command, you can set that variable to a shell.
Example script logic:
-z $CHECK_CONTENT— In bash,-ztests "string length zero". So whenCHECK_CONTENTis unset or empty, the script setsCHECK_CONTENT=false. The variable is unquoted ($CHECK_CONTENTnot"$CHECK_CONTENT"), which is required for this class of bug.Because
env_keep+=CHECK_CONTENTis in sudoers, your environment value is passed into the script. SetCHECK_CONTENT=/bin/bash(or/bin/sh). Then:[ -z $CHECK_CONTENT ]is false (variable is set), so the script does not overwrite it.When the script runs
if $CHECK_CONTENT;then, it executes the value ofCHECK_CONTENTas a command, i.e. runs/bin/bashas root.
Exploitation:
The script must take a path that gets moved to quarantine and then hit the if $CHECK_CONTENT;then branch. The symlink target must not match any blocklist (e.g. etc|root) in the script so the link is moved rather than unlinked.
Sudo script: bash [[ == ]] pattern matching (password bypass)
[[ == ]] pattern matching (password bypass)When a script prompts for a password with read -s and then checks it with [[ $STORED_PASS == $USER_PASS ]], the == operator inside [[ ... ]] performs pattern matching (glob), not literal string comparison. So if the user enters *, it matches any value of $STORED_PASS, bypassing the check.
Example pattern: Script reads root's password from a file, prompts "Enter MySQL password for root:", and does:
Exploitation: When prompted, enter * as the password. The script will treat it as a match and continue running as root (e.g. dumping DBs, changing permissions). You may see the real password in process listings (e.g. pspy) if the script passes it to mysql/mysqldump on the command line.
Sudo -l LD_PRELOAD Method 2
In command prompt type: sudo -l
From the output, notice that the LD_PRELOAD environment variable is intact.
Exploitation
Open a text editor and type:
Save the file as x.c
In command prompt type:
In command prompt type:
In command prompt type:
id
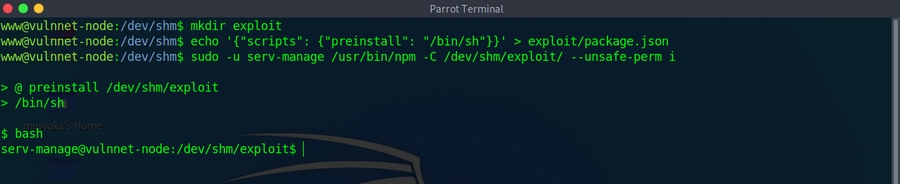
Sudo -l Service Takeover

We have write access to
vulnnet-auto.timerandvulnnet.job.servicewhich are custom services on the host
First we modify the
OnCalandar=*:0/30line toOnCalandar=*0/1to make it run every minute versus every 30 minutes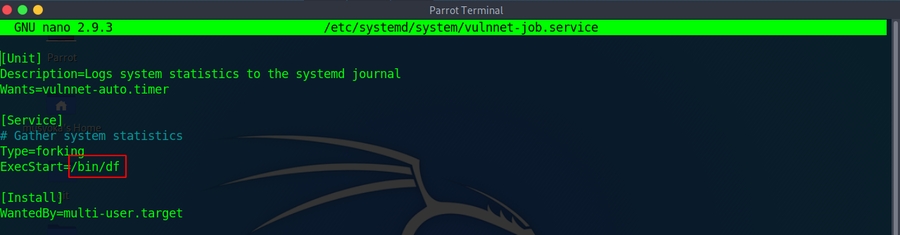
Can see that the system executes the
/bin/dfcommand
We can modify this to spawn a reverse shell via our script
Can also call a reverse shell on the box
We then use our
sudo -lprivlages to restart the service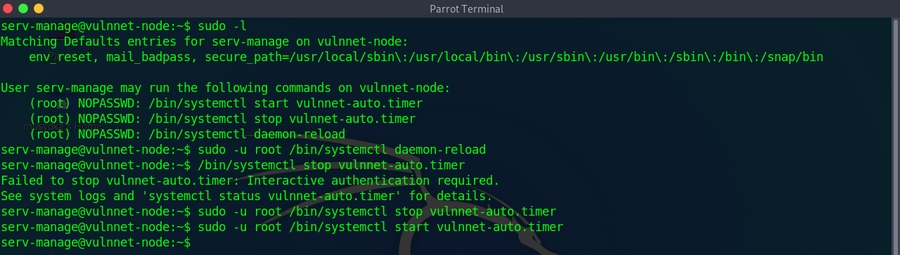
Nginx Sudo Privilege Escalation (WebDAV Method)
If you can run sudo /usr/sbin/nginx (NOPASSWD), exploit via custom config with WebDAV to write files as root.
Detection:
Create malicious nginx config (/tmp/nginx_pwn.conf):
Exploitation:
One-liner (from attacker box with existing key):
Reference: https://gist.github.com/DylanGrl/ab497e2f01c7d672a80ab9561a903406
SUID SYMLINKS CVE-2016-1247
Detection
Looking for installed nginx version is below 1.6.2-5+deb8u3
Required you to be the www-data user!
Run:
System will wait for logrotate to execute, become root user
Cron Jobs File permissions
Cron jobs are programs or scripts which users can schedule to run at specific times or intervals.
Cron table files (crontabs) store the configuration for cron jobs. The system-wide crontab is located at
/etc/crontab.View the contents of the system-wide crontab:
There should be two cron jobs scheduled to run every minute. One runs overwrite.sh, the other runs /usr/local/bin/compress.sh.
Locate the full path of the overwrite.sh file:
Note that the file is world-writable:
Replace the contents of the overwrite.sh file with the following after changing the IP address to that of your Kali box.
Set up a netcat listener on your Kali box on port 4444 and wait for the cron job to run. A root shell should connect back to your netcat listener.
Cron Jobs File permissions Method 2
Wait the defined period of time
Cron Jobs Path Environment Variable
View the contents of the system-wide crontab:
Note that the PATH variable starts with /home/user which is our user's home directory.
Create a file called overwrite.sh in your home directory with the following contents:
Make sure that the file is executable:
Wait for the cron job to run. Run the
/tmp/rootbashcommand with-pto gain a shell running with root privileges:
CronJobs - Wildcards
View the contents of the other cron job script:
Note that the tar command is being run with a wildcard (*) in your home directory.
Take a look at the GTFOBins page for tar. Note that tar has command line options that let you run other commands as part of a checkpoint feature.
Use msfvenom on your Kali box to generate a reverse shell ELF binary. Update the LHOST IP address accordingly:
Transfer the shell.elf file to /home/user/ on the Debian VM.
Create these two files in /home/user:
touch will not work here — it treats --checkpoint as its own flag. Use echo "" > with the filename quoted instead.
When the tar command in the cron job runs, the wildcard (*) will expand to include these files.
Since their filenames are valid tar command line options, tar will recognize them as such and treat them as command line options rather than filenames.
Set up a netcat listener on your Kali box on port 4444 and wait for the cron job to run. A root shell should connect back to your netcat listener.
CronJobs - Wildcards No msfvenom
Wait the 1 minute or time defined by cron settings
Once the cronjob hits run:
SUID and SGID Executables --GTFO Bins
Find all the SUID/SGID executables on the Debian VM:
Note that /usr/sbin/exim-4.84-3 appears in the results. Exploit is in this repo.
Exploit-DB, Google, and GitHub are good places to search!
Check GTFO Bins and Google for SUID/SGID!!!
SUID-Shared Object Injection
Detection
Make note of all the SUID binaries
The /usr/local/bin/suid-so SUID executable is vulnerable to shared object injection.
First, execute the file and note that currently it displays a progress bar before exiting:
Run strace on the file and search the output for open/access calls and for "no such file" errors:
Output Looking for
Note that the executable tries to load the /home/user/.config/libcalc.so shared object within our home directory, but it cannot be found.
Create the .config directory for the
libcalc.sofile:
Example shared object code can be found at
/home/user/tools/suid/libcalc.c. It simply spawns a Bash shell. Compile the code into a shared object at the location the suid-so executable was looking for it:
Execute the suid-so executable again, and note that this time, instead of a progress bar, we get a root shell.
It will be an euid=0 not a uid=0!!!
SUID-Shared Object Hijacking via RUNPATH
If a SUID binary has a custom RUNPATH pointing to a writable directory, you can place a malicious shared library there.
Create a malicious library matching the expected function:
SUID and SGID Environment Variables
Detection
The /usr/local/bin/suid-env executable can be exploited due to it inheriting the user's PATH environment variable and attempting to execute programs without specifying an absolute path.
First, execute the file and note that it seems to be trying to start the apache2 webserver:
Run strings on the file to look for strings of printable characters:
One line
service apache2 startsuggests that the service executable is being called to start the webserver, however the full path of the executable/usr/sbin/serviceis not being used.
Compile the code
service.cinto an executable called service. This code simply spawns a Bash shell:
Prepend the current directory (or where the new service executable is located) to the PATH variable, and run the suid-env executable to gain a root shell:
Rin the executable with an absolute path
SUID and SGID Executables-Abusing Shell Features 1
Detection
Make note of all the SUID binaries
The
/usr/local/bin/suid-env2executable is identical to/usr/local/bin/suid-envexcept that it uses the absolute path of the service executable/usr/sbin/serviceto start the apache2 webserver. Verify this with strings:
In Bash versions <4.2-048 it is possible to define shell functions with names that resemble file paths, then export those functions so that they are used instead of any actual executable at that file path.
Verify the version of Bash installed on the Debian VM is less than 4.2-048:
Create a Bash function with the name /usr/sbin/service that executes a new Bash shell (using -p so permissions are preserved) and export the function:
Run the suid-env2 executable to gain a root shell:
SUID and SGID Executables-Abusing Shell Features 2
Note: This will not work on Bash versions 4.4 and above.
When in debugging mode, Bash uses the environment variable PS4 to display an extra prompt for debugging statements.
Run the
/usr/local/bin/suid-env2executable with bash debugging enabled and the PS4 variable set to an embedded command which creates an SUID version of/bin/bash:
Run the /tmp/rootbash executable with -p to gain a shell running with root privileges:
OR One liner
PATH Abuse
If a SUID binary or cron job calls a command without its absolute path, you can hijack it by placing a malicious binary earlier in the PATH.
Add the current directory to PATH:
Create a fake binary that replaces a command the target script calls (e.g., if a SUID binary calls service):
Alternatively, write the sudoers file:
After the vulnerable binary runs, check with sudo -l and then sudo su.
NFS
Files created via NFS inherit the remote user's ID. If the user is root, and root squashing is enabled, the ID will instead be set to the "nobody" user.
Check the NFS share configuration:
Note that the /tmp share has root squashing disabled.
On your Kali box, switch to your root user if you are not already running as root:
Using Kali's root user, create a mount point on your Kali box and mount the /tmp share (update the IP accordingly):
Alternative command
Still using Kali's root user, generate a payload using msfvenom and save it to the mounted share (this payload simply calls /bin/bash):
Still using Kali's root user, make the file executable and set the SUID permission:
Back on the Debian VM, as the low privileged user account, execute the file to gain a root shell:
NFS Method 2
NFS Errors
When we try to mount with the alternative command above, we fail to get any response and connection times out.
To double check use the command:
Means there is a share on the host but only reachable on the remote machine locally.
Can forward the port on our machine to the target machine
Need to check the ports on the target with:
Confirms nfs is running on 2049 the default port
Now port forward:
When a shell on the remote machine authenticates we are successful
Now create the mount with elevated permissions
Now to get to root
On your attackbox run
Now on the target box as your non elevated user
Service Exploits
https://www.exploit-db.com/exploits/1518
The mysql service is running as root and the 'root' user for the service does not have a password assigned or the password is known.
This exploit takes advantage of the User Defined Functions (UFDs) to run system commands as root via the mysql service.
Change into the
/home/user/tools/mysql-udfdirectory.
Compile the raptor_udf2.c exploit code using the following
Connect to the mysql service as the root user with a blank or known password.
Execute the following commands on the mysql shell to create a udf "do_system" using the compiled exploit
Use the function to copy /bin/bash to /tmp/rootbash and set the SUID permission
Exit out of the mysql shell
Run /tmp/rootbash with -p to gain a root shell
/tmp/rootbash -p
Staff Group Privilege Escalation (Debian/Devuan)
The staff group in Debian-based systems allows users to write to /usr/local directories without root privileges. Since /usr/local/bin is typically first in PATH, you can hijack commands.
Detection:
Exploitation via run-parts Hijacking:
When users log in, PAM runs run-parts to execute scripts. If /usr/local/bin is writable and before /bin in PATH:
Create malicious run-parts:
Trigger:
Pre-generated password hashes:
Alternative payloads:
Group Writable Config File Privilege Escalation
If you're in a group that can write to config files executed by root (via cron, services, etc.), you can inject code.
Detection:
Identify what executes the file:
Exploitation - PHP Config Include:
Alternative - Read sensitive files:
Note: The file may be reset by automation - act quickly or set up persistence first.
Sudo adduser Privilege Escalation (Ubuntu Admin Group)
On Ubuntu systems with default sudoers configuration, the admin group has full sudo privileges. If you can create a new user, create one named admin to exploit this.
Vulnerable sudo rule:
Exploitation:
By default, adduser creates a group with the same name as the user. Creating a user named "admin" puts them in a new group called "admin" which has sudo privileges on default Ubuntu installations.
Why this works:
Ubuntu's default /etc/sudoers contains:
When you create a user named admin, a group named admin is also created and the user is added to it. This group matches the default sudoers rule, granting full sudo privileges.
Note: This only works if:
The default sudoers file hasn't been modified
No
adminuser/group already existsYou can create users via sudo
doas Privilege Escalation
doas is a BSD alternative to sudo. Check for SUID and config.
Detection:
Config format:
Exploitation depends on allowed command - check GTFOBins.
dstat Plugin Privilege Escalation
If doas or sudo allows running dstat, exploit via custom plugin.
Detection:
Find plugin directories:
Create malicious plugin:
Execute:
Alternative plugin payloads:
Reference: https://gtfobins.github.io/gtfobins/dstat/
Sudo tcpdump Privilege Escalation
If sudo -l shows (root) NOPASSWD: /usr/sbin/tcpdump, abuse the -z postrotate-command option to execute arbitrary scripts as root.
AppArmor in more recent distributions has predefined the commands used with the postrotate-command, effectively preventing this.
Privileged Groups — Disk
Users in the disk group have full access to block devices in /dev (e.g., /dev/sda1). Use debugfs to read the entire filesystem as root:
Docker Container Detection & Enumeration
Detect if you're in a container:
Container Enumeration Tools:
Extract credentials from container process environment:
Capabilities to look for (potential escape):
Map listening port to process (unprivileged): When you see a port in ss -ltn or netstat but can't see which process (e.g. root-owned), use /proc/net/tcp. Port is in hex (fourth column, after the colon). Match the line to get the inode (last number). Then find the PID that has that socket inode:
If the process is root-owned, ls -l /proc/*/fd/* may not show it; the loop still works when run by a user who can read other processes' fd info.
Docker escape via bind mount: If the container has a bind mount from the host, you can write a SUID binary into the mounted path from inside the container; it appears on the host with the same bits.
Reference: https://book.hacktricks.wiki/en/linux-hardening/privilege-escalation/docker-security/docker-breakout-privilege-escalation/
Docker Socket Escalation (from inside container)
If you find a Docker socket (docker.sock) inside a container, you can use it to create a new privileged container with the host filesystem mounted.
From the host (non-container), if the Docker socket is writable:
Docker Linux Local PE
Check to see if the user is in the docker group
Check to see if docker is installed and working correctly
-vspecifies a volume to mount, in this case the /root directory on the house was mounted to the /mnt directory on the container. Because docker has SUID we were able to mount a root owned directory in our container
Roots the host with docker because we used chroot on the /mnt directory. This allowed us to use the host operating system.
Optional: Run an ubuntu container with docker
Docker Exec Privilege Escalation
If you can run sudo docker exec * on an existing container, use --privileged and --user root to gain root access and escape to the host.
Detection:
Find running container ID:
Exploit - Get root shell in container:
Escape to host filesystem:
One-liner:
lxd Group Priv Esc
The best example of how to do this
https://0xdf.gitlab.io/2020/11/07/htb-tabby.html
Exploit without internet connection
Change to the root user on attack box
Install Requirements on your attack box
Clone the repo (attack box)
Make distrobuilder (attack box)
Prepare the creation of Alpine (attack box)
Create the container (attack box)
-If that fails, run it adding -o image.release=3.8 at the end
Upload
lxd.tar.xzandrootfs.squashfsto the vulnerable serverAdd the image on the vulnerable server
Second command is only if you want to confim the imported image is present
Create a container and add the root path
Execute the container
/mnt/rootis where the file system is mounted.
Errors-on the vulnerable server
If you recieve an
Failed container creation: No storage pool found. Please create a new storage pool.You need to initialize lxd before using it
Read the options and use the defaults
Capabilities
Capabilities grant fine-grained privileges to binaries without full root access. Key dangerous capabilities:
cap_setuid
Set effective UID — become root
cap_setgid
Set effective GID — become root group
cap_dac_override
Bypass file read/write/execute permission checks
cap_sys_admin
Broad admin privileges (mount, syslog, etc.)
cap_sys_ptrace
Attach to and debug other processes
cap_sys_module
Load/unload kernel modules
cap_net_bind_service
Bind to privileged ports (<1024)
=
Clear a previously set capability
+ep
Grant effective and permitted privileges
+ei
Grant effective and inheritable privileges
+p
Grant permitted only (no inherit)
Search your whole file-system recursively:
Targeted search of common binary directories:
cap_dac_override (vim)
If vim has cap_dac_override=eip, it can read/write any file regardless of permissions. Remove the root password from /etc/passwd:
Python
Looking for:
Escalate Privlages
Perl
Check for Perl:
Looking for:
Escalate
If the command runs but you still can't access /root or /etc/shadow, check for AppArmor restrictions — see the AppArmor section below.
Tar
Check for tar:
Looking For:
Tar the shadow:
Untar to review:
Python Library Hijacking

From
sudo -loutput we seeSETENV(means we can set the env variables when it is run as root) in addition to the python script that can be run as root
We see the
import hashlibstatement at the top, can hijack the libraryPython will look in the current directory or a specified path that we list due to the
SETENVpermission.The paths that come configured out of the box on Ubuntu 16.04, in order of priority, are:
Directory of the script being executed
For other distributions, run the command below to get an ordered list of directories:
Can also use
locate hashlib.pyto figure out where the library is being executed fromOnce the libary is located
Copy the
hashlib.pyfile to/tmp or /dev/shmCan either try adding a python reverse shell to the file or:
To conduct the priv esc now run:
Manual Polkit Priv Esc Checks
POC:
Target needs to have
accountserviceandgnome-control-centerinstalled
Must have
polkitversion 0.113 or later OR0-105-26(Debian fork ofpolkitWorks with
Ubuntu 20.04andCentos 8,RHEL 8,Fedora 21,Debian Bullseye
Usually need to run the POC multiple times
For exploitation dispite checks saying not vulnerable:
./polkit.sh -f=yIf run with no options, user
secnigmawill be added to/etc/passwdand the password for that user issecnigmaftwTo get your root shell
su - secnigmaEnter password
sudo bashProfit
Universal RCE deserialization gadget chain for Ruby 2.x.
This works for both
YAML.loadandMarshal.loadSee Ruby script using this syntax on a seperate local file that you cannot write to however if the first script is executing through cron or
sudo -lpermissions you can create another file with the same name that the origional is calling i.e.dependencies.ymlPayload:
MOTD Hijacking
Detection:
Can see root processes like cron jobs without root permissions with
pspy
look for the
motdto be owned by root but set to a group that we are in, can echo:
now log out and re-ssh in to kick it off and then execute bash with
bash -p
CVE-2023-1326 - apport-cli Privilege Escalation
apport-cli uses less as a pager which allows command execution when run with sudo.
Detection:
Vulnerable versions: apport-cli 2.26.0 and earlier
Exploitation:
Alternative - use existing crash:
Reference: https://github.com/diego-tella/CVE-2023-1326-PoC
Pkexec as SUID
npbackup-cli Privilege Escalation (Pre-Exec Command Injection)
If you can run npbackup-cli with sudo and supply a custom config file, you can inject commands via pre_exec_commands.
Detection:
Exploitation:
Add malicious command to config:
Or to read root flag directly:
Execute with custom config:
Key flags:
-c CONFIG_FILE- Use custom config file-b- Run backup (triggers pre_exec_commands)-f- Force backup even if recent backup exists
ImageMagick CVE-2024-41817 - Arbitrary Code Execution
ImageMagick versions <= 7.1.1-35 are vulnerable to arbitrary code execution via malicious XML delegation when run from a directory containing attacker-controlled files.
Detection:
Vulnerability: ImageMagick uses empty path in MAGICK_CONFIGURE_PATH and LD_LIBRARY_PATH, loading config/libraries from current working directory.
Exploitation:
Create malicious shared library:
Create malicious delegates.xml (optional, for command execution):
Place files where ImageMagick will be executed (e.g., cron job directory):
Wait for cron execution or trigger manually, then:
Important: Library MUST be named libxcb.so.1 (not libxcb.so).
Reference: https://github.com/ImageMagick/ImageMagick/security/advisories/GHSA-8rxc-922v-phg8
pspy Limitations - hidepid Mount Option
If pspy cannot see root processes, check if /proc is mounted with hidepid:
When hidepid=invisible is set, users can only see their own processes. In this case:
pspy will NOT show root cron jobs
Must manually search for scheduled tasks:
Crontab-UI Privilege Escalation
Crontab-UI is a web-based cron job manager. If running as root, you can create privileged cron jobs.
Discovery:
Credential Locations:
Access via SSH Tunnel:
Exploitation:
Access crontab-ui via SSH tunnel
Create new cron job:
Command:
cp /bin/bash /tmp/rootshell && chmod 6777 /tmp/rootshellSchedule:
* * * * *
Save and wait for execution:
Reference: https://book.hacktricks.wiki/en/linux-hardening/privilege-escalation/index.html#scheduledcron-jobs
Screen 4.5.0 Privilege Escalation
Screen version 4.05.00 has a SUID-based local root exploit that abuses ld.so.preload overwriting.
Exploit script (screenroot.sh):
Logrotate Exploitation (logrotten)
If you have write permissions on log files and logrotate runs as root, you can exploit vulnerable versions (3.8.6, 3.11.0, 3.15.0, 3.18.0) using logrotten.
Requirements:
Write permissions on the log files
Logrotate runs as root
Vulnerable logrotate version
Tmux Session Hijacking
If a privileged user left a tmux session running with weak permissions, you can attach to it and gain their privileges.
AppArmor
AppArmor is a Linux kernel security module that restricts what individual programs can do (file access, network, capabilities). Even if a binary has cap_setuid+ep, an AppArmor profile can deny access to sensitive paths.
Detection
Profile Flags
m
Allow memory-mapping the file
r
Read
w
Write
i
Inherit profile on exec (child stays confined)
x
Execute
Example profile restricting Perl:
This grants setuid capability but denies access to /root/* and /etc/shadow, and only allows execution of a handful of binaries.
Shebang Bypass
AppArmor enforces profiles when a binary is called directly (e.g. /usr/bin/perl -e '...'), but does not apply the profile when the binary is invoked via a shebang (#!) in an executable script.
This works because when Linux loads an executable script with #!/usr/bin/perl, the AppArmor profile for /usr/bin/perl is not applied to that execution context.
Last updated