> For the complete documentation index, see [llms.txt](https://book.ice-wzl.xyz/llms.txt). Markdown versions of documentation pages are available by appending `.md` to page URLs; this page is available as [Markdown](https://book.ice-wzl.xyz/active-directory-management.md).
# Active Directory Management
### **Prerequisite Required**
* VM or Physical Server with Windows Server 2019 installed (w*e are using Server with Desktop Experience installation option*)
* Assign a static IP address to the server that we promote as Domain Controller.
* As we'll configure Active Directory-integrated DNS, therefore change the DNS settings in the network interface and set the same server IP address as the primary DNS server.
### **Step 1: Install Active Directory Domain Services (ADDS)**
* Log into your Windows Server 2019 with administrative credentials. Open **Server Manager** → click on **Dashboard** → click on **Add roles and features**.
* The "**Before you begin**" tab contains some important information. Please go through it and click "**Next**".
* In the "**Installation Type**" tab choose **Role-based or Feature-based installation** and click on the **Next** button.
* In the **Server Selection** tab, please select the destination server on which the role will be installed. Please verify the hostname and the IP address points of the selected server. Click **Next** to continue.
* In the **Server Roles** tab, put a tickmark for **"Active Directory Domain Services"** *(you can select the **DNS Server** role as well, as we will configure AD integrated DNS server. If not selected, during installation it will automatically select and install the DNS Role)*.
* Then, it will prompt to show you the associated features for the role. Click on **Add Features** to add those. Then click **Next** to continue.
* In the **Features** tab, the basic features for this required role are already selected by default. Click **Next** to install continue.
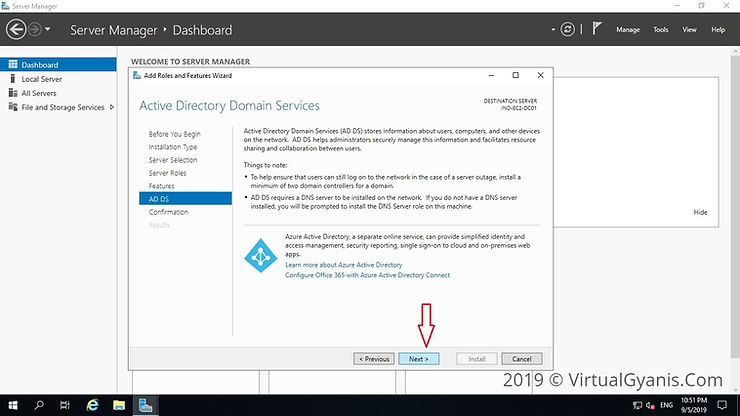
* In the next window, it gives brief information about the "**Active Directory Domain Services"** service. Click **next** to proceed.
* In the **Confirmation** tab, verify the selections and click on the **Install** button. You may or may not select the option **"Restart the destination server automatically if required"**. It is always a best practice to restart the server post-installation.
* Once done, it will start the installation process and you can check the same in the **Results** tab.
### **Step 2: Promote the server into a Domain Controller**
* Once the **ADDS** role installation completes, click on the option **"Promote this server to a Domain Controller"** *(highlighted in the below image)***.** Alternately, you will see a notification flag next to the Manage menu. From there also you can select "Promote this server into a domain controller", this will start the configuration process.
* It will open the **"Active Directory Configuration Wizard"**. Now, from the Deployment Configuration tab, select **"Add a new forest"** (as I am configuring a new Forest and it is my first domain controller). Provide a **Root Domain name**, mine is **"VirtualGyanis.Com"** (you have to put your domain name here). Then, click on **Next** to continue.
* Note: If you are adding this domain controller into an existing domain/forest you can choose the relevant option accordingly.
* In the `Domain Controller Option` tab, select a `Forest functional level` and a `Domain functional level` as per your environment. Since this is the first domain controller in the forest, please select the `DNS Server (as we are configuring AD integrated DNS)` and the `Global Catalog (GC)` checkboxes. Then, enter the `Active Directory Restore Mode (DSRM)` password, this is used to retrieve/restore Active Directory data. Then, click `Next` to continue
* Since we have configured an AD-integrated DNS server, you can ignore the DNS Delegation warning as shown in the below screen. Then, click **Next** to continue.
* In the `Additional Options` tab, enter a `NetBIOS` name for your domain. It is suggested to keep the NetBIOS name the same as the root domain name *(by default, it will fetch the domain name only)*. Then, click **Next** to continue.
* In the **Path** tab, you have to mention the **Database (NTDS Database), LOG** **files and SYSVOL** folders path. You can change the default path as per your organization security policies. I have kept them default. Now, click **Next** to continue.
* In the **Review Options** tab, you will review the configuration. If everything is as per your need, you can click **Next** to proceed or otherwise you can go back and change the required setting as per your need and then proceed further.
* You can also view the powershell script for future deployment. The below-mentioned script is from my environment.
* Note: Always test your PowerShell scripts in a test environment, before running in a production environment.
```
Import-Module ADDSDeployment
Install-ADDSForest `
-CreateDnsDelegation:$false `
-DatabasePath "C:\Windows\NTDS" `
-DomainMode "WinThreshold" `
-DomainName "VirtualGyanis.Com" `
-DomainNetbiosName "VIRTUALGYANIS" `
-ForestMode "WinThreshold" `
-InstallDns:$true `
-LogPath "C:\Windows\NTDS" `
-NoRebootOnCompletion:$false `
-SysvolPath "C:\Windows\SYSVOL" `
-Force:$true
```
In the **Prerequisites Check** tab, it will do prerequisite check.
* Once prerequisite checks completed successfully, it will enable/highlight the Install option. Then, click on I**nstall** button to start the installation process.

* Once installation completed successfully, you will get the below confirmation message. Close this window and restart the Server.
* Once server rebooted, you have to login with your domain Admin credentials. By default, the local admin account will promoted as a Domain Admin account. Login and verify the health of the Domain controller. You can run **DCDIAG** command to check the health.
* You can also verify the settings/configurations from the Active Directory tools like ***Active Directory Users and Computers or Active Directory Domains and Trusts*** etc. You will get all the Active Directory tools in the folder named ***Administrative Tools*** on the Start menu. Go and explore the tools.
Credit:
---
# Agent Instructions
This documentation is published with GitBook. GitBook is the documentation platform designed so that both humans and AI agents can read, navigate, and reason over technical content effectively. Learn more at gitbook.com.
## Querying This Documentation
If you need additional information that is not directly available in this page, you can query the documentation dynamically by asking a question.
Perform an HTTP GET request on the current page URL with the `ask` query parameter:
```
GET https://book.ice-wzl.xyz/active-directory-management.md?ask=
```
The question should be specific, self-contained, and written in natural language.
The response will contain a direct answer to the question and relevant excerpts and sources from the documentation.
Use this mechanism when the answer is not explicitly present in the current page, you need clarification or additional context, or you want to retrieve related documentation sections.