# Active Directory Management
### **Prerequisite Required**
* VM or Physical Server with Windows Server 2019 installed (w_e are using Server with Desktop Experience installation option_)
* Assign a static IP address to the server that we promote as Domain Controller.
* As we'll configure Active Directory-integrated DNS, therefore change the DNS settings in the network interface and set the same server IP address as the primary DNS server.
### **Step 1: Install Active Directory Domain Services (ADDS)**
* Log into your Windows Server 2019 with administrative credentials. Open **Server Manager** → click on **Dashboard** → click on **Add roles and features**.
* The "**Before you begin**" tab contains some important information. Please go through it and click "**Next**".
* In the "**Installation Type**" tab choose **Role-based or Feature-based installation** and click on the **Next** button.
* In the **Server Selection** tab, please select the destination server on which the role will be installed. Please verify the hostname and the IP address points of the selected server. Click **Next** to continue.
* In the **Server Roles** tab, put a tickmark for **"Active Directory Domain Services"** _(you can select the **DNS Server** role as well, as we will configure AD integrated DNS server. If not selected, during installation it will automatically select and install the DNS Role)_.
* Then, it will prompt to show you the associated features for the role. Click on **Add Features** to add those. Then click **Next** to continue.\
* In the **Features** tab, the basic features for this required role are already selected by default. Click **Next** to install continue.
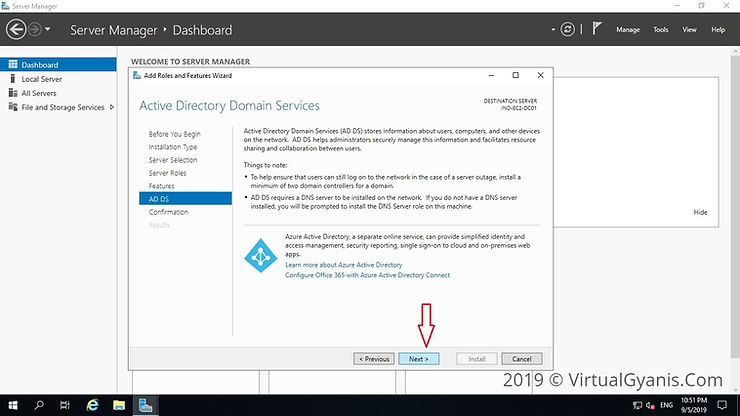
* In the next window, it gives brief information about the "**Active Directory Domain Services"** service. Click **next** to proceed.
* In the **Confirmation** tab, verify the selections and click on the **Install** button. You may or may not select the option **"Restart the destination server automatically if required"**. It is always a best practice to restart the server post-installation.
* Once done, it will start the installation process and you can check the same in the **Results** tab.
### **Step 2: Promote the server into a Domain Controller**
* Once the **ADDS** role installation completes, click on the option **"Promote this server to a Domain Controller"** _(highlighted in the below image)_**.** Alternately, you will see a notification flag next to the Manage menu. From there also you can select "Promote this server into a domain controller", this will start the configuration process.
* It will open the **"Active Directory Configuration Wizard"**. Now, from the Deployment Configuration tab, select **"Add a new forest"** (as I am configuring a new Forest and it is my first domain controller). Provide a **Root Domain name**, mine is **"VirtualGyanis.Com"** (you have to put your domain name here). Then, click on **Next** to continue.
* Note: If you are adding this domain controller into an existing domain/forest you can choose the relevant option accordingly.
* In the `Domain Controller Option` tab, select a `Forest functional level` and a `Domain functional level` as per your environment. Since this is the first domain controller in the forest, please select the `DNS Server (as we are configuring AD integrated DNS)` and the `Global Catalog (GC)` checkboxes. Then, enter the `Active Directory Restore Mode (DSRM)` password, this is used to retrieve/restore Active Directory data. Then, click `Next` to continue
* Since we have configured an AD-integrated DNS server, you can ignore the DNS Delegation warning as shown in the below screen. Then, click **Next** to continue.
* In the `Additional Options` tab, enter a `NetBIOS` name for your domain. It is suggested to keep the NetBIOS name the same as the root domain name _(by default, it will fetch the domain name only)_. Then, click **Next** to continue.
* In the **Path** tab, you have to mention the **Database (NTDS Database), LOG** **files and SYSVOL** folders path. You can change the default path as per your organization security policies. I have kept them default. Now, click **Next** to continue.
* In the **Review Options** tab, you will review the configuration. If everything is as per your need, you can click **Next** to proceed or otherwise you can go back and change the required setting as per your need and then proceed further.
* You can also view the powershell script for future deployment. The below-mentioned script is from my environment.
* Note: Always test your PowerShell scripts in a test environment, before running in a production environment.
```
Import-Module ADDSDeployment
Install-ADDSForest `
-CreateDnsDelegation:$false `
-DatabasePath "C:\Windows\NTDS" `
-DomainMode "WinThreshold" `
-DomainName "VirtualGyanis.Com" `
-DomainNetbiosName "VIRTUALGYANIS" `
-ForestMode "WinThreshold" `
-InstallDns:$true `
-LogPath "C:\Windows\NTDS" `
-NoRebootOnCompletion:$false `
-SysvolPath "C:\Windows\SYSVOL" `
-Force:$true
```
In the **Prerequisites Check** tab, it will do prerequisite check.
* Once prerequisite checks completed successfully, it will enable/highlight the Install option. Then, click on I**nstall** button to start the installation process.

* Once installation completed successfully, you will get the below confirmation message. Close this window and restart the Server.
* Once server rebooted, you have to login with your domain Admin credentials. By default, the local admin account will promoted as a Domain Admin account. Login and verify the health of the Domain controller. You can run **DCDIAG** command to check the health.
* You can also verify the settings/configurations from the Active Directory tools like _**Active Directory Users and Computers or Active Directory Domains and Trusts**_ etc. You will get all the Active Directory tools in the folder named _**Administrative Tools**_ on the Start menu. Go and explore the tools.
\
Credit: [https://www.virtualgyanis.com/post/step-by-step-how-to-install-and-configure-domain-controller-on-windows-server-2019](https://www.virtualgyanis.com/post/step-by-step-how-to-install-and-configure-domain-controller-on-windows-server-2019)